
Leaderboard


Popular Content
Showing content with the highest reputation on 01/19/2013 in all areas
-
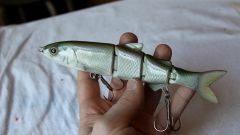 so heres my latest creation and the longest project that i have worked on so far, the overall time that i have spend on making this thing can be count in days not hours. i think it came out looking great. if you guys want to see more pics of it you can check them out from my blog http://solarfallbaits.blogspot.fi/2013/01/a-true-labor-of-love.html1 point
 -
You might also consider getting some Createx Airbrush Restorer. This stuff is great at dissolving dried paint gunk in your airbrush. I soak my airbrush in it about every 3 or 4 months, or as necessary, just to make sure it remains clean. Ben1 point
-
Yes, Lincoya was the one who steered many of us to photo finishing. I started printing on tissue and placing it over foil because I couldn't print on the foil directly and felt that decals were too thick for my liking. I wanted the shine of the foil to bleed through the image. Here's the Tutorial I put together. Photo Finishing Foil and Faux Finishes The following Tutorial is for those of us who want to create very realistic finishes with a minimum of hassle. This is not to say it is the only or best way to achieve that goal, but I found it to be a very viable alternative to decals, and much less costly. Truth be told, I also find it easier to do. In addition, the supplies are more readily available. With very little practice, anyone can get wonderful results. I developed this technique after realizing that it is not practical to print on foil. Doing so, is a tribute to Murphy’s Law. There was smearing (And Swearing), tearing and an overall unsatisfactory result. Still, I wanted to get a shinny metallic finish under the Image of a baitfish. After much experimentation, I struck upon the Tissue/Foil process, which allowed me to get the results I wanted. I’m sure those of you who give it a try will also be as pleased as I was. I’d also like to say that you can place the Tissue image onto a painted finish. The underlying color will show through the Tissue Here is a rendition of a Menhaden over yellow paint. The Tissue allows for a very user friendly method of applying a Photo Finish, especially over foil. Here’s hoping you find it a useful tool. Mike P (Husky) Supplies; Foil or Foil Tape, Adhesive, White Gift Tissue and a scanned image to print. 1. Affix the wrapping tissue to a sheet of standard paper with a glue stick so it can be printed on with an inkjet or laser printer. Glue the edges of the standard paper then lay and cut the tissue, once affixed. A razor works great for this purpose. 2. Print the Fish Image you want onto the Tissue Paper. I use MS PUB to Size and reverse the image. I’m sure that there are many other programs that will work as well or better. I get many of my images by searching Google Images. If you can, it would be better to take photos of the baitfish to get better quality renditions and even more realistic images. 3. Glue the printed images onto Foil or Foil Tape with spray adhesive. (Use the Brighter side on the Foil) Spray the foil and carefully place the tissue, avoiding wrinkles. 4. While you’re waiting for the glue to dry, seal your plug if you haven’t already done that. I use the Plasticoat process, but and good sealing method will do. Plasticoat is just hard plastic cups or plastic utensils dissolved in Virgin Lacquer thinner. 5. After the glue has dried, cut out the Image and the foil. I like to use Foil tape when practical, but it is much thicker than standard foil and only comes in Silver. It is stronger and more durable though so you’ll have to see what suits your needs best. Smaller plugs will be effected by its’ weight. 6. Spray the back of the Foiled Images with adhesive (Foil tape has its’ own) and glue them on your lure. It helps to align the Images before gluing them on so you can get them positioned correctly. "Measure twice, cut once". (This means if you need glasses, wear them for this step. I still make that mistake at times. ) Work them in GENTLY, from the centers out. Use your finger tips to do this work so not to damage the thin tissue. With a little practice, this process becomes very simple. Once the Images are totally in place, burnish them on with a round smooth object to get all the remaining wrinkles out. Again, go gentle as not to tear the Tissue. A Sharpie works great for this. Here’s a “Foamie Herring” getting the treatment. 7. Let the Adhesive dry, totally. (Foil tape needs no waiting period) Once dry, coat the lure with Etex or Devcon. I prefer Etex as it is thinner and I have a half gallon of it. If you use Devcon, it would help to thin it a bit, but isn’t absolutely necessary. The moisture in the FIRST topcoat will make the Tissue transparent allowing the foil or painted finish to come through. Whatever is printed on the image will remain, giving a very realistic effect. 8. When the first coat is cured, Paint the back and belly. You people using air brushes can get a very nice transition. When the paint is dried, give the lure another Top coat. After that sets, I add my lips. This plug was done with Rattle Cans. Here are some results of this endeavor; http://www.stripersonline.com/surfta...light=weakfish1 point