Leaderboard


Popular Content
Showing content with the highest reputation on 04/12/2013 in all areas
-
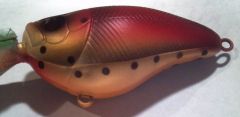 This is the bait I mentioned in the hard bait forum under stencil making. Although I also use vacume formed stencils I wanted to show you can use just plane on masking tape to make stencils as well. On this particular bait I am "trying "the to go for a riveted look, kinda like an old airplane . All stencil work was done will green masking tape. On these 1.5's you use another blank and stick the tape on, press it down around the 3-d details and gently trace the gills or which ever part of the bait and trim the tape with a sharp exacto knife. Make sure you heat set your paint well or it could come up with the tape when removed. Now I need some advice for thinning white createx paint to get it to be not so grainy. Also advice on adding a light source effect to the paint job.Any ideas??? This part of airbrushing is new to me. Thanks........Joe1 point
 -
Thanks Dave. All I really did though was just pass on info learned here at TU. That's what is so great about this site. Helping each other to come up with new ideas and improve on older ones. Ben1 point
-
Hey John, To make templates for both sides I sacrificed a crankbait by cutting it in half and then cutting away the diving lip which just gets in the way in my opinion. The little bit you lose where you cut the bait in half isn't going to hurt your stencil either. The vacuum former I built has small holes drilled in a piece of plywood to provide the suction needed to pull your stencil material down. The lure half is placed over the hole pattern and the warmed stencil material is then layed over the lure half. Getting your stencil material warmed up enough makes it much easier to form properly. I built a frame that holds the stencil material and it is placed in the oven until the material starts to sag in the middle. If it starts to cool too quickly I then use a heat gun and the back side of a butter knife to finish the forming. hope this helps, Ben1 point
-
Add 5-8 drops of green pumpkin to watermelon and stir thoroughly. 1-to 3 drops of black can have a positive effect but proceed slowly. Folks simply add too much L.C. watermelon color and then fail to adjust it properly.1 point
-
1 point
-
A whole lotta don'ts here, reminds me of growing up. Here are some do's: Do-learn how to use the search function Do-feel free to ask questions Do-be honest when talking about certain products Good or Bad, as you could save the members here alot of money. Do-have fun Saint.1 point
-
berkley Camo is one of the hardest colors to make. (at least for me) Ive been playing a little, its close but no cigar yet 1 cup plastic 4 drops of moss green 3 drops of watermelon 2 drops oxblood now the key I found to give it the brownish effect was the brown Fleck and the gold fleck added into it. I only had .035 and it should be fine fleck Like I said close but not right yet Delw1 point