Leaderboard


Popular Content
Showing content with the highest reputation on 03/25/2015 in all areas
-
The only thing I've ever wrapped in foil is leftover pizza. Even then, I didn't do to good of a job... I'd be interested in the responses, I keep thinking it's something I'd like to try. Jason2 points
-
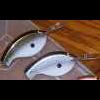
 Here is another version of my resin casted trout model. This one has two screw eyes for the line tie. The two screw eyes generate some different swimming action. You can see the different action in this clip. Tell me what you think. Greetings from germany
© donak
1 point -
paint one colour, put it in the oven for 10 mins, then do the second and full cure it.1 point
-
It gets to be about building a bait that works, and the sooner it gets destroyed the better! When you walk in my shop I want to point at that lure hanging and say "Look at that lure, took me 12 hrs to make and it didn't last four months. Wacked 'em thou. They destroyed it! And it was coated with 2 Ton Epoxy! Didn't matter who threw it either, fish couldn't stand it.........". Have fun making. Barry1 point
-
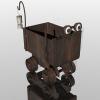
very cool set up. Gave me some ideas to help organize my shop1 point
-
I started making my own baits because I was tired of spending my money on commercial and so called "custom" garbage. Except for a few small shallow crankbaits, I throw my own baits or baits that I have re-done (Poes and Bagley) exclusively. They just plain work. Nothing in my bag is stock. So for me, it is not a hard thing to do. A really good plug knocker also helps me hang on to the lures that I make. Skeeter1 point
-
What ever you choose to do do one move at a time or you will go crazy it might be to much angle also but keep playing around and wright it down keep notes.1 point
-
Mark- I airbrushed 100's of bass jigs 25+ years ago w/ VL&J paint. The trick is to spray them w/ two part epoxy after the paint dries and they will not effect plastics. For powder painting- you cure jigs w/ weed guards already poured in w/ a tight fitting sleeve that goes past the top of the fiber guard by 1/4". The trick is to pre-heat around the base of the weed guards so the powder paint sticks- without affecting the fiber guards.Lower the oven temp to 250 and bake for 20 minutes. Remove the sleeve and the guards will flare but now you don't have to use pliers to flair out the guards. Most here on TU use Teflon pins and glue in the fiber guards1 point
-
Here's the link, and they ship almost anywhere: http://www.directcolors.com/product/ac-1315-high-gloss-concrete-sealer/1 point
-
Try buying some 1/8" or slightly larger diameter aluminum tubing from a hobby supply store. Cut it into pieces 1/4" longer than your weed guards and then flare one end out (I used a large nail that a sanded smooth - then just stuck in in the tube and rotated it around until the edge flared out). Then slide the flared end over the weed guard and slide it down to the base/lead before heating your jigs and you're good to go. The tubing will keep the weed guard from warping/bending when heated. I slide the tube on, heat with my heat gun and dip in the fluid bed to coat the head.... then cook them in the oven. Once fully cured I slide the aluminum tubing off and trim or bend the weed guard as desired. J.1 point