Lincoya
-
Posts
647 -
Joined
-
Last visited
-
Days Won
5
Content Type
Profiles
Articles
TU Classifieds
Glossary
Website Links
Forums
Gallery
Store
Everything posted by Lincoya
-
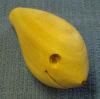
 I'd like to have a few of them in my tacklebox, too! Beautiful baits.
 -
Guys, Just keep checking. I'll probably post the rules this weekend and we'll get the swap started. Gene
-
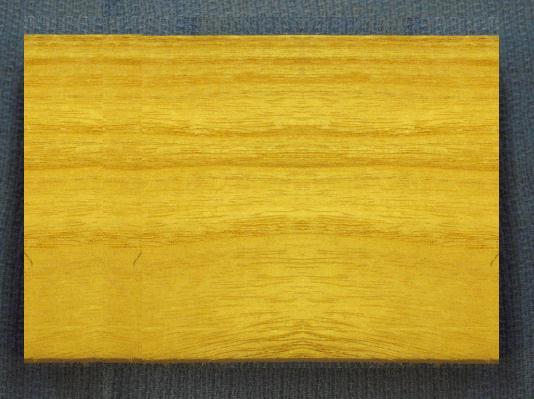
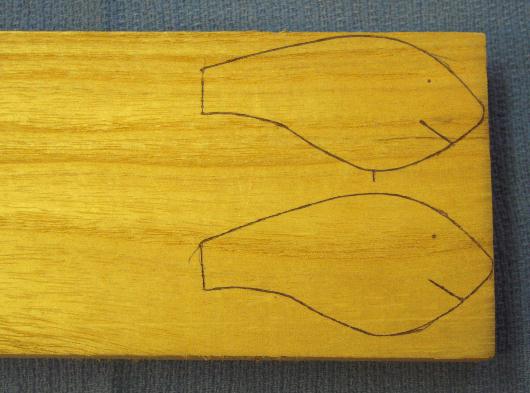
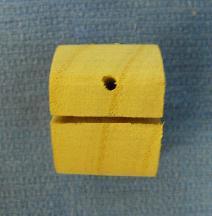
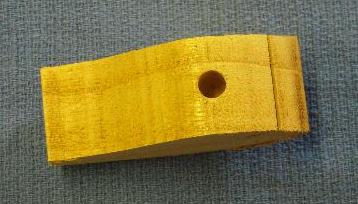
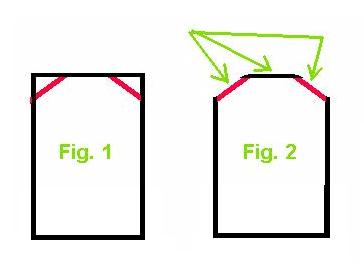
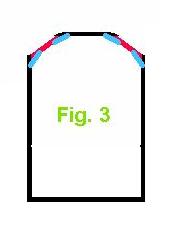
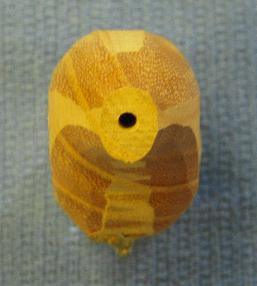
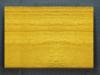
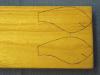
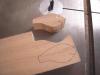
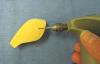
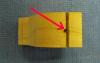
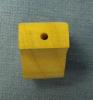
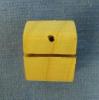
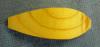
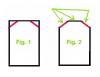
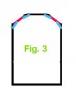
HAND CARVING YOUR OWN FISHING LURES Do you have an idea for a “new and improved” lure or an oldlure that’s not available anymore? Or would you just like to copy another lureand make some modifications to it? That’s not a problem any longer. I'm going toshow you in the following steps how to hand carve your own custom lures. If you follow the steps below, you'll find outthat it's really not a hard thing to do and you can step away from repaintingother people’s lures. I’ll start by selecting a pattern for my lure. This can be apattern that somebody else has drawn up or I can create my own pattern. I usecardboard for my lure patterns. I then write on my pattern any informationabout that lure such as: location of hook hangers, location and amount ofweight for the lure, thickness of the lure, eye placement, lip angle and type,and any other pertinent information. That way the information is always handy.I also cut the lip slot into the pattern. Select the wood that you want to use to carve your crankbaitout of. Here, I'm using Paulownia. I have several boards that I have planned tospecific thicknesses. You can also use a block of wood and after you cut outthe profile of your lure, you can just cut the lures off at the thickness thatyou want. There are other various woods that can be used including basswood,balsa, and poplar. The choice is up to you. I’ll trace my pattern onto the wood making sure that I markthe location for the eyes and for the lip slot. I also want to make sure thatthe grain of the wood runs the length of the lure and NOT from top to bottom.This will ensure that the lure has structural integrity. Once I've completed that, I’ll take the wood over to theband saw and cut out the profile of the lure. At the same time, I’ll cut thelip slot. Before I cut out the lure I will check and see that the table of theband saw is 90-degrees to the band saw blade. This ensures that the lip slot will beperpendicular to the lure. If I wait until after I carve the lure, it's hard tocut the lip slot and get it right. Using a small 1/16-inch drill bit, I’ll drill a guide holefor the placement of the eyes. NOTE: This is optional. I do it to give me areference point to countersink my eye sockets. In this step I will widen the lip slot. For that I use a1/16-inch diameter diamond grinding bit. I like to use one that has a 1/16-inchshaft. That way I can get deeper intothe lip slot. This bit will follow the already cut lip slot almostperfectly. Be sure to widen the lip slot before you do the tapers on your lureas the bit will sometimes tear out a small chuck of wood as it exits the lipslot. After I widen the lip slot, I then hollow out a smallchannel at the bottom of the lip slot that will allow me to insert the back endof the line tie if the line tie is in the lip. Next, I'll go ahead and drill the holes for the rear hookhanger and line tie (if the lure’s line tie is not going to be in the lip). I willalso drill a hole to accept the belly weight. The next step is to taper the nose on both sides and thentaper the tail. I can do this taper either by carving the taper with a goodcarving knife or I can sand the tapers on a belt sander. I’ll try to keep thesetapers as symmetrical as I can. You can see in the picture that the nose istapered about a quarter of the way back from the nose and the tail is taperedfrom about midway of the body to the tail. This taper may vary depending a loton the type of lure that you're making. Now I’m ready to start carving the lure. I will start bycarving the shoulders on either side of the back as in Fig. 1 above. I willcarve until the widest point on both sides is about the same width as what I'veleft across the back. I want those threeplanes to be basically the same width. You'll see what I'm talking about in Fig2 above. Once I get those flat planes carved on the shoulders I will roll thelure over and do the same thing on the belly. I originally started with four corners on the lure. Now thatI have carved those corners off, I have eight corners. Carve those corners offand that will basically round the edges of the lure for you. For you guys thatare carving musky lures or large swimbaits you will wind up with sixteen corners.Just carve them off like I did the eight corners. That should be enough tofinish the rounding of your larger lures. After I carve the lure I glue in the belly weight, the rearhook hanger, and the line tie, if there is one. My carving is now done. I’m going to sand the lure. I liketo use the fingernail sanding sticks that you find in the beauty department ofyour local shopping center. The ones at Wal-Mart are 100-grit on one side and150-grit on the other side. I use these because they tend to round the lurebetter than just sandpaper. Sandpaper tends to follow all of the contours ofthe lure and doesn’t give me that good rounded finish that I want. It’s just myway. Your way may work better for you. After I have finished sanding the lure Iwill sand the lure again with some 220/240-git sandpaper to give me a finalfinish. I give the lure a final inspection to ensure that I have allof my tapers symmetrical, all of my knife marks are sanded out, and the lurehas a general overall good appearance. My lure is now ready for a couple of coats of sealer. A few final notes: keep your knife sharp, take your time,and always check and make sure that you keep both sides symmetrical. I hope that you’ll give this a try. One you create your ownlure that swims like you want it to, there will be no holding you back. Good luck and I hope this helps. Gene Graham aka “Lincoya”


-
I'm in the process of writing up the guidelines for a lure swap. I expect to have the guidelines ready in the next week or two (I also have a day job. ). Please stay tuned. Gene
-
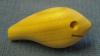
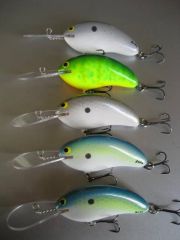
 Tested it in Clinton. It swims great and digs like a backhoe!
 -
I do like Cheap Trix. Harbor Freight brushes, trimmed to about a half inch, crimp the brush so that it holds the bristles better, and I toss 'em when I'm finished. As far as mixing: I've mixed on paper, cardboard, foil, plastic, the bottom of Coke cans, wood, or whatever is handy at the time. I've mixed my D2T with nails, popscicle sticks, tooth picks, small knife blades, plastic sticks, or wood sticks. I have NEVER, I repeat NEVER had a problem with air bubbles in my finish. I mix it fast, mix it slow, it doesn't matter. Maybe you guys are just trying too hard.
-
Shhhh! I don't want my wife to hear this. But, sneak into the kitchen and get your wife's pasta machine. Get a strip of foil, some tulle (netting) cut a little wider than the foil, and a piece of cardboard from a cereal box, beer carton, etc. Set the pasta machine on the thinnest setting that you can. Place the foil on top of the cardboard and then the netting on top of the foil. Crank the three together through the pasta machine and you have foil scales. Cut your lure pattern out of the foil, stick it to your lure, rub the foil into place gently with your fingers, and the burnish the edges of the foil. I demo this process at the TU Get-together and guys there, I believe, were impressed. Gene
-
Ben, I didn't know if you where willing to try making your own or not. I have come up with a jig that will help you grind the bevels perfectly. The jig will cost you about 10 cents for the materials. Do you have a table saw and a belt sander? And would you be interested in a picture of the jig? Gene
-
Ben, Being a wood carver for over 15 years now I've seen and used a lot of carving knives so, I understand your problem. As you probably know by now, you can pay a lot of money for a carving knife, if you want. However, one of the best knives that you can buy, for the money, is a "Murphy" knife. It generally sells for around $15 and, if taken care of, will provide you years of excellent service. You can buy the "Murphy" at several locations but I would recommend Smokey Mountain Woodcarvers, ( http://www.woodcarvers.com/murphyknives.htm ). I have bought a lot of stuff from them over the years and they have always been friendly and fast. No matter where you buy it, ask them to sharpen it for you. Most businesses will provide that service for free. As far as keeping it sharp: as long as you don't damage the edge, all you will need is a strop loaded with an extra fine compound. You can order the strop and the compound at the same place where you order the knife or you can make your own. All you need is a piece of clear-grained hardwood such as poplar, cherry, maple, etc. DO NOT USE pine, cedar, oak or any other wood that has a strong grain pattern. Cut your wood to a good usable size (1/4"T x 2"W x 10"L). Next, spray one side of your wood with a good spray glue and let it dry. Then, get a piece of leather (I would recommend pigskin because it's thinner and will give you a sharper edge), spray one side of it with your glue and let it dry. Once both pieces are dry, carefully stick the leather and wood together. You can find a good polishing compound at places such as Lowe's and Home Depot. When buying the compound at Lowe's buy the WHITE compound. It's the finest that they sell. I hope this helps. If you have any more questions, don't hesitate to ask. Gene
-
I have to be in Edmonton in the middle of July for my step-daughter's wedding. I'll be there for a week. I'd like to do a little fishing while I'm there if I can find someone to take me. Gene
-
Give me a couple of weeks and I'll try another crankbait swap. We'll see if we can get some interest in it this time. If not, we can always swap lures among ourselves. Gene
-
Dave, I'm sorry that you couldn't join us. We had a great time, as usual. We got to see old friends that we hadn't seen for a while and got to meet some new ones. Tony Brinlee (aka tbrinlee) made the trip from Dallas. Jason (I'm sorry but I don't remember his last name) (aka Icemann) came in from Kansas City and showed us a few card tricks. Mike (from Shorty's Hooks) (aka Capt Hook) is a local guy. All of them are really nice guys and fit in with the rest of us like they have known us for years. It's still amazes me that Pete (Hazmail) comes all the way from Austrailia to join us. We tested a couple of new top coats that look promising.One of which is a "green" top coat. We traded lures around. I picked up some really nice baits that would look good in pictures but you really have to see them to appreciate them. I want to add that I would to thank Nathan and Deb Bettencourt for hosting the event at their place again. I know it's a big expense and a lot of work for them to do this. It's always a great time but it's also a hugh disruption in their lives. Gene
-
 Nicely done BobP.
 -
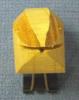
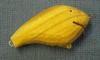
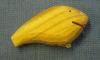
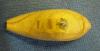
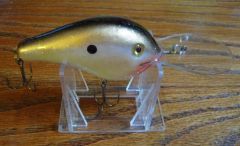
This is my copy of a Rapala DT-16. It's handcarved out of Paulownia. I haven't had the chance to fish it yet. You can see it person at the TU Get-together in Clinton, MO this coming weekend. Gene
-
BobP, There was a post that Nathan put up on Feb23rd. It has been in the events section until recently (the last day or two). It has been moved (I'm guessing by Jerry) to the top of every page. There is also a counter attached to it. It is also headlined on the home page. Gene
-
Jesse1378, The rules aren't meant to restrict people. They're there to provide guidlines. Typically people don't want to swap a crankbait for a pack of worms or a jig or spinnerbait for obvious reasons. However, if the people that make jigs, worms, or spinnerbaits wanted to "sweeten the pot", so to speak, and increase the amount of worms, etc. to make it fairer to cost of a crankbait, I'm sure that everyone would be happy. As to your comment about not being as good as everyone else when it comes to making crankbaits: it doesn't make a difference. Everybody has to start somewhere. Other people, like myself, just want to see what everyone else is making. I have handmade lures from all over the world. Some of them are as good as any factory made lure and some are nowhere near that good but I like them all. Gene
-
Come on guys and ladies. The date is getting closer. Just 12 more days. Join us. I guarantee you'll have a good time. Gene
-
Linda & I will be there Thursday before lunch. We're looking forward to seeing everyone again and hopefully meeting a lot of new people. Gene
-
No, typically a crankbait swap would not include jigs. However, if we had a swap and everyone in the swap was agreeable to including jigs, it could happen. A person swapping jigs would have to include more than one jig though to make the swap fair to those swapping crankbaits. Gene
-
nlo85, I don't want to sound as though I'm putting you off because I"m not so please don't take my response the wrong way. It's easier for me to refer you to another post rather retype it all (especially since I don't type very well). If you will will read the post in the Lure Swap section titled TU Lure Exchange, it will explain the rules and procedure. If you have any questions after that, I'll try to answer them. Gene
-
There was no interest in the swap last year when I set it up so I never tried again. If we can muster an interest in a swap, I'd be more than happy to try again.
-
Before you place your foil on your bait, run it through your wife's pasta machine. Place the foil in the machine backed by a piece of cardboard and then place a a piece of netting on the front of the foil. Crank the handle, roll the foil through and you have perfect scales. Just cut out the sides for the baits, peel and stick, and blend the edges.
-
It's good to see you back again, my friend. There's still a lot of the old gang here. We just don't post much.
-
Pete, I missed it again. Sorry buddy. Hope you had a happy birthday! Gene