

Lure--Prof
-
Posts
1,752 -
Joined
-
Last visited
-
Days Won
1
Content Type
Profiles
Articles
TU Classifieds
Glossary
Website Links
Forums
Gallery
Store
Everything posted by Lure--Prof
-
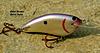
 Makes me (almost) all emotional lookin at that pretty bait! Sweet! Dino
 -
 Rofish, Yep, homemade twisted wire eyes...I use them sometimes on baits I'm keeping...and there are all kinds of ways to increase their holding power to the point of being the least likely part of your tackle to fail during a battle with heavy fish. Before I glue mine in, I always hit the twists with a file to roughen them up for maximum glue bonding. By inserting the belly hanger towards the tail, Its length can be increased while also being opposite the direction of pull force. I normally glue my line ties down through the lip, and into a ballast hole. It is also easy to bend a bar into one of the wire's tag ends. the wire can also be twisted with loose wraps, allowing the glue to flow throughought the inside of the hanger...etc. Rayburn Guy, I always remove loofahs, etc, before constructing rock reefs, standing timber, and stump flats, in the bath tub. After all, gotta take care of the wife! Dean
 -
Yes, a big +1 on that Bob!
-
Jelutong, Createx, 4 coats of Brush applied Dicknite's Topcoat...I made this one with homemade screw-eyes instead of my usual wire-thru construction. It has performed great so far thru a half a day of hard cranking in the bathtub---only had to get out my bait knocker once when I hung it in some deep rip-rap. I'll sure be glad when my favorite lake thaws!!!
-
Any Preference On Airbrush, Siphon Or Gravity Fed?
Lure--Prof replied to apaseman's topic in Hard Baits
I never thought i would give up my Badger Siphon feed...but I don't think I've used it since I began using my gravity-feed Iwata Eclipse HP-BS. For what it's worth, I spray Createx and Parma with mine and never thin any of it unless I'm adding some transparency for special effects, or experimenting. -
Congrats John, that is great news!!!! Dean
-
My buddy David Sullivan told me the same thing about those particular Lucky Crafts. What I would do is apply a non-solvent containing coat over the L. C. finish, and then apply my DN on top of that. Component Systems clear coat would work for this, as would Devcon 2-ton, or another non-solvent containing epoxy, which means that E-tex might NOT work as it contains a bit of solvent. Whenever I use epoxy beneath DN, I prep the epoxy by scuffing, and then washing with dish soap, and am careful to not contaminate the surface with a fingerprint or a paper towel, unless it is that non-oil-containing kind specified for glass cleaning.
-
For extra holding power, score the unthreaded part of the shaft before gluing. Also be certain to degrease your stainless screw-eye threads, as there is always residual cutting oil left there. Alcohol or Acetone are effective degreasers.
-
Thanks for sharing that address! I got some G-10 from McMaster-Carr recently, and though the quality is great, I would like it to be a tad clearer. Dean
-
Hmmmm...Bob, I, along with severral other people I know always apply multiple coats with DN, and have never encountered your blemish problem(I've applied as many as 9 coats on a bait before)...I don't know your application process, but feel free to pm me if you'd like to work on the matter...can't be that difficult to find the problem...are you suspicious as to what the cause may be? Dean
-
 Great name!!!!! Gotta catch fish!!! Mean McClain
 -
In that earlier thread, Riverman reports his problem with ruining good hair brushes via solvent, while I have never encountered that problem. I can only guess that perhaps he's soaking his brushes in solvent? When I clean my brush after using DN, or epoxy, I pour a small amount of rubbing alcohol into the concave bottom of an areosol can or soft drink can and dab it around, repeating until the alcohol remains clean, which is usually 2 or 3 repeats. After the first dab, I'll squeeze the bristles with a paper towel over the trash can. When finished with the alcohol, I give the bristles a quick wash with Dawn dish soap at the kitchen sink, rinse, shake out, and hang to dry. If you're in a hurry to dry it quickly, use some newspaper, as it is lint free and oil free, which is why it also works well for cleaning the glass in your pick-up truck...you do drive a truck, don't you!?!? Dean
-
Luke, that was my best guess as to why you didn't achieve adequate adhesion. I would very much like to give you an exact answer as to when enough hair dryer is enough; however it is not an exact science. I will tell you this though, I really put the heat to mine, to the point that I can actually see a bit of steam leaving the bait. A light touch on the paint helps also; if you're applying it really thick, naturally it will take longer. If you're applying several coats of colors it will serve you well to heat set between colors, and naturally anytime you're applying scale netting or masking material to the paint. When removing these materials go slowly and peel backwards as opposed to pulling upward. I always heatset while my netting is in place. That being said, your lack of adhesion could also be caused by a primer coat that isn't fully compatible with Createx. While I don't use an adhesion promotor, I have no problems painting, and then thoroughly heat setting Createx Opaque White over an epoxy seal coat which I prep by scuffing, and then scrubbing with soap and water. This is just what works for me... Good luck, Dean
-
Diemai,
Ah yes, the hidden messenger! I had to figure that one out also...Right at the top beneath the TU logo where it says, "Signed in as diemai", there is a little arrow button just to the right...it is your friend!
-
KF, it sounds like a failure to adequately heat-set to me. Dean
-
.040 spring-tempered spinnerbait wire will certainly exercise your fingers, not to mention your frustration! I sometimes use .032, but 99% of the time I use 19 gauge stainless I buy at Ace Hardware or sometimes Harbor Freight. This wire doesn't have the temper of spinnerbait wire, making it very much easier to form. This is the stuff you need! Some builders use 18 or 19 gauge brass or copper wire, but I simply prefer the stainless from Ace which will tune easily enough, but will hold tune much better than the soft wires. Ace Hardware has a whole rack of spools of wire, however the only stainless is the 19 gauge. The rest of the steel wite is zinc plated, which will work fine, but can rust, unlike the annealed stainless. If Ace doesn't have it in stock, they can order it for you. Harbor Freight has what appears to be the same wire on a much larger spool that is less expensive. I'm sure McMaster-Carr has, if not the very same, then a very similar annealed (as opposed to spring-tempered) stainless wire also. Dean
-
Tailweight it and it will walk...all you have to do is establish the center of gravity in the rear of the bait to make the front wag, and this will work with about any bait shape, whether floating or sinking, Now if you want the bait to glide side to side, as in large or smaller muskie-style gliders, the body shape and weight placement become a litltle more critical...but to simply make a the lure do the right, left, right, left, deal, rear weighting will get you there, even with stubby little poppers like I frequently make.
-
Angus, it sounds as though you're using a product with properties just like DN, and have a good system worked out, and yes, what some builders refer to as "the storage hassles of DN", are often made to sound complex and intimidating, when in fact, the process takes longer to explain than actually do. The "laws" of Dicknite's topcoat usage are simple and straightforward, and they aren't forgiving if you ignore them, but I also find that it is quicker and easier to use than epoxy. The same can be said for the speed of applying DN with a brush, (which compared to epoxy is much faster) as it nullifies much of the speed advantage dipping usually gives. The bottom line is that every topcoat has its own learning curve, and it is a good idea to learn to use more than one topcoat, in order to exploit the advantages of each one. I always use epoxy over foils and DN over the final paint and epoxy, and there is another learning curve to that. As you guys who've been dipping have learned, the Big Key in putting the brakes on curing in the container, is replacing the oxygen with an inert gas and sealing it tightly. I use a couple wraps of teflon tape around the jar threads, and then finish with a wrap of Parafilm around the top of the jar and lid. Parafilm will not work on the inside of the jar, as the DN's solvent will melt it.. KK, I think you'll be happy with DN's durabillity, and the way it burns-in, to both the paint, and to itself in subsequent coats---It does not layer like epoxy, and thus eliminates the possibility of delamination. Dean
-
I'm not clear on why your edges are sticking up. Like Bob said, Briteback tape is easy to use and has good adhesive, and I've never had a problem with edges sticking up; nor have I had a problem with any of the foils with which I've added 3M's Super 77 spray adhesive to the less shiny side. I'd trim any foil that was standing proud flush, and then add another coat of epoxy. It is standard procedure to then paint over the seam that should be straight down the back, to hide the seam. Rapala has been doing just that, even before their lures began crossing the ocean from Finland to America, and they're still doing their foils that way...why mess with a good thing? Dean
-
 What ff said! Dean
 -
 Solid! Love that body shape! Dean
 -
 Nice'n Jed! Dean
 -
 Very, very fine! Dean
 -
Hey, better a stale thread than stale bread! I will say that yes, If you have just a modicum of mechanical ability, you can take this on. The 5000 series in general is really Free Spool Baitcaster 101. There have been more than a few baitcasters on the market which were uh-oh specials as soon as the right side cover was removed, but the Ambassadeur is not one of those. The most frequent mistake made upon reassembly is incorrectly positioning the anti-reverse dog, and sometimes the pinion gear. Over-oiling and greasing are popular, as is thinking that WD-40 is a good bearing lubricant...over time, WD will turn gummy, which is a good thing to remember about door hinges also. If you can take good close-up digital photos as you disassemble the reel, it is a good idea to do so. Use a good clean, well-lit work area, and use a system for grouping your parts. On a right retrieve reel, I always started by removing the left side cover, and then the spool from the frame. Then you can go to the right sideand remove the right casing by loosening the big thumbscrews to free it from the frame. Now you canlay the gear case on its side with the handle and star drag up. Now you're in position to remove the right side cover, which is done by removing the handle nut, handle, and star drag (you may need to grip the shaft flats gently and firmly with something non-marking to unscrew the drag star). Remove the two screws remaining on the cover, and you're ready to remove the cover. You may need to use a thumbnail to gently pry the gear plate and the cover apart as you jiggle them slightly, and this should be done slowly and gently, but firmly to remove only the sidecover, with its right side spool bearing cap still attached. As you lift, be sure you're not lifting the gearshaft, spacers, and drag washers along with the cover, and be sure that the anti-reverse dog remains in place also on its shaft, just forward of the free spool button. This gets your side covers, spool, frame, and gear plate apart with all gears attatched and in place, and if you take your time, the rest of the procedure is pretty straight. As you reassemble, do not grease the nylon levelwind timing gears, or any part of the levelwind: Just lightly oil. Know that the spool edges are toleranced to the frame, and that the frame is not a bearing surface: Keep this tolerance clean and dry, and your levelwind and pawl area clean and oiled, with a drop of oil on your bearings, andy your reel will always cast well. Yes, I used to do reel repair! I still have my first Ambassadeur, a new 1962 model that my Dad gave me for my 11th birthday. I hope this gets you started on the right foot! Dean
-
After cleaning with alcohol, I take my brush to the sink and wash it thoroughly with Dawn detergent and rinse well. This will get rid of the bubbles (will allow use of the acid brushes too). A buddy told me that he uses acetone to clean his brushes, and he doesn't have to do the soap aand water thing. (I know I just posted this in another thread, but here ya go) Dean