woodenfeather
-
Posts
149 -
Joined
-
Last visited
-
Days Won
2
Content Type
Profiles
Articles
TU Classifieds
Glossary
Website Links
Forums
Gallery
Store
Everything posted by woodenfeather
-
 Nice! I like the fact you used a picture of a fish you caught. That automatically gives this bait some fish catching mojo.Good job.
 -
 Thanks guys but I suck at painting. That's why I'm liking Husky's photo technique! Mother nature did the paint job on this one, although blending it was a painful experience. On the diving depth, after testing I'm thinking more like 4'. Not as deep as I intended but she swims nice anyway. Thanks for looking
 -
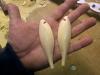
PVC through wire made in halves. All shaping including lip done with a router table and templates. Caught a small bass while tuning this one before the epoxy was completely cured.( I hope I didn't poison it on top of ripping a hole in its mouth). Not sure how deep she dives. I think maybe five or six feet on a good cast. Any guesses?
-
A Mac, go to LurePartsOnline and look under wood plugs and plug hardware. It should be under plug hardware.
-
Hey Ben, you beat me to the punch. I thought I saw them at Lure parts online but checked before I replied. I refreshed the page and there you were. A-Mac, I've had good success using 1/8 ounce egg sinkers with a screw eye run through the middle, just food for thought.
-
I would like to say there was some luck involved, considering all the time I spent trying to make my first glider. It's kinda neat how different the behaviors are between baits, all with the same shape and all weighted to sit or sink horizontally, can be when their ballasts are distributed differently. I did a lot of reading before trying it, and I got the impression from all the articles that each bait formula should be slightly over weighted, so you can drill out and adjust to get the action you want, especially if you are trying to have a suspending bait. Good job on your first attempt!
-

5th Carved Bait--Foiled Photofinish Bluegill
woodenfeather commented on Big Bass Man's gallery image in Hard Baits
 Beautiful. Great job on blending the back and belly. Just a really great looking lure all around.
 -
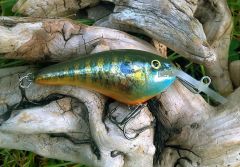
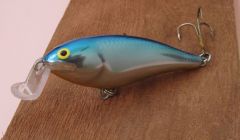
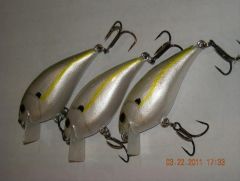
 I finally tried the photo finish technique as per Husky's tutorial. It wasn't as difficult as I anticipated. The crank is 3" made from PVC, through wired. Sorry for the crappy cell phone picture.
 -
 Nice. Look forward to seeing it finished
 -
 Some more.
 -
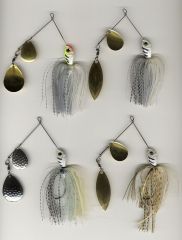
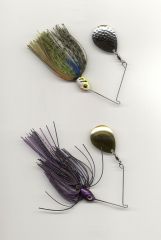 Its been a while since I made some spinnerbaits. I used the ultraminnow mold and bought the skirts on ebay. I have my best luck on the purple.
 -
 The shallow shad rap is my favorite lure. You did a killer job on these! Is that some sort of thermofoil finish?
 -
I used to work for a display company and did alot of acrylic fabrication. We used the WELD-ON 3 and 4 for virtually all our welds. Polycarbonate does cloud up slightly due to the high moisture content, the more humid it is the worse it clouds. You will still end up with a virtually clear joint though, but compared to acrylic it will be hazy. The nice thing about using the water thin solvent cements is that you can hold the pieces together, then (using a needle applicator) apply the glue where the two surfaces meet. The cement is drawn between the pieces through capillary action. The stuff dries quick so you can handle it within minutes. If I remember correctly, I think that solvents other than methylene chloride(WELD-ON 3) will work also, like MEK or acetone. I know acrylic can but not sure about polycarbonate.
-
If your tying directly to the crankbait without a split ring or snap, make sure you use a loop knot. I usually use the rapala knot. A clinch knot will bind up in different spots on the line tie and cause the lure to act funny from cast to cast. I know I'm pointing out the obvious but it took me years to figure that out. If these are crankbaits your making from scratch than it could be any number of factors. If you post a picture and some design details you might get a better answer.
-
 Beauty!
 -
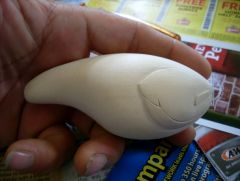
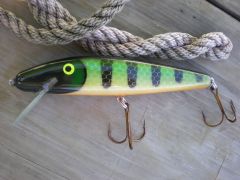
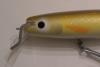
 My first glide bait. Also the first time using PVC. Made in two halves with through wire. This was a prototype that earned itself a paint job. I am glad I took such good notes!
 -
Hi Rickjames, Not sure if this applies in your situation, but if your baits have the line tie and hook hangers installed prior to cutting the lip slot, you can make a simple jig using them as your contact points. Just make a platform a little larger than your bait, Than apply small blocks, just thick enough to lift the bait off the platform surface, for the line tie and hook hangers to sit on. Now remove some of the platform to allow clearance for the bandsaw blade. If your line tie and hookhangers are inline with the center of your lure, than your cut will be perfectly perpendicular to them. You can get fancy and put little pins to position the lure and also reference the edge of the platform to a fence or sliding T square. I just hold it steady and eyeball because I'm usually just doing one. If you have a lip slot that intersects the line tie than this won't work. Good luck
-
lagoon 6 12 11 8.37 popper fish
woodenfeather commented on mark poulson's gallery image in Hard Baits
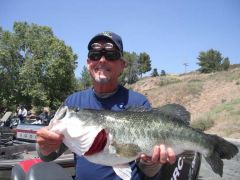 Hawg! A+ on the release!
 -
Thanks Guys, that website is awesome. I repositioned the ballast weights to the tail and nose and it has a much more exaggerated side to side motion. Still needs some work though because it wants to nose dive. I think I need to try a different wood. I am using cedar and I need to add over an ounce of lead to get it to slowly sink. That's in addition to the two 4/0 saltwater trebles and three split rings, plus a through wire harness of 1/16" dia. stainless. Thanks again, Dan
-
I've used 1/8 lexan to make large pikie type lips. . I just cold bent it and they are still holding up. A vice with a sharp edge is what I used. If you want a 90 degree bend you'll have to go past cause it will spring back.
-
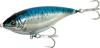
Hi Guys, I was checking out the sebile stick shadds and was curious about the keel it has and what this brings to the table as far as action is concerned. Part of my brain says it would inhibit the walk the dog action, but from experience the more flat the sides are the quicker it turns? I find it an interesting feature and was wondering what you guys thought. I have been trying, unsuccessfully, to make a subsurface twitch bait . My head is full of ideas on how I can achieve the action I want and still have a nice tapered fish shape( I'm assuming the shape is why mine suck). Here's a pic of the stick shadd. Thanks, Dan
-
Hi guys, Vodkaman, thanks for the compliments. I've seen pictures of the duplicator you made. Simply awesome! I hope you try this method and perfect it. Central, to answer your question, yes and yes. Whittler, I was thinking of trying PVC after talking to Mr. Poulson. I might give it a try. Guys I am pretty excited about finally finding a way that "SUGGESTS", I can get the shapes that I like, replicate them with a level of precision my old eyeball method doesn't allow, and produce them in sizable batches. I say " suggests" because it isn't foolproof and I don't want to jinx it. I don't know when I will get a chance to revisit this idea, but I hope someone tries it and does some of the troubleshooting for me before I do. Dan
-
 unbelievable
 -
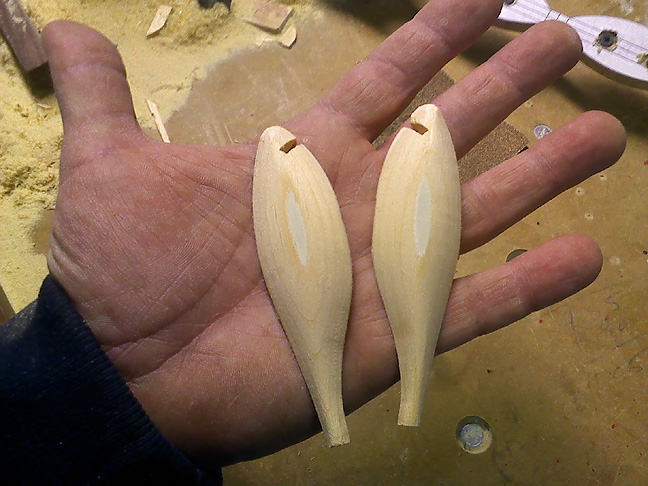
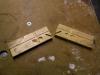
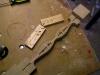
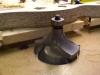
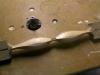
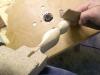
Hi Guys, I saw a discussion on here a while back about rounding lures. I had some free time today to try an idea I had and am encouraged by the results. Before I begin I should say that safety should be observed when using power tools, duh. I will post some pictures of what I did, if you chose to try it than please use your head. Because it's freaking stupid dangerous I would also like to say that if this technique has already been shared than please direct me to it because I think its a good one, I am in no way trying to take credit away from anybody by reinventing the wheel. This is literally just a prototype experiment. I rushed through it not wanting to waste to much time if it didn't work, so don't lambaste me for it's crudeness . I'm sharing it with you now because I'm hoping you'll share some improvements with me. And because I will get distracted and probably won't revisit this project for months. Ok. I will try to post some pictures and add commentary. They should be pretty self explanatory. I dimensioned some wood to 3/8 x 1 1/4. ripped a shallow dado(1/32 x 3/16) down the middle. I then cut the blanks to length, in this case 4". Cross cut a dado of the previous dims where I wanted the belly hook hanger to be( I ran it through the top to use as a locator when glueing). Then separated them into lefts and rights before cutting the slot for the bib and drilling the ballast cavities. The template uses the thru wire dados to position the blanks so they will line up after. They also keep the blank from sliding during cutting. Here is the blanks attached to the template with two small screws, next to a 3/4 round over bit. As you can see the radius have overlapped at the tail and nose thus creating a taper. A quick sand with some 80 while still affixed to the template. Ready for assembly ,assuming your wire has been formed and your ballasts are made. This method requires some finesse on the router. It is best if you climb feed a few passes until most of the material has been removed to avoid any tearout. I used some pine I had and it machined reasonably well. But other wood like cedar might not be well suited to this process. I hope this sparks some ideas for someone.
-
 Thanks Mark ! I'll have to give it a try. I used to work for a display company and a rep. gave me some 4x8 sheets of the stuff in .75" . I'm embarrassed I didn't think of using it for lures at the time. I made a sign for our church with one on the CNC and I still have some scrap in my garage. I guess I shouldn't feel bad 'cause I never used the CNC router for lure making either. You think of all the cool stuff you can do in the shop after hours, but when your shift is over its out the door. Thanks again for the tips, Dan