


nova
-
Posts
2,960 -
Joined
-
Last visited
-
Days Won
13
Content Type
Profiles
Articles
TU Classifieds
Glossary
Website Links
Forums
Gallery
Store
Everything posted by nova
-
I'm pretty sure we've all burned ourselves. It's not if you are going to burn yourself; it's just a matter of when and how bad. lol It's a really rewarding hobby though and well worth the effort. There are many tips posted in TU about what not to do and it may be worth while to do a search for them. If you have any questions don't hesitate to ask. Remember; there are no stupid questions, only stupid answers. www.novalures.com
-
I've tried that Dave. The epoxy will become opaque as you slide the knife/blade under it due to the flexing of the epoxy. www.novalures.com
-
At our local dollar store they have bags of tiny glass beads in all kinds of colors. There are thousands of beads in each bag. (no holes in them which would cause a bubble to form). www.novalures.com
-
I don't think it will work. Over time the plastic will break down chemically; I'm pretty sure but I stand to be corrected. Also; the plastic can react with other types of plastics such as styrene. I would try silicone caulking mixed with a little water. That gets quite stiff but has some flex to it. www.novalures.com
-
I like to tinker as much as the next guy; but I think that in the end you will spend more money than it would cost to buy the proper injector. I have run into this before when I first started this insanity; lol. If money doesn't matter then fill your boots and keep us informed on how you make out. Sometimes it can trigger some interesting comments and thoughts from other members. www.novalures.com
-
Question:- what are the tubes at the top made of? Do you rough sand the area of the injector with large grit sandpaper before you apply the JB? As far as something more heat resistant goes; you should talk to someone in the automotive repair department of your local dealership. www.novalures.com
-
Stick with the pots for now. It takes a steady hand and lots of repitition. Take your time pouring as well. don't try to fill the mold too quickly. This will lead to an overfill. After a while you will know just when to stop the pour so that the mold is filled to the right amount and you have very little trimming to do. www.novalures.com
-
I looked through the robo site and I couldn't find the color. If you could post a link or a pic we may be able to help. www.novalures.com
-
Start with LC's motoroil(if it's still the same as what I have). That color is much closer to the picture. You may not need to add any other colors with it. www.novalures.com
-
Rattle Can Technology To Keep The Plastic Mixed
nova replied to Piscivorous Pike's topic in Soft Plastics
You can do the same thing to the bottles of color. 3 or 4 steel ball bearings work great. www.novalures.com -
I've tried the highlights with lacquer thinner and it works although it takes quite a bit of powder. The downside to it (for me) was that spraying thorugh an airbrush atomizes the thinner into the air. Not really a good idea for several reasons. I have used art brushes and bent wires. There are some pictures of this in the gallery under my name. (nova) www.novalures.com
-
Sorry for the double post. If the mods want to remove one that would help. Nil
-
If you want an easy way to nose hook a bait all you need is a bunch of split rings. I'm assuming you are pouring in an open mold. As soo as you pour the bait grab a split ring with a pair of tweezers and drop it flat into the position that you want it. When you rig your bait just pass the hook right through the ring. I think you will find that this will hold the hook without hindering the action of the bait. The best part of this is that once the bait gets too ripped up to fish you just take out the ring an re-use it. www.novalures.com
-
Yes you need to "dry" them. If you don't the oils from the fat will come out and the dye won't take. You need to split the tails and remove the bone and meat. Scrape out as much fat as you can and then coat the hide with borax. Place it so that critters won't get to it and it's dry. It won't take too long for it to dry out. Borax also will keep the bugs out. When I used to tie flys I would experiment with all kinds of natural dyes. You can use beet juice, strawberry juice and so on. You use them the same way as other dyes; but don't forget to "fix" the dye once you get the color you want. Hope this helps. www.novalures.com
-
It never bothered any fish that I used it on. Ever hear about WD-40 being used as a scent? That works as well. www.novalures.com
-
Starting To Make Some That I Will Actually Fish
nova replied to Columbia Craft's topic in Soft Plastics
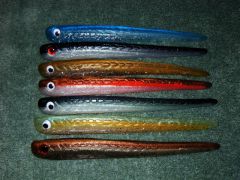
Great looking baits. The blending effect is quite striking with those colors. www.novalures.com -
I think the problem might be that you are using too much pearl powder. Try starting with 4 oz plastic and 1/16 th oz pearl and your salt. No color. Heat it up and have a look at it. Then if you want more color start by adding one drop of white at a time until you get the color you want. Take your time; don't try to rush it. www.novalures.com
-
There's an old fly fisher's trick to make fly floatent. You take parrafin and melt it then add kerosene. After it congeals you can apply it to the flys. You should be able to do this with the bee's wax and "concentrated" scent. Hope this helps. www.novalures.com
-
 Nice looking product.
 -
One thing I noticed that no one mentioned is that you have to stir the plastic between heating bursts or the plastic will burn from the center outwards. (I'm assuming that you are new to pouring) www.novalures.com
-
Did you add scent to the plastic before you heated it? That might turn color and show in the white, I use coarse/pickling salt and flour it in a grinder. When you look for salt look for "pure" salt. Table salt has a number of additives in it. www.novalures.com
-
Mike; check my site and look for the color "blue worm". Is that close to what you want for a base color? www.novalures.com
-
Looking For A Divided Pyrex Cup Or Something Similar
nova replied to cintaskevin's topic in Soft Plastics
I use roof flashing the same as Jim. Never had a problem and I have never had to "dull" the edges. I believe the flashing is made of tin (mostly). Just go to your local building supply and they should be around a buck a piece. You want the pre-cut pieces not the type on a roll. They are bent to a 90 degree angle. All you have to do is flatten them out and cut to shape. www.novalures.com -
The easiest way would be to contact the manufacturer. I'm not familiar with that product. I thin epoxy with alcohol 90%. It may work on this product as well. www.novalures.com
-
Years ago I tried coating the outside of the mold with epoxy. It did help some. Then I went one step further and took a piece of cotton cloth (thin) and wrapped the outside with it before the epoxy set up. Then applied more epoxy over the cloth. It is a little time consuming to do it but once you have it done it will last a long time. The ones I did are still just fine even though I've bumped them around quite a bit over the years. www.novalures.com