


ldzoller
-
Posts
48 -
Joined
-
Last visited
Content Type
Profiles
Articles
TU Classifieds
Glossary
Website Links
Forums
Gallery
Store
Everything posted by ldzoller
-
Please go to eHow.com and check out my article on how to make a powder paint fluid bed. Thank you.
-
I tend to stay away from the Gammas because they have a very small barb. The hook itself is extremely sharp and will hook the fish no problem. But the small barb doesn't hold the fish and I think these hooks lose more fish than other brands.
-
Mustad as well, triple grip and round bend alike. A lot of my baits use a nickle triple grip on the tail and a red round bend at the belly. For an example, look at the "Dibble Shad" in the gallery.
-
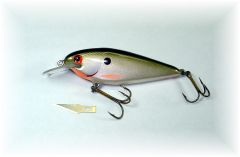
 Here are a few of the first baits I have made. They are carved from Red Cedar. Please tell me what you think.
 -
 Here are a few of the first baits I have made. They are carved from Red Cedar. Please tell me what you think.
 -
 Here are a few of the first baits I have made. They are carved from Red Cedar. Please tell me what you think.
 -
 Here are a few of the first baits I have made. These are carved from Red Cedar. Please tell me what you think.
 -
 Here are a few of the first baits I have made. These are carved from Red Cedar. Please tell me what you think.
 -
 Here are a few of the first baits I have made. These are carved from Red Cedar. Please tell me what you think.
 -
I think you can cut you wood into smaller pieces and dry it yourself fairly quickly in a microwave or toaster oven. I'm not exactly sure how you can tell when the piece is dry, perhaps someone else has tried this and can offer some insight. Or, just experiment on your own and see.
-
I think I might remember reading somewhere that you can soak your rivets in bleach for awhile (not sure how long) and then build the bait and it will squeak much sooner with use. I think it had to do with the materials of the rivet, though. Most rivets are aluminum, I think, and this might have been with stainless steel rivets. Anyone else ever heard of this?
-
I do not know what the big manufacturers use, however, I have been experimenting with waterslide decal paper you can use in your inkjet printer. I purchased mine online. I think I paind about $16 for 10 8"x10" sheets, including shipping. I found a bluegill pattern I liked and used Adobe Photoshop to print both sides. You must seal the paper with a acrylic clear coat first, then dip in water and the image slides right off. I placed it on the bait, it wrinkles some and needs to be worked in order to curve it. I still got some creases. After it dried I used Devcon 2-Ton to clear coat the lure, sanded down the high spots, and clear coated 2 more times. I will try to post a pic as soon as I can. I really liked the results, but it was a fair amount of work.
-
Check out this link. http://buildyourcnc.com/default.aspx I am currently researching DIY CNC as well.
-
Eastern Red Cedar
-
If I might interject a question along this line, not trying to offend, but I thought this applied to the topic... If the general consensus is that simple paint scheme is better, than how important is the shape of the bait as long as it wobbles with some decent action? We spend all this time carefully shaping our baits, but does that really matter as well? That post a while back about the truck shaped bait comes to mind.
-
Your baits look great, however, may I suggest trying to use the Macro focus mode on your digital camera. That will help you get the baits in clear focus and not the background. This will help show off your awesome work better. On your digital camera look for a button of setting with a symbol next to it that looks like a tulip (flower).
-
I think I have read that some guys do use Acetone, but I have only used the Virgin Lacquer Thinner with great succes. It seems like it wouldn't make a difference. However, when I first tried that mixture I used just regular Lacquer Thinner, not the Virgin type, and it did not work. All I got was a melted blob at the bottom of the jar that would not fully dissolve. Once I got the Virgin Lacquer type it worked great.
-
Has anyone ever tried using a bag from snacks like Doritoes or other chips? Turn the bag inside out and it is just like foil, very reflective. Talk about recycling!
-
I use and love a homemade mixture of Virgin Laquer Thinner and cut up plastic cups. You could do a search for "sealer" and find many results on this site. The Virgin Laquer Thinner melts the cups. This liquid is now a sealer that a bare wood bait can be dipped into. Shake off the excess over a trash can and let dry (about 3-5 minutes). The sealer will soak right into the wood. Coat again using the same dip-shake process. Let dry, usually a bit longer. Coat again or as many times as you need. I usually do 3-4 coats. You will end up with a clear coating ready to be painted that seals and requires no sanding before painting.
-
Sorry, I'm at work right now, not at home in the shop. I will try to do a tutorial soon.
-
 That is an awesome looking bait! If you don't mind me asking, how do you bend the lip?
 -
I'm just starting out as well, I've only been making baits seriously for about 2 months. I kinda played at it for two years but I'm getting much more serious now. I am finding each bait takes about 2 hours to make, not including the drying time for paints and epoxy. If I take drying time into account I have no idea, but I can make a bait in two days within that 2 hour build time. My process is pretty simple. First, I draw the bait on my squared up block of wood (I use Eastern Red Cedar). Second, I carefully cut the shape, both from the side and the top/bottom, and the lip slot on my scroll saw. If the block is perfectly square the lip slot will be, too (saves time later). Total time here is about 5 minutes. Third, I use a 1 inch belt sander and I sand the rounded shape of the bait. I am real careful here and check the shape from every angle ofte. If I'm careful here it only takes 5-10 minutes of shaping, but being careful will saves lots of time later on at the next step. Fourth, I go to the dremel tool with a fine grit sanding drum and perfect the shape of the bait. Again, I check the shape from every angle for symmetry and the better a job I did on the belt sander, the less time I have to spend here with the dremel, and it usually only takes about 10-15 minutes. Fifth, I now perfect the lip slot with a small file and cut and shape the lip. I use lexan for my lips, cut on the scroll saw and perfected with the sanding drum on the dremel. I check it for fit in the lip slot and make sure it is perfectly centered. This is about a 10 minute job. Once the lip is perfect, step Six is drilling the pilot holes for the line tie and hook hangers. Again, I use the dremel tool with a 1/64" drill bit. Also, if I need balast or want to add a rattle I use the dremel drill bit and carving bits to do that now. Any holes for rattle chambers get covered up with stick marine epoxy. These holes and chambers take about 10 minutes to do. It takes about 10 minutes for the marine epoxy to dry and then sand flat with the dremel drum sander. Step Seven in sealing the bait with the virgin laquer thinner+plastic cups mixture I learned from this site. This usually takes 3-4 coats and maybe 10 minutes. Now, Step Eight is test the bait in the bathtub to make sure it will swim the way I want. I don't count this time because it is so much fun to do. Once that's good, Step Nine is base coat of flat white spray paint and let dry maybe 10 minutes. Step Ten is the various colors for the finished paint job. This may take anywhere from 10-30 minutes depending on the complexity of the paint scheme. Also, if I want to add any decals (sometimes I use a waterslide decal to put the name on the bait) I put it on once the paint is dry. Step Eleven in the first coat of Devcon 2-Ton, a quick 5 minute job. I will put the bait on a drying wheel to let dry for at least 2 hours. Step Twelve is to add the 3-D eyes, hook hangers and line tie (I use screw eyes), and the lip. I always coat the threads of the screw eyes before I screw them in. This takes about 5 minutes. Then I give the entire bait another coat of Devcon 2-Ton epoxy with at least 2 hours of drying on the wheel. Once the bait is dry I inspect it real well and, if necessary, will give it another coat of epoxy. And that is pretty much it. Add it all up and the total build time of 120 minutes, about 2 hours. This is, of course, if I don't make any major mistakes, which rarely happens. I hope this helps and I would love to hear anyone elses step by step process.
-
Bandit also has several models in a solid black color. Try their web site to see them.
-
hazmail, you're right, it did take a long time to do. This bait is 2" long and it took 2 hours to punch and appy all the circles. It is very labor intensive. I think I'm going to try some other kinds of tape, this was furnace tape by the way. It was hard to puch, very sticky. threeccustomlure@yahoo.com threeccustomlures@yahoo.com
-
Here is a pic of a bait I just finished with a slight variation on foiling. Instead of cutting a single piece of foil to cover the entire bait I used a single hole punch to punch a bunch of tiny circles from the foiil. I then overlapped them on the bait to create a scale pattern of sorts. I still used a small strip on the belly, but the rest of the bait is covered with these small overlapping circles of foil. Please tell me what you think. Thanks.
