


jigmeister
-
Posts
348 -
Joined
-
Last visited
-
Days Won
27
Content Type
Profiles
Articles
TU Classifieds
Glossary
Website Links
Forums
Gallery
Store
Everything posted by jigmeister
-
That hook point sucks but the skirt on that jig looks great !
-
Check out TAP Plastics they sell 2 part silicone and polyester resin for the heads
-
You can move lead ballast around mounted externally outside the body of a prototype to get an idea how much weight you need and where to place it first for a particular design . Once you arrive at the weight required and drill into the lure body you will be losing a slight amount of buoyancy and slightly altering the center of gravity you had previously established with the weight on the outside and may have to make slight adjustments . I have taken a drill and slowly removed lead from a weight I had glued in for ballast after testing to get the balance back after moving the ballast inside the body . Not the scientific answer you were looking for but that's how I have done it …….
-
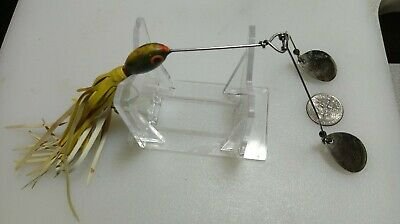
The one I had years ago did pivot here's a picture from ebay showing the wire construction .

-
A little tip on something I've been doing that works really well for a bait keeper . I take a single staple for a staple gun and using nylon thread ( rod guide , jig tying thread, or upholstry ) and tightly wrap the staple onto the hook shank and finish with a whip knot in whatever location you want on the hook . The leg(s) of the staple will be sticking straight out from the hook shank . I then bend them forward towards the line tie at a 45 deg angle and clip them off to about 1/8" long barbs using dikes . Now coat the thread with super glue and you have a simple and strong keeper. You can use a whole staple for 2 barb keepers or cut the staple in half (before tying) for a single barb keeper . I use thinner lighter gauge staples for finesse type baits with lighter hooks .
-
I have done a bunch of experimenting trying to match colors . Instead of wasting plastic during this process I switched to using an ounce of vegetable oil to see how many drops of what color{s} it takes to achieve the result I was after. You then just multiply the amount of drops by how many ounces of plastic you'll be pouring . I 've thrown out a bunch of colored oil in the process but it's a lot cheaper than plastisol .
-
I think it was like a 6 or a 7 but it was definitely the biggest willow blade available at the time . I think the big blade thing exploded on the scene in the early 80's . I don't remember Roland being the originator of the bait but rather a younger unknown angler from the East discovered it .
-
https://www.etsy.com/market/plastic_cone_bead?ref=rlte_std_1&page=2
-
Are these beads glass or plastic ? If so you can definitely find them online searching sites that sell beads for jewelry making .
-
Made my own Ned Rig head mold (vulcanized)
jigmeister replied to Mad Moose Baits's topic in Wire Baits
Great topic and video ! Instead of cutting a sprue afterwards a worm weight works great for a sprue shape . Drill a small hole in the master jig head just big enough for a short piece of spinnerbait arm wire . Put the wire in the hole you drilled and slide the worm weight onto the wire up against the master . Check alignment to make sure it's straight for a clean parting line . -
These are old school type plastic baits that shine when the water is cold . Hard to find these type lures and color selection is not too appealing when you do but I don't have to worry about that anymore …..
-
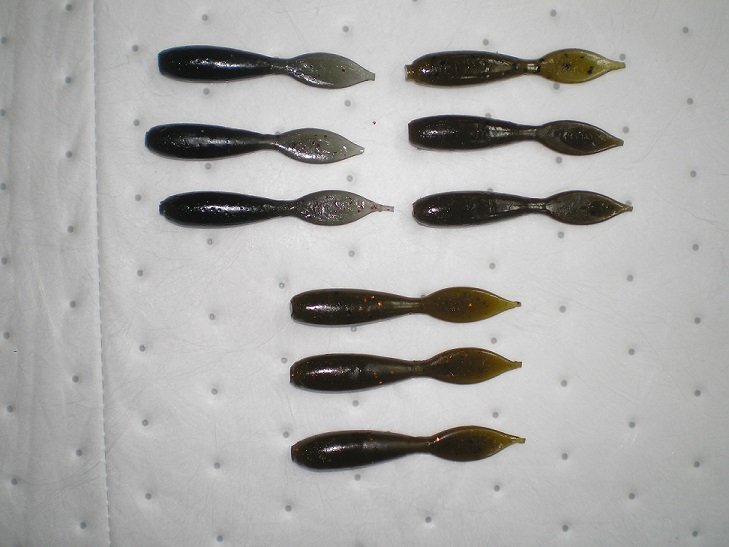
Haven't been here in quite a while but haven't stopped making baits and trying out new ideas . Here is a picture of a 3" smooth sided full round spade tail grub I created . It has no rings on the body like most other similar grubs available in an effort to look more lifelike . Colors pictured are smoke , green pumpkin , and green pumpkin , orange flake . I poured these in a silicone mold I made using hard masters .
-
The "newer" old square cut living rubber was coated with silicone (or something similar ) which seals the rubber so it wont accept any attempt to dye it I have found. The original old flat cut rubber used talcum powder as a lubricant for scoring the strands and to prevent the strips from sticking together (versue the later silicone method) . The silicone treated rubber is darker and slightly glossy while the talcummed rubber is dull (flat ) . You can use a sharpie permanent marker to color the original powdered rubber with mixed results.
-
Saltwater Plastic Yellowing With Clear Baits
jigmeister replied to jigmeister's topic in Soft Plastics
Basseducer thanks for the tips .....Ken -
I noticed that some "MF" saltwater plastic seems to be prone to yellowing when pouring transparent "smoke" colored baits . Since this formulation is harder (thicker?) I am wondering if it is a temperature thing due to possibly heating it more to get the flow when pouring I am used to ? Definately worse with each reheat. Do you need heat stabilizer with saltwater plastisol? Thanks -Ken
-
this stuff is extremely light (aluminum) and if the bait is covered head to toe the weight distribution should be even ,unless you have an extremely sensitive bait you should be OK .
-
I first started using the Britebak foil around 02 or 03 for foiling baits . The gold foil they sold was actually made of brass and didn't seem to adhere as good as the silver foil . I normally use a plastic spoon for burnishing and then wipe down the foil covered bait with a paper towel damp with rubbing alcohol to maximize the shine . I had a buddy who is a machinist make me an embossing tool with a round brass bar cut with a "knurling tool cutter" for imprinting a scale pattern into the foil . I use Devcon 2t for the outer finish and have yet to see a bait's foil lose it's shine under the top coat .
-
A Couple Questions On Building A Hunting Crank
jigmeister replied to RayburnGuy's topic in Hard Baits
I got this idea to make a " Hunting crankbait " test model with a tunable /adjustable weight system so I could change weights and or locations and discover the secrets of just what made a crankbait hunt . I carved it out of balsa using the large size plastic Big "O" as a model . When it was ready I cast it into the pool with no ballast weight added in the special chambers I had built into my test lure . To my surprise it ran great hunting left and right +/- 1-2 feet to the sides . No matter how I positioned or added weights it still hunted the same . I had to laugh because it seemed I could do nothing to make the darn thing stop hunting . I have no idea why it hunts so the whole excercise was a waste . Just my luck I guess ..........Jigmeister -
I believe this style is an old design having its origins in the Soviet Union
-
I don't know if there is a such thing as "dry" CO2 gas ? You can create a small block of dry ice from CO2 flowing thru a hinged container made for the purpose .
-
Need Opinions On A Large Scale Injector I Plan To Build.
jigmeister replied to Fish_N_Fool's topic in Soft Plastics
The suction gun "JSC" suggested would be cheaper than having something built . I bought one about ten years ago to experiment with injection molding and it worked . Both end caps thread ON/OFF just like your design and a threaded brass fitting of your choosing will thread into the end cap to mate with your mold . The body gets kind hot so I put some split foam pipe insulation and duct take on for insulation. Wear leather gloves when pouring . -
I'll bet you were " Hopping Mad" when your line broke .
-
This thread really has no place on this forum! (in my opinion) There are plenty of other sites where this subject is being debated . If you don't like BASS'S decision then start designing the next big thing to replace the A-rig
-
that would be green pumpkin on the top half and smoke with blue flake on the bottom half
-
seems like all the red colors I've ever bought are not really transparent with the exception of "strawberry" which seems to be kind of a purplish /red

