


BobP
-
Posts
5,782 -
Joined
-
Last visited
-
Days Won
193
Content Type
Profiles
Articles
TU Classifieds
Glossary
Website Links
Forums
Gallery
Store
Everything posted by BobP
-
One other observation - about speed. It is now taking much longer for me to get a response from the site when I enter its URL. The delay time is usually 15-20 seconds. When I use the "Back to...." button at the bottom of a thread, the wait is often similar. JMHO, I'm all for HIGH SPEED - LOW DRAG when it comes to websites. I appreciate Jerry eliminating little-used features or anything that detracts from fast and efficient interaction by TU members. A bunch of bells and whistles may be interesting to a few internet junkies but most TUers "just wanna have fun".
-
As long as the DN in the dipping jar is roughly similar to "original" viscosity, I'll top it off. You have to maintain the level so you can submerge the whole lure. If the DN begins to thicken, that's a sign that it will develop a semi-cured skin eventually, at which point I'll stop topping off the jar. You can still use it but you have to remove the jellied skin from the jar before dipping. I usually roll up a paper towel and swish it around the surface to collect the jelled DN. Then I use the jar for dipping prototypes, cheap knockoffs, jig heads, spoons, etc - but not lures where a pristine finish is critical. You could also thin the older DN with lacquer thinner and shoot it through an airbrush or brush it on, but I haven't tried that because I'm all about "fast and easy".
-
A-Mac, I understand the attitude toward brushing versus dipping - less wasted DN. But you waste epoxy every time you mix a batch to coat a lure. You waste some to overspray and left-over finish if you shoot any finish. And yes, you waste DN when you dip and as much drips off the lure as stays on it. Waste is a given. What is more important to me is which method gives you the best finish and the easiest application. I dip lures in S-81. Takes 5 seconds; dip, remove, hang it to dry/cure. The only bubbles I get are a few small ones that may be sitting on the surface of the DN when the lure was dipped. You can pop them with a needle if you notice them soon enough. Here's the dip waste question: how long, if at all, do you let the DN flow/drip off the lure as you remove it from the dipping jar? If you remove the lure slowly and let drops fall back into the jar, you expose the DN to moisture and, depending on how fast you use up the finish in your jar, your DN will begin curing before you can use it all (notwithstanding the use of Bloxygen). If you dip and remove the lure quickly, more excess DN will adhere to the lure and drip off after it is hung up. I started with the "slow remove" but have switched to "quick remove" after having a couple of jars of DN begin to cure. I figure those excess drips off the lure are a cheap price to pay so that a pint of DN is not ruined. And I think if you do a cost/benefit study of the various finishes used on crankbaits, you'll find DN S81 is very cost effective even when dipping it. Waste or not, it's the best performing topcoat I've found and that's the most important factor.
-
I've owned Thundershads, Stanfords, and Tennessee Tuffies. If this Thundershad was the same bait originally touted by Rick Clunn (and it looks like it), I wasn't impressed. Mine had non-thru-wire construction, a fairly brittle finish, and fell apart pretty quickly. My disappointment in their durability was a big impetus for me to start building baits. I have a couple of late 90's Standford baits and they are still solid crankbaits, though I had to replace a cracked plastic lip on one. Of the three brands, the Tennessee Tuffy is the one I value the most for their performance, build quality, and durability. They just flat out catch bass. Now, I'm talking baits from 10-12 yrs ago. There's no telling how a small bait company may progress or decline over a decade, so like they say.... your mileage may vary.
-
Dave, this one's a classic! Nice work!
-
Looking at your crankbaits in the Gallery, I sure wouldn't want to break one of those beauties off! If you fish with baitcasting gear from the bank, I'd be using a good quality 15 or 17lb fluoro like Trilene 100% fluoro or P-Line fluoro for my crankbaits. Many guys use too small a line for fishing shallow crankbaits. 10lb line is great for deep cranking to get the bait down deep but if your lures are digging bottom from the bank, there's really no need to go light. Fluoro is less visible, so you can upsize and it also has some stretch so you can snap lures off of snags with it. It lasts a long time on the reel because it isn't affected by UV radiation like nylon lines. Just be sure to tie a good knot with it!
-
 That too nice to use as a pull chain. Paint some eyes on there, put in a belly hanger and fish it! I really like how you blended the colors on this one.
 -
 Really beautiful work! It's nice to see excellent build and finish quality when it comes together.
 -
Jerry, one quirk I noticed in the Hardbait Forum is the text editor will select and highlight the whole typed text in your post if you right click the mouse at the end of your text. If you are trying to insert a URL or anything else copied from another site, you cannot do it the easy way with Cut and Paste because the URL will replace all the text. As I use the cut/paste feature often to direct others to sources for supplies, etc, it's a hindrance.
-
Nuno, taxidermy supply companies are the best source of special colors. I buy Smith Wildlife, Van Dyke, Polytranspar, etc from suppliers listed on www.taxidermy.net here in the U.S. I bet there are similar companies in Europe.
-
I usually get mine here: http://www.texaswoodcarvers.com/ I order a couple of 9 oz sets at a time and usually include some other baitmaking stuff like Dremel bits, sand paper, CA glue, etc to defray shipping costs. I hear you can also get Devcon at Ace Hardware stores - they may have to special order the 9 oz size bottles.
-
http://www.ebay.com/itm/IWATA-Revolution-HP-BR-Gravity-AIRBRUSH-Nails-FREE-HOSE-/390337242344?pt=LH_DefaultDomain_0&hash=item5ae1e9a4e8 Nuno, above is an Ebay ad for the Revolution BR, which is what I was referring to - sorry for leaving off the "R". There are lots of Iwatas on Ebay to browse, you may find another model that you like better but I think any Iwata with a .3mm or .35mm tip is the best size. Within each basic Iwata model, there are various choices for the size of the paint reservoir and whether it is a gravity or a siphon feed. For crankbaits, I find the 1/16oz gravity feed cup is perfectly adequate. Small enough not to get in the way, large enough that one cup of paint is usually enough to color basecoat a crankbait. If you also want to use the airbrush for larger projects, you might opt for a larger paint reservoir. Saint - From a few posts here on TU, I understand that the NEO is made in China (or outside of Japan in the Far East somewhere) so Iwata can market a lower priced model. I haven't seen many posts about the NEO because it is a relatively new airbrush model. You might check on airbrush websites for more about them. I have high confidence in Iwata quality control based on using a couple of their airbrushes. But frankly, having them made outside Japan gives me pause and I'd want to see more user reviews before getting one.
-
Nuno, if I used only one airbrush, it would have a .3mm tip size and a small gravity feed cup. That tip is big enough to do color basecoats and shoot heavy pearls and flake paints but small enough for some decent detail work and shading. For me, it's "right sized" for crankbaits. A majority of users find gravity feed airbrushes easier to use, easier to clean, and require less air pressure to atomize paint. One model I like is the Iwata Revolution B model. It's high quality, has the above specs, and a very moderate price. But there are lots of brands and models to choose from. The choices in your area may differ from what's available here in the U.S.
-
I've run every version of FF since 2.0 (5.0 and 6.0 most recently) and have never had any video problems. Then again, all I do with video is play it. I update my Flash player and FF via automatic downloads and so far, so good. Computers are getting darned complex. I quit trying to understand them a decade ago.
-
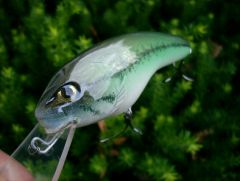
I use fluorescent yellow Createx too. To avoid using a template, I shoot the shoulders of the bait light gray, then run the yellow just underneath that, touching the gray. The gray makes any yellow overspray disappear and it gives you a line to shoot along so you can get a neat line. I don't think the fish care one way or the other but I don't like using a template for the lateral line because it looks too mechanical. This is the way the original Sexy Shad was done because if you shoot yellow at the edge of a blue back, the overspray gives you green.
-
I think you're right about wire strength versus line/rod/reel strength. But the test strength accounts for straight line pull and doesn't account for instantaneous strain caused by casting the lure or a strike by a big fish, or fatigue due to repeated flexing. I don't know any way to design for those forces so I use larger wire, as long as I can shape it accurately and easily, and can account for its added weight. For me, that's usually #12 .029" (180 lb test) ss leader wire or .041" diameter hard temper stainless. Since you can twist larger wire into just as small an eye as small wire, why not use it? If you think the screw eyes are obtrusive, you can recess them into the body segments just as you would a wood screw. And you could use 2 double screw eyes rather than 4, for less work. JMHO. Instantaneous strain can be a b****. It's why you can break 50 lb braid with a snap hookset with a rod that couldn't survive a straight 15 lb dead weight lift.
-
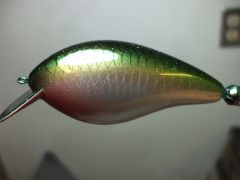
Kinkuro - looking at your link, it is obvious that the Kinkuro is mostly gold foil, not paint. There really is no good paint alternative to foil if you want that metallic reflection. I suggest using self-adhesive gold foil like you can find at jonestones.com. It's the easiest, fastest way to put foil on a bait. You can find the foil at the website or at stores that supply stained glass artists. Cut the foil, peel off its backing, smooth it on the bait and then emboss a scale texture on the bait by rolling a knurled handle of a hand tool over the surface. I use the little knurled adjuster knob from a pair of Vise-Grip pliers but a trip to a hardware store or your tool chest may suggest other options. When the foil is ready, paint the bait's margins with your airbrush and clearcoat the bait with epoxy or a waterproof urethane.
-
-
I'm with you Glenn. A buddy of mine had a Minn Kota autopilot TM on his center console boat and it gave him fits. It would lose sync and go off in random directions occasionally and he replaced control boards in it twice. I like the IDEA of sophisticated RF and computer controlled stuff, but for day-in-day-out reliability, simple cable drive TM's still work. Whether it's foot control or hand control is a matter of what you're used to. I like foot control. After awhile, your foot becomes educated and you don't think about it; the boat just goes where you want it.
-
Since the S82 is water borne, I'd guess it would be similar to other water based finishes and the S81 would be OK with it after is it fully dry. That's no guarantee, just a guess. My concern is this: S82 is an oxygen cured finish and unless you plan on letting it sit for 9-14 days before applying the S81, I'm wondering if it would ever get a chance to cure after application of the S81. Uncured S82 is about as weak as a coat of acrylic paint and if left uncured, IMO it would be a waste of time. Personally, I would just apply a single coat of S81. That's all I ever do now and have zero topcoat failures. I have some Target Coatings finish similar to S82. I use it to protect a garden bench in my backyard
-
I assume you're talking about a lure turner, not a lure dryer, per se. Lure turners are very individualistic, just depending on what you need. You want enough positions on the turner to hold the maximum number of lures you finish at one time. You want a rpm between 1 and 12. The motor needs to be powerful enough to turn the mass of the frame and the lures without working too hard. Most guys prefer an A/C gear motor of some type. Other than that, the design is pretty much open to anything you can scrounge, screw together, or buy. There is no wrong way to do it as long as the lures get rotated and the topcoat doesn't run or drip. My turner has 6 positions, turns at 6 rpm, and is driven by an a/c disk motor similar to what you would find in a microwave turntable. Made from a piece of 3/4" pine shelving, a piece of 1/2" dowel as an axle, some short 1/8" dowel spokes epoxied into the axle, and some alligator clips stuck on the spokes. It's compact and fits on a shelf in the garage.
-
I agree with the "max power you can afford" school to a point but see no need for a 105 lb TM with 3 batteries on a 14 ft jon boat. You'd probably have water coming over the transom! I run a 60 lb thrust Evinrude 24 V TM on my 19 ft glass bass boat and have never run out of juice during a day's fishing. If I fished the Great Lakes often, I'd definitely be running a long shaft TM but that would just get in the way down here. IMO you just need to get a TM that fits your boat, your fishing area, and your fishing style. One size doesn't fit all.
-
My wife drives her car like a demolition derby champ and the body shop guys always tell me to let the new finish harden for 2 weeks before washing it so it will fully harden and the surface of the clearcoat will not get scratched up. Translating that to lures, yeah you could fish them a day after clearcoating and the the urethane should hold up and prevent any water intrusion, which is a main function of the clearcoat. But the lure is more prone to scratches and hook rash. So it's Player's Choice, depending on how desperate you are to fish the lure versus how much you care about maintaining its gloss.
-
Round versus square: Here's a Sisson P-20 deep diver which has an essentially square lip but dives and swims nicely. Come to think of it, it resembles the lip on a Hellbender except for being square versus scalloped at the end. No doubt different lip shapes tend toward different swim characteristics and it's worthwhile to take that into account if you want the whole design to come together harmoniously. But don't get too focused on one design element. Everything counts: shape, length, angle, line tie position, thickness, and how much the lip width exceeds the width of the bait body. I'm leery about "rules" concerning lip shape because I see so many successful exceptions. But as usual, Dave's experiment provides useful information that you should consider in your own designs.
-
I think it's very hard to deduce the cause of a coating failure when you layer different types of coatings over one another, especially if the coatings are not from one "family" of coatings produced by one company, or are not coatings known to be compatible through wide usage. If you aren't causing the problem because of some mistake in applying, drying, or curing the Klass Koat, look at what's under it - especially any other solvent based coating. Most TU'ers shoot water based acrylic colors. They have a few good points, not least that a fully dried acrylic usually does not react chemically with most popular topcoats including 2 part auto clearcoats. But a solvent based undercoating or "primer" can react with a solvent topcoat, even through an intermediate acrylic color coat. Unless someone else uses exactly the same regimen of coatings as you do, there probably isn't an answer and you'll just have to experiment to resolve the problem.
