


BobP
-
Posts
5,782 -
Joined
-
Last visited
-
Days Won
193
Content Type
Profiles
Articles
TU Classifieds
Glossary
Website Links
Forums
Gallery
Store
Everything posted by BobP
-
Waste? Yes, there's some. It boils down to how bad you want that paint shade. I buy taxidermy acrylics when possible to get paint that I can shoot right out of the bottle, but it isn't always possible. What's a boy to do? You can't mix it in the cup of a gravity fed brush. IMO, airbrush paint is pretty inexpensive in the overall scheme of things. I always buy it in 4 oz bottles or larger. You can sometimes overlay transparent airbrush color to get some paint effects but that augments rather than replaces paint mixing.
-
The position of the line tie has a huge effect on the bait's action and stability. Shallow runners generally have good action if the line tie is near the nose of the bait and down on or near the surface of the lip. Whether the line tie is actually placed in the body's nose or incorporated into the lip itself is the builder's choice. When you build a crankbait to run more than 4-5 ft deep, you need more lip length and it becomes necessary to have the line tie out on the lip surface so the pull point is away from the nose of the bait. If you try to keep the tie in the nose, the lure will "blow out" and run on its side or spiral through the water. You can read posts on TU about the physics of lip design but if you want to keep it simple, "Monkey see, monkey do" works pretty well. look at the crankbaits you like to fish and note how their lips and line ties are arranged, specifically the shape and size of the lip, its angle to the body's horizontal axis, and where the line tie is positioned.
-
I mix large batches for multiple lures and small batches for one shot. For large batches, I mix it in an old 2 oz plastic paint bottle. With Createx colors, that means mixing half a bottle of paint and adding water and flow enhancer to make the bottle about 80% full of ready-to-shoot paint. I mix small batches in a shot glass for immediate use. As far as formulas, some guys like them and you can see a few formulas in the Hardbait Cookbook. If you measure out the paints by cc's and drops of paint to get a "perfect shade" you can note the formula down and repeat it later. I just mix it 'by eye' because a 2 oz batch lasts a long time and quite a few baits.
-
Biggun, I wouldn't call what you describe a KO. A KO is a cheap plastic bait molded to look exactly like an original high end bait and mentioning the high end bait in its advertising. IMO, it's unethical for a KO to trade on the name of the original and imply that it's just like it, at 1/4 the price. Why? Because it's never just like it. Never. The original Megabass 110 has an excellent reputation and costs $17 a pop. Worth it? Obviously yes to thousands of buyers. If a guy buys Megabass 110 KO's, paints and then sells them as "custom painted Megabass 110's, he oughta be horsewhipped, then jailed for fraud. If he buys 5, paints and fishes with them, at least he's only deluding himself.
-
Other criticisms of KO's aside, Extreme didn't say he paints them for sale, but that he paints and uses them after customizing the weight. That's making a silk purse out of a sow's ear. Nada wrong with that. I've got a tackle box full of Pointers, Staysees, 110 Ito Visions and other Japanese jerkbaits because I haven't been able to build a wooden jerkbait that can match their action and castability. Unlike other crankbaits, I don't fish them in gnarly cover and so rarely lose one, so don't really mind the high cost.
-
The only 5's I've seen are VMC Rapala "Original" round bend trebles from Cabelas and I don't see them anymore on the website. If you Google "size 5 treble hook" you will find a few sources/brands. I usually go with a short shank #4 trebles instead. VMC makes some and the new KVD trebles from Mustad are short shank, and pretty nice hooks, IMO.
-
Well, as a bass fisherman I know nothing about pike and musky lures. But I enjoy seeing the art - that larger "canvass" on pike and musky lures results in some knockout paint schemes! TU is a community that includes both hobby and pro builders. I actually prefer it when a pro includes his company logo on gallery pics. It makes his commercial status clear and gives me an idea of 'where he's coming from'. Unless he starts posting prices and shipping rates with the pics, I don't think it's advertising. And if he does, The Red Gator will bite him.
-
Different strokes for different folks. I take 5 or 6 rods, which all fit in my bass boat rod box. I usually use 2 or 3 of them. I don't like junk laying around on deck while fishing. I've cut down on the hardbaits and plastics I carry. I figure if I can't pre-plan enough to fit everything in one large worm bag and 5 mid-size 3600 boxes that fit a cloth tackle bag, I'm too clueless to fish. I own hundreds of crankbaits but my boat boxes hold maybe 100. That's plenty to fish anywhere, under any condition. There's nothing worse than sitting on deck, lines dry, pawing through bait boxes and wondering what the hell the bass might bite today. Confidence catches fish and that hurts confidence. One thing about baits - if they don't stay wet, you aren't catching any fish.
-
I think you'll find some generic craft paint shoots OK through a .35mm tip but some won't, however much you thin it. If you thin it too much, it will lose its ability to form a uniform film. Airbrush paint has smaller grains of pigment and flow enhancers while craft paint is designed to be brushed. You won't know which colors in a craft paint brand will work and which won't until you try them. If it works on one bottle, it may not on the next you buy of the same color. If half the paint you buy can't be used, it cost about as much as buying airbrush paint. Something to think about. I started out with craft paint and a larger tip airbrush than yours. I persevered and overcame the limitations. Later, I got a small tip (.2mm) airbrush, and craft paint became a non-issue because it simply would not work at all. Ever. Not saying craft paint can't work, just that it isn't ideal.
-
It's a rare crankbait that will not eventually hit hard objects. If they don't, they aren't being fished aggressively enough. Polycarbonate lips are virtually unbreakable so that's my strong preference. It may yellow after extended exposure to UV light but most crankbaits don't experience that so it's not an issue to me. I would think lip toughness would be especially important on large baits that you hope will get gnawed by big fish.
-
Yep, that's the stuff. And that's the best price I've seen it sell for.
-
Rofish, I've never done photo realistic lures but for multiple coats of epoxy, I might try Envirotex Lite which comes pre-thinned and is relatively inexpensive (a 2 bottle pint of Etex runs less than $15 at craft shops around here). Etex has a good reputation for durability and flexibility. Its downside for me is the long time it takes to begin hardening, requiring several hours of rotation. I haven't considered whether humidity levels have an effect on epoxy curing, all I can say is I haven't noticed it. As far as solvents; after it's mixed, I suspect you can use lots of stuff to thin Devcon without much effect on it curing. I like denatured alcohol for the time it extends brushing time while not much extending the normal times to various cure states. I've never had a problem with it, which I've occasionally had with other solvents. Like most builders, some of the stuff I do or don't do amounts to Crankbait JuJu - Did it once, screwed it up, now it's verboten. Did it some, never screwed up, now it's THE WAY THINGS SHOULD BE DONE. I'm not a materials or coatings scientist so have to rely on superstition!
-
Zeb, Like anything, it takes some time to get the knack of using epoxy. My guess is you didn't mix it enough if you got lumps. I squeeze equal pools of resin/hardener into a shallow jar top covered with tin foil and mix the heck out of it with a plastic strip cut from an old credit card, for at least 30 seconds. If it's cold in the garage and the epoxy is thick, I mix in a FEW drops of denatured alcohol. The alcohol just about doubles the brush time and will help expel air bubbles. I like an artist's brush to apply epoxy. The fine bristles help pop bubbles. You want to smooth it on the lure, always keeping the brush loaded and never dragging a dry brush over the surface. For me, doing 2 bass lures per batch of epoxy is comfortable. There's no sense in pushing it if the results are a ruined lure that you spent hours building. As far as fisheyes, I think they can be caused by oil on the lure. I also think you can cause one if your brush fails to make good contact somewhere, leaving dry paint under the epoxy. Have a plan in mind when you start brushing epoxy and follow your routine every time so you won't leave any dry spots. I start around the margins of the lip, hit the tail and the belly hanger, then start with the back and work my way around the lure, always brushing head to tail.
-
Jeez, who'd a thunk it? I thought ultrasonic cleaning would be pretty gentle! I disassemble the brush and soak it overnight in an airbrush cleaning solution, and that seems to work fine. There are always flakes of paint in the solution after the soak. I thought the airbrush was clean from my standard daily cleaning routine but there's still dried paint in there somewhere! I don't think you have obsess about it - I soak mine when the mood hits after 5-10 painting sessions.
-
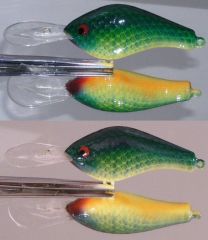 I always painted a standard "crankbait perch" pattern with yellow sides, Green shoulders over black side 'daggers' and back, and orangey-yellow belly. The pattern has tons of color contrast, which I guess is the whole point. But perch have different coloration depending on the region - so what's "realistic"?. And does it catch fish better? The farther north you go (or maybe just in clearer water?), the colors fade and there is less contrast. Some have virtually no orange on them. If I had any suggestion, it would be to use templates for the daggers (which you want to emphasize) and a more limited green scale effect just on the shoulders. When I have trouble shooting over netting on this pattern (and I do!), I lose the netting in favor of better shading on the shoulders. The bass won't care and there's so much going on in the pattern already, neither will fishermen. But who's to say the bass won't gobble your pattern up "as is"? You'll have to ask them!
 -
I leave the lure turner on for at least an hour, usually more. D2T takes 5-7 hrs to cure to a "touch-able" state and like Etex, takes 24 hrs to reach 90% cure. Messing with it in the meantime just leads to unhappy endings. I keep the unused epoxy to judge how the cure is going too. But there's a stage during the cure when I've checked the remainder, thought it was hard enough to turn off the turner, but found my 'expert sense of touch' wasn't so expert after all. Building crankbaits will eventually teach you patience; it's just a matter of how many crankbaits you ruin before you learn the lesson.
-
Another reason to like Dick Nite original moisture cured urethane is you just dip it and hang it. No rotating, no spraying an auto clear. Any excess drips right off the end. It takes a few days to cure to final hardness but can be handled after a few hours when the solvent has flashed off. It's designed for dipping Dick Nite metal spoons so it's a custom solution for your task if you do a lot of them. BTW, nice paint jobs!
-
Yes, you can use it as an undercoat but whether you should thin it, or if you even need to, I don't know. Etex is thin because it already contains solvent. Maybe its solvent would react badly with a "solvent to be named later'. so my inclination would be to use it "as is". The "thin epoxy for undercoating" comes from guys who use Devcon 2 Ton, which is a thicker, quicker curing epoxy.
-
Most of us would hesitate to say what wood NOT to use because guys use such a wide variety. There are several "classic" crankbait woods that are used for good reason: balsa, basswood, and cedar are popular in the U.S. I suggest using a wood that has density that works well in the particular bait you're building. Light wood for shallow diving baits where high buoyancy is an asset, hardwood for deep divers that are easier to shape and finish. Stick with one wood and you'll build better crankbaits as you learn how to use it over a series of builds: how to shape it, how to design good baits from it, how to finish it. It's worth buying good kiln dried wood in enough quantity to last you awhile because its consistency will pay dividends as you learn the craft and you will come to understand that only good raw materials make good crankbaits. The price of wood and other raw materials that go into a crankbait is nothing compared to the time and effort you'll put into building it.
-
You can use anything as a sealer as long as it inhibits water penetration long enough for water based acrylics to dry on it before they raise the wood grain. The only thing I would warn against is using the PVC pipe cement with the blue dye. That dye will leach through acrylic paint and show on the lure's surface. Not all PVC pipe cement has blue dye but it's required by many states for inspection purposes. I used some to join the sections of a Zara Spook that I shortened one time, and it leached right through. Lots of stuff works fine just for waterproofing but some choose sealers (aka undercoating, primer, etc) for added characteristics like good leveling over rough sanded wood, quick dry or cure, ability to not react badly with later solvent based coatings, wood reinforcement, etc. Let us know how it works for you!
-
Lots of options, I'd break them down into 3 main groups: Epoxies - Devcon 2 Ton, Envirotex Lite, Nu Lustre 55, Flexcoat, etc. All are slow cure epoxies including glues, pour-on epoxy finishes, rod guide epoxies. Brushed on and requires a lure turner to prevent it from sagging while curing. Usually thicker than other finishes but creates an attractive tough waterproof coating. What many painters start with, and still used by many experienced builders. Urethane - Especially moisture cured urethane (MCU) like Dick Nite. Creates a thin tough waterproof coating. MCU is very durable and glossy and you can brush it or dip lures into it. MCU has stringent storage requirements to stop it from curing in the container. Some MCU is sold as floor finishes (e.g., Garco, Famowood). The solvents in MCU make it touchy about compatibility with other solvent based coatings. Auto Clears - Especially 2 part "high solids" auto clears. You mix the urethane and hardener in a prescribed ratio (2:1, 4:1, etc) then spray it usually in 2 coats. Often a thicker coating than MCU but thinner than epoxy. Has limited pot life after mixing and is toxic so use an organic solvent rated face mask while spraying. A beautiful topcoat with durability similar to.... your car!. Search the forum for specific tips, problems, comparisons among the brands.
-
I painted a batch of lures using the Pledge, then dipped in original formula Dick Nite moisture cured polyurethane. No problems, so I think if it doesn't react badly with that topcoat, you should be safe using it with just about anything! I would say the Pledge finish is more a "flow enhancer" than a "reducer". It doesn't thin paint down to where I would use it for detail shots, so you need to add water like the YouTube video indicates. Another thing: Pledge dries to a hard acrylic coating. So when mixed, it makes a paint dry harder than before. Maybe that's good, maybe not. I cleaned my airbrush with water per normal and set it aside. The next day when I disassembled the brush, the needle was glued in the barrel's packing where paint tends to accumulate, and it required forceful removal. Not a problem if you clean your airbrush thoroughly immediately after use, as you should. But if you are lazy about it, the Pledge may compound any problems you have with dried paint inside your airbrush.
-
Gunnie, I understand your concern about thinning. Skeeter probably agrees and he's maybe topcoated more baits with D2T than anyone on TU. But if you are literally a garage builder, IMO there aren't many viable alternatives. Heat lowers the viscosity for a few moments but just makes the epoxy cure faster. That pressures you to get it on the lure even faster than the couple of minutes you had before. I don't hesitate to stir in a few drops of denatured alcohol to get D2T to brush easier in cool temps and honestly can't tell any difference in durability from lures I brush with straight D2T on hot summer days. Lots of guys use Etex or various rod epoxies - all of which are solvent modified. I like D2T because I have experience with it, but solvent modified epoxies like Etex are still popular with many guys who build hard working musky baits and that speaks to its durability. More epoxy finishes are ruined or weakened by poor mixing, poor measuring, or using the wrong solvent than the differences we're talking about here, so my advice is: Measure it correctly, mix the hell out of it... then thin it as little as you must to get it on the lure without an anxiety attack.
-
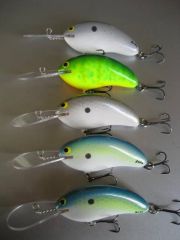 Basswood medium divers. .37oz with trebles. Production is way down! Too cold in the garage to paint crankbaits!
 -
Feel no sorrow for northern fishermen! Yeah, unless they want to ice fish, they're out of luck Nov-Apr. On the other hand, their lakes are less crowded during the fishing season and after the long winter break, the fish have forgotten what a lure is. I sneak up there every chance I get to reeducate some of the bass and pike population.