


BobP
-
Posts
5,782 -
Joined
-
Last visited
-
Days Won
193
Content Type
Profiles
Articles
TU Classifieds
Glossary
Website Links
Forums
Gallery
Store
Everything posted by BobP
-
Based on what I like to fish, I'd build a 2-2/14" flat sided bait with a circuit board lip. That's the optimum style bait for fishing shallow rocky cover. Added benefits: circuit board lips and flat sided bodies are the easiest to shape accurately.
-
What Lure-Prof says is true and I would add that commercial baits are usually design calibrated to a performance standard that will maximize the number of crankbaits that perform "good enough". Big manufacturers don't want to disappoint customers. They know a crankbait with great performance will be on the edge of the performance envelope. And manufacturing at that edge invariably means some of your product will cross the fine line from "great" into the "just a bit too far, dammit!" category. Over the line means untunable, will not run, will get bad press, and will be rejected by fishermen. Not a good outcome if you sell millions of crankbaits every year. On the other hand, if you build for yourself, you can ignore the commercial implications and try to build every bait to your particular performance standard. Over the edge? Fix it, or give it to that brother-in-law you don't like, or throw it away. You learned something and the next bait you build will perform better. You will end up with some outstanding baits in relatively short order. Company sponsored pros are delivered a hundred crankbaits to test in their swimming pool to get the 10 which perform the best. Build your own and get crankbaits that are as good or better.
-
I've always loved fishing crankbaits. Tried commercial wood baits and liked how they worked but they had poor durability. Frustrating to catch fish and have your bait fall apart after only one day! And they were expensive. I began building crankbaits to get baits that perform better and last longer. The durability part was not difficult. The performance part is the challenge. After building/testing/fishing many crankbaits, you begin to understand how they work and you become a better crankbait fisherman, too. And you come to understand that it's impossible to know everything about them so there will always be something new to learn.
-
Hey, if it gives you a smooth waterproof surface on which to paint, what's not to like? I tend to use Devcon Two Ton because I have it on hand and it works well. If what you use does not wrinkle or bubble under the topcoat you apply, you're golden. As far as cost goes, I think the cost of almost any finishing or build material used on a crankbait is inconsequential compared to the worth of the final product. The main "cost" is in the labor.
-
I think having choices is the best of all worlds. Those who are more concerned about the user-friendliness of topcoats, or guys who paint with lacquers may be happy with the water borne DN2. Those for whom water resistance is paramount may want to stick with original moisture cured DN1 or something similar. Include me in the second group. All said and done, I want to build crankbaits that are at least as durable as the most durable commercial wood crankbaits.
-
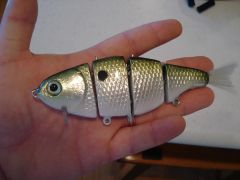 That couldn't look any more like a real shad! Nice job!
 -
Sure, rattle cans will work and I've seen some really great paint jobs done with them. Good artists somehow produce great results, even working under less than ideal technical limitations (that ain't me! I need all the tech help I can get!). Painting with rattle cans is a good reason to use an epoxy undercoat and topcoat - epoxy is virtually inert and works well over just about any kind of paint, unlike solvent based topcoats that often react badly when used over solvent paints.
-
Finishing baits can be pretty simple. Here's a very simple method that works great for me. I use only water based acrylic airbrush paint like Createx, Smith Wildlife, Polytranspar, etc. Wood baits need a smooth waterproof undercoat before you start shooting water based paint or the wood grain will rise. If you are using epoxy as a topcoat, the simplest and best method to undercoat the bait is to paint it with Devcon thinned with some denatured alcohol so it penetrates the wood. After the epoxy cures, sand it with 400 grit and apply a second coat if needed to make it perfectly smooth and without any faults. Epoxy needs to be sanded before you apply acrylic paint to provide a "toothy" surface for the paint to grip. So lightly sand the 2nd undercoat too. After undercoating, shoot a color basecoat of white, then colors, then apply your epoxy topcoat. "Translucent" means that it transmits some light, which wood won't do. But many like using what are called Transparent colors (they are actually translucent, of course) on all baits. Createx paint is sold in both solid and "transparent" colors. On solid baits, transparent colors can layer to blend into a more natural, lifelike pattern. On clear plastic baits, they can be used to get an actual see-through bait. Use the search feature in this forum to explore paint templates - there are many threads discussing them.
-
I've ground down molded eyes on plastic lures with the tip of a Dremel cylinder carving bit. Just be careful not to go too far or too fast. At high speed, the bit can melt the plastic rather than abrade it away - then it sticks to the bit and you end up with a depression in the eye socket instead of a flat surface on which to set the 3D eye.
-
The Dick Nite topcoat can only be ordered from Dick Nite, who often runs a banner ad at the top of this page. You can click on his banner and be taken to a special page on his website to order topcoat at a substantial discount provided to TU members. Be advised that the topcoat is not available right now (or last I heard anyway) due to supplier problems. Dick is having a new topcoat formulated, which will eventually be available via his website. Devcon Two Ton epoxy became popular among builders partly because it was sold at most Walmart stores. They no longer carry it, but some ACE hardware stores do (or can order it). You can also buy it online. I buy 9 oz epoxy sets (4.5 oz bottles of resin and hardener) from: http://www.texaswoodcarvers.com/ There are other online sources I haven't tried because the prices seem pretty uniform and I've gotten good service from Old Texas Woodcarvers. Several epoxy brands are popular among crankbait builders and there are other brands of moisture cured urethane available. Topcoats are the most discussed topic on this forum, so if you do a search on them you will find hundreds of related threads.
-
I use Devcon Two Ton 30 minute epoxy because it won't eventually turn brown like 5 minute epoxies. Fill the lip slot with epoxy with a piece of wire, push in the dry lip and the excess epoxy squeezes out the back of the lip where you can wipe it away. If you put epoxy on the lip before you insert it, some inevitably gets pushed out onto the lip's surface, which IMO looks bad. If you cut a couple of small slots in the back of the lip, they get filled with epoxy and improve the strength of the lip bond.
-
Azek decking seems to be most popular. Go to http://www.azek.com/ to see their products and a dealer locator to find a nearby source.
-
Unless otherwise indicated, Iwatas don't come with a hose. You can either buy an Iwata hose or get a Paasche hose and use an Iwata-Paasche hose adapter. Compressors are rated for their max output. That's 10-15 psi more than the constant operating pressure they maintain after you press the trigger on your airbrush. You may shoot at lower pressures but most guys like to have 30-45 psi operating pressure available for shooting color undercoats, thick pearls, and flakes - so JMHO, I wouldn't buy a compressor that advertises less than 60 psi max pressure. Tool compressors typically have 100+ psi, so they are a popular and inexpensive choice. You'll need a pressure regulator and a moisture trap between the compressor and the airbrush. I find it easier to buy the components, then go to a home center and get the adapter fittings needed to connect everything together. Add PTFE (aka Teflon) plumbers tape to all connections. Createx is the "standard" for airbrush paint - sold more places than any other. It's good stuff, shoots well and is consistent. The Createx color palette is not designed for nature painting like some other brands. You can custom mix Createx to suit or you can buy other brands for specific colors. I mix and match brands with no problem - it's all acrylic water based paint. Other guys prefer to mix their own intermediate shades. There are other "tools and tricks" guys use with airbrushes: scale netting, paint templates, thinning agents, etc. Get some airbrush cleaning solution and the smallest set of cleaning brushes you can find when you order your supplies. Clean airbrushes work and are fun to use. Clogged brushes are a giant pain in the neck.
-
I use any brand, just depending on the colors available. My favorite Polytranspar is the Super Hide White, which is the best color basecoat I've ever used. It has lots of pigment to hide underlying color, dries fast to a smooth hard surface.
-
Spoonbender, Romanack also wrote the book "Precision Casting" which is where I got my data. Unfortunately, it didn't sell as well as "Precision Trolling" and has not been reissued since its publication in 2000. But it still contains data on lots of "classic" popular crankbaits from the large manufacturers and it's certainly worth a look-see for general info on crankbait depth performance.
-
Well, the website found via Google is not active but I see you can still buy them on Ebay and there's an accurate review on Tackle Tour. I got a couple of Thundershads a few years ago when Rick Clunn was touting them and they didn't last very long, so I think the Tackle Tour review is dead-on regarding both performance and durability. Enough said?
-
I have sidescan sonar and no, it won't help. There's no scaling for the sidescan info shown on the screen like there is for down looking sonar. The best I can suggest is determine the bottom depth on a regular sonar and see if you can bounce bottom with your crankbait. Of course, you have to have sonar that is correctly "offset" for the depth of your transducer and you have to trust that your sonar is fairly accurate. If you want real dope about crankbait depth, it's worthwhile to dispel a couple of myths. Here's some data from "Precision Casting" published in 2000, which did actual underwater tests of casting and crankbait performance over a measured course of distance and depth observed underwater by a diver: Many guys buy into the fiction that 4-5 cranks of the reel get a crankbait down to max depth. Not so. On a long cast, crankbaits reach their deepest beginning 30 ft from the boat, lasting until 12 ft away from the boat. This is very consistent across brands of commercial crankbaits and types of crankbaits (shallow-medium-deep runners) - consistent enough that you can ignore claims to the contrary. Guys also think (and you even hear pro tournament fishermen saying this) that a long cast is 75-100 yards. When actually measuring casts by a group of experienced bass fishermen, a "very long" cast is 100 FEET, and a typical "long cast" is 70 FEET - not YARDS. So on a long 70 ft cast, the crankbait is still diving through most of the retrieve, only reaching max depth after 40 ft of the total 70 ft retrieve back to the boat. You need to calibrate test results (and expectations) against reality, not advertising foolery.
-
-
Perfect!
-
I think using a hair dryer on it would probably counteract the high humidity. The faster it dries, the more it cracks. I've only tried Folk Art brand.
-
In my experience, it's hard to get the crackle effect you want unless you experiment. The little details make all the difference. I paint with acrylic water based paint and have tried one brand of acrylic crackle medium over foil and paint. The foil is much slicker so the same technique I used over paint resulted in drastically more cracking over the foil. The same thing happens over different paints if their surfaces differ in texture. Instructions for my crackle medium said to brush it on, let it dry completely, then apply paint over it and it would crackle as it dried. There was almost no cracking when I did it that way, so next I sprayed the top paint onto crackle medium that was still wet, and dried both simultaneously with a hair dryer. Lots more cracking that way. Worked OK over a paint base but over foil, it cracked so much that the top paint looked like small paint beads instead of crackle paint. Also, when I did one side of a lure at a time, it was impossible to get the other side to look similar - so I learned to do both sides at the same time. Bottom line, you have to experiment with your particular medium and your particular paint because there are so many variables.
-
I'm relieved that other testers had good in-the-water performance. Did I do something to screw up my test? I didn't think so but all my finishing details are in the first post of this thread so you can judge for yourself and point out any shortcomings you see. If your test worked great, did it differ in any detail from mine? The difference I'm hearing so far is: my test blocks had scratches down into the underlying acrylic paint before an immersion test, while other guys fished crankbaits that had no scratches or dings when testing began or when it finished. If this is the only difference, and a finish works well in one scenario but not the other, each of us can draw his own conclusions.
-
I don't know of a glue like you're seeking. I use Devcon Two Ton epoxy because it doesn't turn brown like 5 minute epoxies. The problem I see with a glue that 'bites into' polycarbonate is it will surely cloud any part of the bill that it touches. As well as cutting slots in the back of a lip, sanding the area of the lip that is hidden in the slot will also increase the strength of the glue bond.
-
I think you can certainly do that but the results depend on the kind of sealer and the application method you use. For instance, if you plunge a heated blank into a jar of low viscosity sealer and hold it there, it will soak up the max amount. If you brush the same sealer on a hot blank, it would also draw it in but you might be left with rough areas where all the sealer was drawn into the wood, leaving little of it on the surface. Some guys submerge blanks in sealer for long periods. It takes longer to dry out and you may have problems if it isn't dry and you use a solvent based topcoat later. I just want a strong, waterproof, smooth surface to paint for bass baits. If the sealer is strong enough to prevent expansion bubbles rising from the wood when I heat dry paint, I'm happy.
-
DUCBOS, DN2 (new) is water-born urethane that can be thinned with water and hardens by exposure to oxygen over 12-14 days. DN1 (old) is solvent based urethane that hardens over several days from exposure to humidity in the air. DN1 has stringent storage requirements to limit its exposure to humidity; DN2 is apparently not as "touchy" as DN1 about how it's stored. Google "Moisture Cured Urethane" and "Oxygen Cured Urethane" for more info.