


BobP
-
Posts
5,782 -
Joined
-
Last visited
-
Days Won
193
Content Type
Profiles
Articles
TU Classifieds
Glossary
Website Links
Forums
Gallery
Store
Everything posted by BobP
-
Sunny, personally, I would put the toughest, thickest stuff I could find on a lure that bluefish are going to be chewing. For me, that's epoxy because you want a coating thick enough to slow down those penetrating snappers. Once they penetrate to the underlying wood, you're done.
-
D2T is somewhat forgiving but if you want a hard topcoat that won't yellow, 2 things: you need to measure it well and you need to mix it really well. Soft spots are caused by failure to mix thoroughly, or leaving some hardener or resin unmixed in the container, then brushing it on the lure. I don't think the glitter had anything to do with it. In summertime, I mix D2T and then mix in a few drops of denatured alcohol to thin the mix slightly and extend the brush time. If you get a soft spot or other goof, a second coating of epoxy will cure it.
-
Between colors, I spray most of the paint out of the bowl with a spray bottle of plain water (hold the brush over a trash can or bowl), shoot a bowl or two of water through the brush - including holding a finger over the tip so the water backwashes paint out of the airbrush's tip section. Then I clean any dried paint out of the bowl with a Q-tip dipped in acetone or lacquer thinner. Cleaning the airbrush between colors and after use is Job #1 if you want it to keep working well. I occasionally disassemble the brush completely and soak the parts overnight in airbrush cleaning solution (sold as a concentrate by airbrush paint suppliers). As careful as I am to clean the brush between colors, it amazes me how much gook an overnight soaking will produce. Other than cleaning supplies and paint, I keep a roll of frisket material handy to make painting templates, an Xacto knife to cut the frisket designs, netting in various sizes to do scale effects, and an old credit card with various size round holes drilled it it to serve as a template for shad spots. Plain water works fine as a thinner on water based acrylics but if you decide to try some of the Createx Auto Air colors, remember they require a specific thinning agent. I also suggest you buy a larger bottle of a white acrylic paint to basecoat your lures before shooting colors on them (i.e., hide the underlying wood grain or whatever). You want a highly pigmented white acrylic. I highly recommend Polytranspar Superhide White, which dries to a hard white gloss surface. Oh, BTW - you'll be needing a hair dryer to dry paint between shots.
-
Lure depth and swimming action are determined by a bunch of things including; lip length, angle and width, buoyancy of the lure (related to how much ballast you use), where the ballast is located (forward/rearward), where the line tie is located relative to the lip surface, plus width and shape of the lure body. It isn't easy to predict how all the factors will play out because they all affect one another. I think your big bait would require a larger lip to get to the same depth as the small bait, if all the other factors are sized proportional to the relative size of the 2 baits. And I would expect the large bait to swim with a slower frequency just because the lip is having to drive almost twice as much body weight. When I'm prototyping a new lure, I sometimes make the lip oversized so I can use a Dremel sander on it during on-the-water testing, reducing the size and changing the shape of the lip until I get the swim action and depth I want. If you get down to a small nub, you know you missed it and one or more of the other factors need to be changed!
-
Nope! I assume they spray them with a custom blended urethane.
-
Sunny, I think coating flies and crankbaits are two different things. Wood crankbaits have to be comprehensively protected from water absorption or they quickly swell up and the finish pops off the lure. This can happen in the first hour of fishing if water gets in anywhere. That's why we go to extremes with topcoats and undercoats and why there's so much discussion here on TU about them. I usually undercoat with Devcon Two Ton epoxy, sometimes with propionate. Then I topcoat with Devcon Two Ton or Dick Nite moisture cured polyurethane. As far as initial looks go, I think the epoxy has it over other topcoats. It makes a very smooth, glossy coating and very rarely has any finish imperfections. But it is not as hard or slick as Dick Nite. DN also has better clarity (if for no other reason than it is much thinner than epoxy). But DN is touchy stuff that will bubble or wrinkle underlying finish if you aren't careful. If I had a spray booth, I'd try a two part high solids urethane auto topcoat - but they are very toxic and require protection I don't want to fool with. I haven't tried lacquer topcoats but my impression is their 'waterproofness' is questionable. Leaving a wet glass on a lacquered table will leave a white ring where the lacquer absorbed water and I assume the same will happen to a crankbait. Let us know how it works out!
-
Most polyurethane is golden brown and the tint is not much of an issue on interior wood furniture. A thin coat shows less color, which can look OK on most baits. It's resistance to impact, moisture and UV yellowing is also an issue, so choosing the right topcoat is important. Many bait builders use epoxies, auto clears, or special moisture cured polyurethanes to get a clear durable topcoat that can withstand immersion and still shed abuse like hook rash.
-
Yeah, you can use filler but then you run into the problem of the filler being harder than the balsa, so when you sand the filler smooth you will be taking away too much balsa around the patch. It can get to be a real PITA once you breach into the balsa. Been there, done that, don't want to again.
-
I still trace an outline of the bait on paper and transfer it to a plastic sheet from which I cut out a pattern. Where the new body differs from the original is usually in how you contour the blank afterward. You can also do a pattern of the top of the bait to help the contouring process along but it still takes shaping by eye to get the body right. A half-body mold could help in shaping if you used it as a "try the fit now" while sanding but I don't see how you could fit a square edged blank into it.
-
If I have a prized balsa bait that needs repainting, I'm not gonna use a stripping agent on it because you never know how it will react with that particular bait's finish. Most strippers/solvents will cloud the lip. And they are really messy. And if they soak into the wood, the repainted lure is gonna smell like paint stripper forever. So I can't help with chemical or solvent stripping but have done quite a few balsa repaints where I sanded the existing finish to remove blemishes and give the surface some 'tooth' to promote adhesion of the paint. If you follow that route, definitely do not sand down to raw wood anywhere. If you create a raw wood spot while sanding, it's soft wood surrounded by hard remaining finish - which is almost impossible to sand without distorting the shape of the lure. Balsa has high buoyancy and the finish on a bass crankbait adds only .03-.04 oz to a lure, so I've always had good results just sanding the existing finish smooth with 400 grit paper. If you do it that way, you also avoid the necessity of doing the undercoating on the lure again. Just sand, paint, and topcoat.
-
Almost all of us use "found netting" when we want something different. Laundry bags, bath sponge netting, aquarium nets, or just whatever we run into at the local fabric store.
-
Here Are My Questions. Can I Have Some Answers?
BobP replied to xix coleman xix's topic in Hard Baits
Here's the simplest way I know to make a durable crankbait. Wipe a coat of Devcon Two Ton epoxy thinned with a little denatured alcohol on the raw wood. This waterproofs it and stops the grain from rising when hit with paint. Lightly sand it smooth after it cures. If you sand down to raw wood again anywhere, apply another coat of Devcon. You want a smooth waterproof surface to paint. No "primer". Shoot a white paint basecoat, then the colors. If you use aerosol paint, let it dry at least 24 hrs to get rid of the solvents. Brush on a topcoat of straight unthinned Devcon Two Ton. Rotate it. You can fish it after 24 hrs. You need to rotate the lure, or at least switch it head/tail every little while for the first hour that Devcon is curing. Using the Devcon for both under and topcoating keeps things simple. I use Size 2 split rings on 95% of my crankbaits. -
I agree with RG. Cured epoxy is pretty inert stuff and won't chemically bond with other finishes. You need to provide some mechanical grip by sanding it. I degloss D2T undercoating with 400 grit paper before I paint. As to whether a coat of DN over the D2T will cure hook rash, I'm less sure about that. DN is harder and slicker than D2T but it is also a lot thinner, so it's a guess which coating would withstand hook rash down to underlying wood longer. The DN would look better longer, but eventually....
-
JMHO, it's easy to find good plastic commercial crankbaits so I'm not very interested in just painting "no-name" plastic bodies. Nothing against it, mind you, but it just doesn't seem to have a lot of "value added" to me unless you just enjoy the painting process. Only about 10% of the "unbranded" unpainted plastic bodies I've tried had enough quality or performance to fish more than one cast. It's more cost efficient for me to buy good plastic crankbaits from Lucky Craft, Bomber, Rapala, etc. If I don't see something I like, I repaint it to suit. Where I can make the most value for myself and friends is with wood crankbaits. Spending extra time and effort, you can make a wood crankbait with more durability and performance than the Big Boys or most custom shops - who can't afford the extra time and effort for business reasons. I recommend repainting popular plastic or wood commercial crankbaits to get into the hobby. Look around for popular crankbaits being sold at reduced price (overstocks, damaged packaging, unpopular color patterns, etc). You know they will perform well when finished and that's critical. If you want to get into building from the ground up, take a look at molding crankbaits from 16 lb/cu ft density foam. It's one of the few mold materials that has a buoyancy similar to balsa wood. BTW, if you want to work in wood, there are ways around creating a dust storm if you're willing to use hand tools for shaping the bodies instead of power tools. A jig saw, craft knife, a rasp, and sandpaper have been used to create a lot of great crankbaits over the years.
-
My wheel runs 6 rpm and has a 6" radius. One minor advantage - this is about as fast as you want one to run if you like to keep it running and just clip the lures on there as you epoxy them.
-
Luke, I'm not sure there are any tricks with Brite-Bak. I trace around the lure on a piece of tape and cut out the pattern. That lets you register the tape at the nose and tail when you begin to stick it on (and it doesn't waste tape). I begin smoothing at the center of the tape and gradually smooth it down to the shoulders and belly of the lure. It's easier if the lure has flat sides, harder if the bait is more rounded. A rounded spherical surface will eventually necessitate creases, so don't try to wrap the entire lure. Just tape from the shoulders to the beginning of the belly, then paint the back and belly. I burnish down the edges with a plastic stick and the Brite-bak is thin enough that a coat of paint hides the margins pretty well. I use Qtips moistened with denatured alcohol to clean off the paint overspray and keep the tape shiny. If the 2 sides don't match coverage, you can use a single edged razor blade to score the tape and peel off strips to even them up. I use the little knurled knob from a Vise Grip pliers to do scale texture on the tape. Just unscrew it from the pliers and run it over the surface. Knurled knobs from various tools will also work.
-
The point is to rotate every finite point on the lure through 360 degrees while the finish dries/cures so that it won't sag or drip. However you clamp it on a lure turner, that's what happens.
-
I use regular Createx paint over clean nickel or scale effect Witch Tape and dip spoons in Dick Nite with no wrinkling and good durability. I'd check out the Createx transparent colors. No, the water based paints aren't going to "bite" into metal, but the Dick Nite will soak through and gives very good adhesion. Could your spoons be coated with a clear enamel before you paint them? That could be causing wrinkling. I'd rub them down with acetone to remove existing clearcoat before painting.
-
Compressors - I've used a couple of airbrush compressors and wouldn't dream of using them in the house with the family at home. Tool compressors are even noisier when they turn on (the larger the storage tank, the less often they run). You do have a few options. You could use a tool compressor installed outside with a hose running inside to your work area. Or you could build an insulated box to muffle the noise of an airbrush compressor. Or you could spend big bucks for a quiet airbrush compressor. Or you could use a large CO2 tank which would be virtually silent. I just do my airbrushing in the garage
-
Do a search on "foamies" in this forum (Search box upper right hand corner) and you will get quite a few threads, including some sources for 16 lb foam.
-
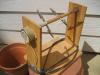
Here's one I've been using for 8 years. Scrap shelving for the base and sides, a 1/2" dia dowel for the axle, alligator clips on 1/8" dia dowel arms for 6 crankbaits, powered by a small 6 rpm a/c motor. The axle dowel has a small hole drilled in its end just big enough for the motor's drive axle to fit, and is locked in with a little epoxy. I used a big washer on the other side from the motor to act as a "bearing" for the axle. Screws and or glue where you want to hold pieces stable. Pretty simple to knock together in about an hour. I put blue painter's tape on the lips of the crankbaits so the alligator clips won't scratch them while turning. Doesn't really matter what it looks like as long as it keeps spinning!
-
Epoxy self-cures after mixing so a 2nd coat of unthinned D2T can be applied anytime after the 1st coat starts to harden. It will all harden just fine. With D2T, an hour would not be too soon if you are using a lure turner. If you are modifying the D2T with solvent, or are using a solvent enhanced epoxy like Envirotex Lite or a rod guide epoxy, you'd probably want to wait 5-6 hrs until most of the solvent has evaporated. It will all cure to regular hardness.
-
You pics were moved to the gallery by the moderator.
-
Looking at lots of finished lures painted with water based versus lacquer based colors, I agree solvent based lacquer offers some hues and effects that are hard to get with water based paint. If I were doing production painting, I might explore solvent based but only after I had a protective environment in place, including a spray booth with exhaust or solvent rated mask, etc. Some of the chemicals in solvent based paints - especially automotive paints and clearcoats containing isocyanates - are very toxic. There's a reason you see auto painters in full body suits with full face masks! I'm a garage hobby builder so solvent based coatings and protection systems just don't make sense for me. Yes, I spend as much time cleaning my airbrush as I do shooting paint through it. But I haven't started growing a third eye yet either.
-
JMHO, I tried one a few years ago and thought all the hardware in the joints made the bait too heavy to swim properly. I installed a small lip in mine which helped a little, but it was still not a "winner" compared to other topwater wake baits with livelier action. Maybe some guys like them, I didn't. Different strokes....

