


BobP
-
Posts
5,782 -
Joined
-
Last visited
-
Days Won
193
Content Type
Profiles
Articles
TU Classifieds
Glossary
Website Links
Forums
Gallery
Store
Everything posted by BobP
-
I’ve done it two ways. I use a Dremel to cut a small slot on the bottom of the lip slot to accept the tail of the line tie. Alternatively, you can cut a slot in the end of the lip and bend the tail end up into it and then crimp it down on the lip’s top surface. You need to cut slots in the bottom and the top of the lip slot in this case, but it makes a very secure lip package to glue into the bait. I use soft temper ss wire, usually .041” Dia for my line ties. That allows you to tune the bait without cracking the lip.
-
I bought a couple of E1’s a few years ago and haven’t noticed anything like them for sale since then (but I haven’t been looking). Mr. Chambers recently passed away and I don’t know if any of the Zoom folks will take up the WEC banner. So you may have to resort to collectors to get your hands on a Zoom WEC, probably at exorbitant and quickly rising prices. I see on EBay that they are going for between $40-80. The factory price was $21. the only retail source for WEC that I know was Peepers Baits.
-
I use cheap flat nylon bristle artist brushes that I bought at Michael’s. Clean them thoroughly with lacquer thinner and they last for years. The small bristles do a good job of popping epoxy bubbles as you brush it on. As far as thickness goes, I like it medium thick. So I pick up a little denatured alcohol with the brush and flick it into the epoxy a couple of times, mixing it in until it I get the viscosity I want. If it is too thin and runny, you will get grain pops when the epoxy hardens. I estimate that two coats (under and topcoat) of epoxy and paint on an average bass bait weigh about .02 ounce, which I figure in when designing the bait.
-
Gravity moves epoxy until it reaches an initial hardness. How long is determined by the brand of epoxy and the temperature. Until that happens you need to rotate a lure, either on a lure turner or by switching it head/tail every 30 seconds or so. Yeah, it’s a pretty big deal.
-
I’ve used 5 min epoxy on lips but decided I didn’t want it anywhere on a bait where it could show because it can turn an ugly brown color from UV exposure. Now I only use it where it will be covered with paint and that includes the lip slot. Since I install lips after painting, it’s out for that application. Really the only time I use it now is to join the halves of a split bait into which I’m installing hardware. Different strokes...
-
The choice of compressor depends mainly on the environment you will use it in. I use a 6 gallon Porter Cable 135 psi tool compressor. Once it airs up it will run my brush for an hour or two but Eastman03 is right - it’s darn loud when it cuts on. I like mine because it was reasonable cost and easily fits under my garage workbench. If it were 30 gallons, I’d like it even more. High quality quiet dedicated airbrush compressors from companies like Iwata tend to be very costly. Tool compressors are the choice as long as noise is not an issue. If it is, I recommend an airbrush compressor that advertises a maximum psi of at least 45-50 psi. That’s because psi on a small compressor drops about 10 psi from its max psi when running an airbrush sustained. I like at least 40 psi of sustained psi available even though I don’t shoot at above 30 psi sustained. That said, even airbrush compressors are loud enough that I wouldn’t run most of them in my house with family members asleep.
-
Thanks. That was very entertaining!
-
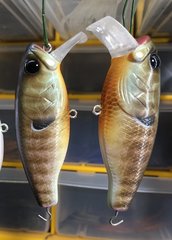
On the first 3 lures, action is imparted by the flat sloped area on the head of the bait. This kind of bait ususally runs in a head down attitude with a very tight wobble. It helps the action if the edges of that flat head surface are sharp. Commercial baits of this type usually weigh 14-15 grams or 1/2 ounce. If yours are much heavier, the head action area may be too small to force the action to take place. on the second baits it looks as though the one in the vid has ok action but is a little slow to get wobbling. It may help to put a little more weight in the front of the bait. nicesint jobs, by the way!
-
I wouldn’t think KBS needs any thinning. I thin a small batch of Devcon, enough for several baits by using my artist’s brush to pick up some denatured alcohol and shaking it into the mixed epoxy, then stirring it in. It doesn’t take much to change the viscosity of the epoxy to whatever consistency you want. I don’t want mine to be too thin. After all, thicker is more durable and epoxy thinned with alcohol will tend to raise wood grain. If the coating is too thin you may have to do a second coat after sanding down the grain pops. when measuring Devcon for average size bass crankbaits, I use 1 cc of each part, per bait, measured with epoxy syringes. Since bar top epoxies like Envirotex Lite come already thinned, I wouldn’t thin them at all.
-
Why not just simply drill it? I use a Dremel and it takes about 2 seconds, and the hole is perfectly sized and located.
-
If the lure runs well without ballast, no action is needed. If it runs well but does not dive to the depth you want, that is usually because the lip is set at too great an angle, or possibly because the lip dive action is not strong enough to make a very buoyant lure dive. Many diving lures are weighted so the head sits lower than the tail and that helps to initiate the lure’s diving action. It also makes the lure swim with a head down attitude. In a practical sense, this also increases the effective lip angle. That is why all the different elements of a lure (lip angle/shape/size, body shape,buoyancy, and ballasting) all operate together and effect each other. Hopefully, they work in harmony to give you the desired action. It often takes experimentation to get this. One shortcut I recommend is to look at lures which have the action you like and copy them. That will give you a basis on which to elaborate your own creations. weighting is not done for a lure to achieve depth, but to steady the lure so it will swim upright. That said, if you want a lure that will suspend in the water when stopped, you have to adjust the weight of the lure so it has near neutral buoyancy..
-
I’d try cutting a stencil for the minnows, color basecoat the whole lure, then use the stencil to shoot silver on the minnows, followed by some delicate shading for their backs. Use a paint dotter to put in their eyes. Alternatively, you could use adhesive foil for the minnow bodies. Whichever way you do it, it’s a finnacky project. Good luck.
-
If you don’t seal the wood before painting, the water in the paint will raise the wood grain, giving you a rough finish. Wood crankbaits live in a tough environment and many of us want to make them as durable and waterproof as possible, so it is preferable to undercoat/seal the wood with a tough waterproof coating that serves as an added protection against water intrusion. Various products including epoxy, MCU like KBS, UV cured polyester resin like Alumi-UV etc can do that. I use Devcon Two Ton epoxy as a topcoat on many baits so it simplifies things to also use it as an undercoating. Scuff the gloss off it before painting to improve paint adhesion. Some like and use primers. I don’t and have never seen the advantage if you paint with water based paint. Here’s the thing: an acrylic paint finish will last exactly as long as the topcoat you put on it lasts and no longer. A wood crankbait body will last exactly as long as your undercoating and topcoat keep water out of it, no longer. If your topcoat gets damaged, acrylic paint will absorb water and push the topcoat off the bait but the lure is salvageable as long as the undercoat remains intact. So one of the simplest durable finish regimens is epoxy then paint, then epoxy. Or epoxy, paint, then MCU. Glitter. There are many ways to use glitter and a recent thread goes into different ways to apply it. Specific to your question, if you put glitter into your KBS and the finish turns out smooth, there’s no reason to apply anything over it. If it’s rough, you can simply add another coat of KBS, or whatever topcoat you want. I’d stick with the KBS. MCU’s including KBS contain solvents that are not always compatible with just any ole other solvent based coating. If you want to mix them, it’s an experiment that may or may not work. Epoxy will almost always be compatible with any other coating because it is more or less chemically inert after it cures. As far as Createx vs Wicked vs Auto-air, I’m sure there are chemical differences but for our purposes, they all shoot the same and are compatible.
-
Mj54, Regarding what brand of paint to use. Most of us keep a basic array of Createx on hand since it has a good consistent quality and can be found anywhere airbrush paint is sold. But there are many other brands and you can mix and match brands just according to the colors and effects you like (pearls, flakes, color shift, etc). I’m a fan of paints formulated for taxidermy. It has some nice effects and usually comes thinned and ready to shoot. But I don’t hesitate to try any brand as long as it is water based acrylic paint. It’s good practice to heat dry each color as you shoot it. I use a hair dryer and it only takes a few seconds. It avoids pushing wet paint around when you shoot the next color. And a buildup of wet paint over wet paint can take many hours to dry. A final topcoat over wet paint can be a disaster, depending on the topcoat used. Some brands are sold in water based and lacquer based colors. I avoid lacquer based because of health and safety reasons.
-
One issue in thinning paint is whether to thin a whole bottle, or just a small amount as you prepare to shoot it. To some extent I think it depends on how often you paint and how quickly you use up the paint (and therefore how often it’s agitated). Once, when I thinned with 15-20% Pledge Floor Polish and then stored the paint for an extended period, the paint pigment and Pledge precipitated to the bottom of the bottle into a super hard mass that was impossible to remix, ruining the whole bottle. Maybe that wouldn’t happen if I used less Pledge, or maybe it was paint specific (I use several brands). No doubt it is best to thin only the amount you plan to use before you shoot. But that is an added hassle I’m too lazy to take. So I switched to an alcohol/water/glycerine mix thinner or Createx 4012 reducer for those admittedly rare occasions when I thin paint. Mostly I just turn up the air pressure and blast away and I use a lot of taxidermy paint that comes ready to shoot.
-
An Iwata Revolution B goes for just under $100, a moderate priced brush. You can also check out brushes from Paasche or Badger who sell brush sets that come with 3 different size nozzles and tips. Personally, I would avoid inexpensive Chinese ab’s. Some work ok, some don’t, and it’s impossible to get parts for most of them when they break. Most ab’s from the major companies are reliable workhorses. Jmho, Iwatas have the best build quality and gravity feed brushes work better, are easier to clean, and make less mess.
-
I’m not sure it matters what you use to undercoat a wood bait with, as long as it is hopefully waterproof. Once you choose a product with that quality, you can then consider products based on their hardness, toughness, speed of drying or curing, thickness, compatibility with the other finish products you use, odor, safety, price, etc, to suit your build program. There are myriad choices.
-
I used to be impatient in many crankbait building tasks. Screwing up baits slowly taught me to quell that impulse. It took years but it was a good lesson to learn. One thing that helped was to plan epoxying or any clearcoating late in the day so it has overnight to cure. Haste really does make waste when building crankbaits. I really like epoxy paste for hardware and lip installation. It’s strong. It stays where you put it and it holds lips in place while hardening. Lip slot a little too thick? No problem. But it stays soft enough to tweak a lip position for an hour or so after gluing. I use a wire to fill the lip slot completely with the paste and then push the dry lip in. Wipe off the epoxy that squeezes out. Hang up the bait and wait at least 8 hours before clearcoating . Superglue? No thanks. Sets too damned fast and I think it has questionable shock resistance. The times when I have had lips in custom crankbaits come loose, I see that they were superglued.
-
I use Rod Bond epoxy paste. It has a very long work time of at least an hour which I use to evaluate the lip position and tweak as required. I usually build cranks in batches of 5-6 and Rod Bond lets me mix one batch of epoxy, insert all the lips, and fuss with them to my heart’s content. I also like that it will not run out of the lip slot like a liquid can.
-
Are you sure you didn’t pick up Devcon 5 Minute epoxy instead of Two Ton? At any rate, I wouldn’t use it. If the hardener is the quick variety, it will always cure too quickly no matter how you dope it, plus it will turn an ugly brown from UV exposure, plus it is only water resistant, not waterproof.
-
Many rod builders like size A nylon thread which is the thinnest diameter. For stronger, I’d switch to larger Size E nylon thread and topcoat it after application with the durable topcoat of your choice (nail polish, superglue, epoxy, MCU, etc)
-
F6D8976E-5816-4202-9D0C-ED42CCE9ADD9.jpeg
BobP commented on J.Bowerman's gallery image in Hard Baits
 Great job!
 -
I recommend contacting a few of the better regarded online sellers like Predator and Dinger baits for suggestions and perhaps some sources if you want to order in bulk from the Far East.
-
It’s good to see a homemade Plopper that gets the job done, Mark. To me it resembles the new Whopper Plopper 75 in shape. Great minds think alike and converge on similar lure designs! Nice job.
-
I can’t help with lead molds or powder paint, which you should address to the Wire Baits forum for suggestions. Createx and its sub-brands Wicked and Auto Air are the biggest water based acrylic latex paints world wide and are good products, but certainly not the only ones. You can mix and match among many brands, just depending on the specific colors you want to use, including taxidermy paints designed to match animal colors. I don’t think there are any cost effective chrome paints you can use that can be topcoated with the most durable moisture cured urethanes or UV cured polyester resins without ruining their shine. We crankbait makers tend to use adhesive foils for that, which can be textured to represent fish scales. Brite Bak is a brand of thin adhesive aluminum HVAC foil that I like. I suggest using moisture cured urethane for metal lures. It’s very durable, clear, non yellowing, waterproof and adheres well to metal. The most used brands are KBS Diamond Coat and Dick Nite Fishermun’s Lurecoat S81. Epoxy is a popular crankbait topcoat but is not ideal for metal jigs since it chips off sharp metal edges very easily. Hope this helps.

