


BobP
-
Posts
5,782 -
Joined
-
Last visited
-
Days Won
193
Content Type
Profiles
Articles
TU Classifieds
Glossary
Website Links
Forums
Gallery
Store
Everything posted by BobP
-
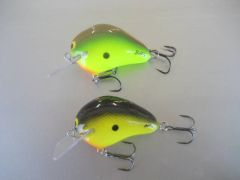 These are similar to the earlier batch, paulownia wood, epoxy undercoat/topcoat, .50 ounce with trebles. Slightly more rounded than the first batch but they have the same finished weight. Top is Chartreuse Classic, bottom yellow/black. BTW, I like the new Mustad KVD short shank wide gap treble hooks on the Chartreuse Classic bait. They are sharper than the VMC short shank trebles on the yellow/black lure.
 -
 Rofish, SHORT SHANK #4 trebles come on a real E1. I hesitate to put oversize trebles on baits but there it is a definite trend among tournament bass fishermen here in the U.S. and the E1 is ballasted and built expressly for that hook. It has its belly hanger installed a little forward compared to "average" (like the Lucky Craft RC 1.5, another example) and the trebles don't tangle. I use VMC Rapala short shank #4's from Cabelas on these cranks. The new Mustad short shank #4 Kevin Van Dam wide gap trebles also work nicely. I think the #4's provide extra holding once hooked and the extra spread of the treble may hook fish that a #6 hook will not on a fat bodied bait (yeah, it may also snag cover more often, though!). Van Dam won the last Bassmaster Classic fishing a 1/2 oz lipless crankbait with huge #2 KVD short shank hooks last winter, so the 'big hook trend' will continue.
 -
Forward/backward motion of the trigger controls the position of the needle, and paint flow. Up/down motion of the trigger controls air flow. That's why it's called a "dual action airbrush". If you unscrew the rear of the a/b, you see a small knurled nut through which the needle fits. With the nut tightened, the needle is trapped and moves fore/back with the trigger as it should. Trigger movement should be smooth; if not, you probably have paint clogged in the barrel of the a/b. Loosen the retaining nut and try to pull the needle out of the a/b. If it's stuck, soak the brush in cleaner until the clog is loosened, then completely disassemble the brush and soak it at least overnight in a cleaning solution. Once you have a clean HP-B, I think you'll like it.
-
When you shoot water based acrylics with an airbrush, some of the paint particles partially dry as they hit the air, clump together, and fall out of the spray pattern or bounce off the side of the lure in the form of dust. More is created when you are test firing the brush to check the spray pattern. That's the downside of shooting inside a simple box because you need to clean the dust out regularly or it will get blown onto lures you are painting. Alternatively, you need a spray booth with positive ventilation and a filter to collect it as you produce it. I get around this by painting in the garage but I confess that isn't much fun on days like today when temp/humidity is 100+, or in February when highs are in the 30's. Most of us sort of ease in to bait building over time but there's something to be said for getting the right equipment and work environment together early in a hobby or business. That way, good technique and build routine become second nature instead of 'adventures in bait building' when you introduce them later. I'm hesitant to make some changes in the way I make baits because I don't want to have to take a step back down the quality ladder to learn and integrate them into my build routine. Not an optimum attitude, but fortunately I only build baits as a hobby and have only myself and a few friends to make happy.
-
I don't think anything's even close to an airbrush. If you're concerned about noise, you ran run one off of a compressed air or CO2 tank. I assume you aren't concerned about vapors if you're considering using an aerosol can.
-
I've always used a square tipped artist's brush and they last several years - just dip them in acetone or lacquer thinner and brush them out on a piece of cloth until they're clean and soft again. I don't get how a finger can get epoxy everywhere I want it, including around the lip margin and the hook hangers.
-
Depends on the type of joints you have. If you use interlinked screw eyes, wrapping the joint in a rubber band will immobilize it while you brush on a clear coat. I strongly prefer to paint and clear coat the sections of the bait separately and then glue the section joints into the body.
-
I didn't see anything about the company selling unfinished bodies and the idea only seems interesting if you have a strong need for rattles or a somewhat restrictive shifting ballast system for casting distance. Would a compressed balsa body infused with a binder be more buoyant or as strong as a plastic body? If they were for sale, could you cut a slot and install a lip securely? From the pic, it will apparently not include interior chambering, which is an important feature in plastic bodies. There's lots TBD. Nonetheless, it's an interesting concept. Thanks Bassrecord!
-
I looked at a schematic for a 100 series and it apparently uses a 3 part head assembly plus the needle. The head assemblies are sold as sets in S/M/L, as are the needles. The nozzle on the 100 looks similar to one on an Iwata (a small screw-in nozzle) and is probably sort of fragile, so I can't recommend trying to mix/match the parts because a wrong size needle can split the nozzle if you aren't careful. I haven't seen specs on the hole sizes in mm for the various head assemblies. I use an a/b with .3mm tip for thicker paints and flakes, and one with .2mm tip for fine shading and details (Iwata). To me, .3mm - .35mm is the 'sweet spot' in tip size if you are going to use one a/b because it will shoot almost any a/b paint but can produce decent shading and detail, with experience. If your medium needle will not fit in the back of the a/b, I'm suspicious that it may not be intended for that model Badger. All said and done, I think the correct head assembly parts, paired with the right needle, will give you much better results with fewer clogs and goofs, and will make using your a/b a lot more fun and productive to use.
-
If it's like my Badger 170, each size tip includes a needle, a nozzle insert, and a screw-on spray cap. Size is designated by the number of rings etched into the piece, or sometimes an etched number or letter S-M-L. When I accidentally mismatched the parts, the results were rarely good but if you don't have the complete set of tip parts that came with the airbrush, experimentation can't hurt much.
-
From reading the description (http://www.cleanclassicautoparts.com/dificlqu.html) it looks promising because it's a high solids one part auto clear, not a 2 part finish with high toxicity. What remains to be answered is its durability. Why not try some and report back to the community?
-
I like to use a thin bladed very sharp knife, like a small Swiss Army knife to skin paint off. It's all "touch and technique" but the things to watch are: Don't let the blade chatter across the surface leaving marks that are hard to erase. Don't get down into the plastic shell of the lure, you just want to get the finish. You can actually peel the finish off most lures by inserting a sharp thin blade under the finish and lifting, and that technique preserves most 3D features. But if there is a 3D scale pattern in the plastic, nothing but sanding it off will really work to get a clear bait. Whatever finish is left, I sand off with 400 grit paper. The lure plastic will turn clear again when you hit it with any topcoat, which fills in the minute sanding scratches.
-
I only apply DN once, as a final topcoat, and I dip only once because it will also react with itself unless it has cured for several days before recoating. Same goes for DN as an intermediate coating, I suspect. I know there's the school of 'more is better' when you're talking about protecting paint but you have to balance protection, looks, and performance. One dip looks good and performs well in my experience with bass baits.
-
I'm not familiar with Deft but I'd be afraid it might react with Dick Nite (as many solvent based coatings do) and wrinkle. Have you considered using just a clear acrylic airbrush paint? All you would have to do is dry it with a hair dryer for 15-20 secs and you'd be ready to apply the next coating. I don't see a reason to apply anything over colors before I dip baits in DN. In fact, DN tends to soak into acrylic paint and form a nice hard unified finish, so I don't want anything on top of the acrylic paint that might inhibit that.
-
Unless you happen to be a lawyer who also makes baits for sale (any hands?), a patent/copyright is exactly worth the money you are prepared and able to spend for lawyers to defend it in a court of law and bully transgressors in the marketplace. How many bait inventors are so successful that a huge legal expense is a rational choice? Especially when the expense may well not have a meaningful result ($$$) even if you win (certainly not guaranteed). What's a boy to do? IMO, TU is about sharing knowledge and yes, that includes design. Maybe it even includes a few war stories about patent protection, etc, if there's anyone here with experience (haven't seen much so far). If you want to hide your light under a basket and keep your "million dollar, fish catching invention" a secret from other craftsmen and knockoff artists.... Please Do! Just do a better job of it. I worked in the Secrets Business for a long time and here's Rule One: Never mention the existence of something you "can't talk about", can't show results for, and may never be able to build in commercial quantity. Rule Two: if you want legal advice, talk to a lawyer (bring money!).
-
 MMmm. Those really say "Eat Me!". Nice baits Mark.
 -
 Fingers, your painting and finishing is simply the best. What more is there to say?
 -
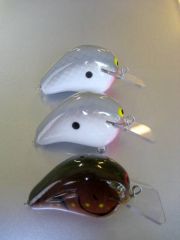
Paulownia wood, 2" long, 3/4" max width, weight .47-.49 oz with trebles, epoxy topcoat. I wanted a "Plain Jane" shad pattern because I fish these in a clear lake and want as few negative cues as possible in the paint pattern. The WEC E1 is really well designed (yeah, I bought a few!). It's heavy enough to cast well, with a square lip that rebounds well off cover, and large #4 short shank trebles that don't tangle. A very practical design for fishing shallow cover. The E1's from Zoom WEC have very high build quality, which their $21 cost reflects.
-
I never use more than one coat of D2T. It's the thickest epoxy widely used as a topcoat, unless you thin it excessively. I sometimes use 3-5 drops of denatured alcohol in enough D2T for 2 baits in order to extend the brush time a little in hot weather, or to make it more brushable in cold weather.
-
The machine in the top video was a custom built duplicator used by a commercial crankbait builder in Kernersville, NC. I suspect someone with local furniture industry experience built it, or adapted it. It was advertised for sale awhile back and the price was in the $25000 range, if memory serves.
-
Welcome to the world of plastic knockoffs! I've tried dozens of knockoffs and found exactly two that I would actually fish with. The problem is the Chinese copy the exteriors but never get the internal structures and ballasting right. You are most likely to find rattle baits that work like you want them to. If you see a popular $15-20 Japanese crankbait with brass ballasting and multiple ballast chambers and expect your $2 Chinese knockoff filled with BB's to perform the same, well, you're in for disappointment. Every once in awhile I get seduced into trying another knockoff but like you, my hopes are always dashed. The cheap Chinese knockoffs are usually worth less than zero. I say less than zero because not only do they waste precious fishing time, but you could have been fishing baits that actually catch fish. If I buy a custom wood crankbait for $20, or build one that works great and catches fish, I'm a happy guy these days.
-
I lightly sand, shoot acrylic colors, and dip baits in Dick Nite moisture cured polyurethane. No "primer". Alternatively, many guys brush on an epoxy topcoat versus the Dick Nite. There are not many topcoats durable enough for crankbaits. The above alternatives are the only ones I've found that I'm happy with. The Dick Nite is particularly good on plastic baits because it looks and performs like a "factory finish". And unlike two part auto clearcoats, it doesn't require a full face mask to protect you against toxic isocyanates.
-
 Nice paint scheme! It looks like you used tape or a card to mask off the bottom of the bait while you shot the top. IMO, that makes for a very sharp demarcation between colors that isn't natural looking. You'll want to learn fading one color into another, and that will come with a little experience. If you hold the bait with the back rotated away from you somewhat, you can shoot the back and any paint that bounces off will bounce over the back and not down onto the side of the bait. If it does bounce down (nobody's perfect all the time) fix it by shooting cover white paint onto the goof area and recoat with the belly color.
 -
Dick discounts coatings to TU'ers as a favor to fellow bait makers, not as the mainstay of his business. When he's busy making a living, it can sometimes take awhile for him to respond to calls or emails. Given the circumstances, I try to be a little patient (but persistent).
-
Any detail done with a Sharpie can run if coated with solvent based topcoat, and Etex contains solvent. Some guys spray over sharpie with clear acrylic paint to avoid the problem. I use a fine point calligraphy pen ($2 at a craft store) and dip it in Createx black. It does a signature with finer line than an ultrafine Sharpie.
