


BobP
-
Posts
5,782 -
Joined
-
Last visited
-
Days Won
193
Content Type
Profiles
Articles
TU Classifieds
Glossary
Website Links
Forums
Gallery
Store
Everything posted by BobP
-
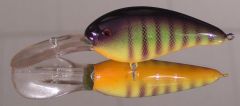 That's a handsome paint scheme on a great mid depth crank - DLN I presume.
 -
It can be tough to get them aligned if the body is not perfectly symmetrical, which most wood baits are not. Even roto-molded wood baits are usually not truly symmetrical. It starts with a good square cut lip slot and a good symmetrical lip. I sight down the belly from the tail to see if the tail hanger, belly hanger and lip seem to align and if equal amounts of lip are showing on each side of the lure. If it looks OK, I look at it from the top to see if it looks straight and even from that perspective. Another alignment aid is a laser level. If you mark the lip's center tip when you trace out the lip, you can sight the laser level down the tail and belly hangers and the line should hit the mark on the tip of the lip. I have not had good results reshaping lips to correct alignment because while it equalizes the areas on each side of the lip, it also distorts the lip shape. I'd rather bend the line tie - that's a natural part of lure tuning. If it just won't tune, you might as well try trimming the lip but it's a last desperate resort.
-
Two popular sources are motors from grill rotisseries and microwaves. I use a puck shaped Macro-Yang synchronous AC10-11 4 RPM motor to drive a small 6 lure turner with alligator clips holding the lures. The frame is cobbled together with some shelving, a 1/2" dowel for the axle and 1/8" dowels epoxied into the axle to hold the lure clips. If you have access to a disco ball motor, I say try it and see how it lasts. Mine has worked for 5 yrs now. The big question is whether the motor has enough torque to rotate the axle and lures without burning out. Anything 2-8 RPM seems to work.
-
A-Mac, I haven't counted how many bass cranks I get out of a quart but I'm very sure it's cost competitive with Devcon epoxy. I know some guys look at dipping and think "OMG! Look at all that expensive DN dripping off that's wasted!" When I hang lures to dry, about as much drips off the lure as stays on it. All I can say is the quart I'm using now has lasted 9 months and there's still plenty left. Ease of use is superior and so are the results, so I'm a happy camper. What turned it around for me is using Bloxygen, a mix of argon and nitrogen gas. Squirt a little in the dipping jar and it never begins to cure. I haven't heard of Extend It, reading the sheet you link to, it's a mix of gases different from Bloxygen. Since it's formulated for polyurethanes specifically, it will probably work great on DN ... but I haven't tried it. I order DN by the quart and decant that into 3 smaller glass jars with good screw on tops, shoot Bloxygen in each. When the dip jar gets low, I pour in some from one of the other jars. Bloxygen costs about $11 per can and says you should get about 75 shots into quart size containers. That a little fishy to me since how much you shoot should depend on the air space in the container, not the fluid level. I give pint jars a 1 second blast and that has worked so far. I get 2 cans of Bloxygen at a time and reorder when the first can is empty, and think I'm using a little more than one can of Bloxygen per quart (rough estimate).
-
I had occasional problems with paint wrinkling under Dick Nite when I first used it. I was dipping baits and putting them on a lure turner while the DN dried. Eventually, I noticed that on problem baits, there was excess DN collecting near the tail of the bait before I could get it on the turner. The DN skins over quickly and was trapping still liquid DN underneath, sloshing back and forth as the bait rotated. It would stay liquid long enough to make the paint wrinkle or bubble. The easiest fix is to dip them and simply hang them up by the line tie to dry. All excess DN drips off the tail, no further problems. No lure turner needed.
-
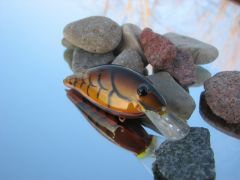
 I really like how your color matches and how it transitions from one to another. Very nice!
 -
I was referring to undercoating and priming with solvent based products, not to lacquer versus acrylic paint. Sorry I didn't make that clear.... I don't paint with lacquer so wasn't thinking in that direction.
-
Neat stuff, Deimai
-
You can sand lightly to give the surface some "tooth" or apply an adhesion promoter (AP). Coast airbrush sells aerosol HOK Adherto and sprayable SEM Plastic AP. Bullseye aerosol is another another popular AP. I just sand lures with 400 grit when repainting but if I were doing 50, I'd probably go with an AP.
-
I can't speak to Grex quality or service but a "Six Pack"? The Grex Genesis XN with .2mm tip retails for about #120. I can buy an Iwata HP-B Plus for around that price on Ebay and I know Iwata is high quality, so I wouldn't be interested. I only use 2 airbrushes to paint crankbaits and think "six packs" are designed for nail salons or T-shirt shops. Can't remember anyone here on TU talking about the Grex brand pro or con. Not running it down but my feeling is that if it were a great brand, guys would have found it long ago and be talking it up.
-
Making crankbaits will teach you patience for sure! There are some things you can do to speed things up a little. Use epoxy thinned with lacquer thinner to undercoat/prime the bait and you only need to wait once before painting. If you use acrylic latex like Polytranspar Superhide White to color basecoat, you also don't have to wait - just dry it with a hair dryer and continue painting with acrylic colors. Dry each color with a hair dryer after you shoot it and when you're finished painting the colors, you're ready to do the eyes and topcoat the bait. Or you can use solvent based coatings and wait wait wait.
-
If it bubbling in the cup, it's getting air so there's a clog in the front of the airbrush. I'd disassemble it and soak it overnight in a cleaning solution. A set of airbrush cleaning brushes can help clean out the barrel. Otherwise you have to use the needle (gingerly) to force out any globs of paint after they are softened by the soaking.
-
Netman, I wrap rubber bands around the joints to immobilize them and mask them from paint spray. It's best to paint the segments separately and then assemble the bait but it you're painting an existing bait.... One thing to be aware of when topcoating with D2T, it draws away from sharp edges while curing and will be almost microscopically thin. The epxoy will chip off quickly if those edges touch while swimming. You can either round off the edges before painting or use an alternative topcoat like Dick Nite, etc.
-
I like to have 2 airbrushes on hand, one with a tip in the .3 - .35 mm range and one with a .2 mm tip. Large tip for color basecoating, overall color, and thicker flake paints, and the smaller tip brush for fine shading and details. I think the Eclipse usually has a .35 mm tip? Tip size and type of airbrush becomes a "personal thing" to most guys - a particular tip size and brush fits one guy's painting habits better than another and it takes a little time to learn what suits you. Sort of like fitting a gun stock to the shooter. I do think most users like gravity feed brushes better than siphon feed after they try them. They shoot paint easier, don't waste paint, and are faster to clean for the next shot. You're a lucky man if your wife stepped up and got you what is IMO the best brand airbrush first time out!
-
No home center I know carries any airbrush paint. Hobby stores like Michael's and Hobby Lobby carry airbrush paint but the selection is usually pretty meager and the brand is usually only Createx. Like many, I went through the progression of using a large tip airbrush and cheap hobby acrylics like Apple Barrel, then switched to all airbrush paint when I moved to a smaller tip airbrush. I would have been happier sooner if I had just started with airbrush paint in the first place. Yeah, they are more expensive but they work much better. And a 4 oz bottle lasts a long long time.
-
Like Jim, I dip bass crankbaits once. I figure dipping is the most DN you can get on a lure in one coat, and it's sufficient for bass fishing as long as we aren't talking about trolling the lure. Are more coats better? Of course! But then you have to worry about how long to wait between dips to avoid bubbles and wrinkling the finish. The single dip baits I'm using now seem to be holding up nicely, so I have no complaints. I also tried Famowood awhile back and it worked OK but I felt it was not as transparent as DN. The other issue - running acrylic paint AFTER heat setting? If it's heat set, it's also dry as a bone and can't run anywhere, so I don't understand. I dry each shot of acrylic as I put it on the lure. I don't blast it to smithereens, I just make sure it's good and dry. When I'm finished painting, it's all desert dry and I don't have to worry about underlying moisture, which CAN screw up urethane finish. I doubt covering damp acrylic with a little lacquer will make any difference.
-
I'd bet most big crankbait companies use something like an automotive urethane on their baits, not moisture cured polyurethane. And they have it custom mixed for their production (as Dick Nite does). I'd try an automotive urethane in a heartbeat. BUT from what I hear, the most durable ones are 2 part finishes that require a catalyst and are toxic to spray, requiring added safety precautions. I like to dip baits, so mixing up a pint of auto urethane which has a limited pot life for half a dozen crankbaits is not gonna work. If I got it all wrong and there's a perfect one part auto finish for me out there somewhere, don't be COY! Do tell!
-
There are a hundred threads discussing airbrushes and compressors so I won't rehash them. Use the search box in the upper right hand corner to explore the possibilities and many opinions. Painting detail is 20% airbrush and 80% artist. On the airbrush side, the build quality and tip size makes it easier or harder to do. Just remember that painting crankbaits is about overall base coating and shading as well as detail.
-
Dean, I definitely have favorites based on my own predilections - dipping Dick Nite and brushing Devcon Two Ton epoxy. If I had to pick one, it would be Dick Nite: dip it, hang it, ZAP, you're done! The 10 second finish! But I recognize my preferences have a lot to do with where I build baits (the garage, in all temperatures), what I build (bass baits that don't require Musky armor), and ease of application (did I mention 10 second finish?). I also use Devcon because it's cost effective, it levels beautifully, cures quicker than other brands, and never requires more than one coat. There's a theme in here somewhere - EASY. The choices you make are informed by how you think about your baits. I want baits to be very durable and attractive but to me, they are fishing tools that can be broken, lost, etc., so you try to strike a reasonable balance.
-
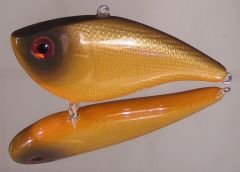
 Man, that's a nice paint scheme!
 -
Various topcoats are available and all of them work fine. Epoxy, Dick Nite, automotive clears, etc. Each has its pros and cons, and its adherents. A builder chooses one because it's compatible with the other coatings he puts on his baits and because he knows how to apply that topcoat with good aesthetic results. All of them are beautiful and durable if properly applied. So yeah, an assertion that he's using "the best" paints and topcoat may be true in one sense (maybe the best he knows how to use?), but otherwise, it's just extra words in a sales pitch. JMHO ps - nothing wrong with salesmanship. It may sell product. But hoopla is hoopla.
-
Tom, your line tie is too far toward the end of the lip. I'd leave it as is and put a line tie directly into the nose of the bait just above the lip surface. Test that and see how it works. If good, snip off the old wire and you're ready to fish. If the action is too wild or the bait spirals, trim the length of the lip in 1/8" increments while retesting. If it just never "gets right", replace the lip with one where the line tie is closer to the body. When I have to do that, I use an epoxy putty log to mount the new lip because of the too-large slot you get when you have to cut out the old lip. Line ties on the surface of the lip should always be less than 50% of the distance from the nose of the bait to the tip of the lip. 40-45% is typical on deep divers but on a shallow diver like yours, it can usually go even closer to the nose. The closer it is to the nose, the tighter and faster the wiggle, which is why it's worth a shot to put it directly into the nose of the bait to see how that swims.
-
There's no rule about how many coats of thinned epoxy to use before painting; I let it cure hard, sand out any rough areas and then decide if a second coat is needed to make the bait smooth before painting. If there are any areas where you sanded the first coat down to bare wood, use a 2nd coat. Bottom line, for best appearance and protection, you want a smooth hard surface to paint, and epoxy is a good way to get it.
-
George, like Redg8r sez, it depends mostly on what material the bait is made of. Balsa lures are more durable with thru-wiring. Hardwood lures generally don't require it. Several TU musky lure builders epoxy screw eyes into hardwood with no problems.
-
You may be able to find pics of thru-wire technique in the Member Submitted Tutorials. There are options, depending on the thru-wire method and the type of wire you select. First, are you going to thru-wire via a hole drilled nose to tail, or are you going to split the bait and glue it together with the frame inside? I split the bait. The second thing to consider is the type of wire you're using. Hard temper stainless is hard to bend so many who use it lay the bait on a plank of wood, mark where the hook hangers will be, then drive in nails at those points to serve as anchors around which to bend the wire. I use soft temper stainless or brass wire and can bend it freehand while holding it against the inside face of one of the bait halves. After bending, I lay it on the bait half, mark around it with a Sharpie and use an awl to scratch a depression into the balsa so the halves will fit together snugly when I epoxy them together.