


BobP
-
Posts
5,782 -
Joined
-
Last visited
-
Days Won
193
Content Type
Profiles
Articles
TU Classifieds
Glossary
Website Links
Forums
Gallery
Store
Everything posted by BobP
-
Ben, google "solvent resistant plastic' and you'll get some industry sites that list the chemical resistant properties of various plastics. The problem is you need to know the specific solvents used in DN to match them against candidate plastics. As far as dumping $50 worth of DN into a bag..... better you than me, brother! I'll keep mine in screw top jars with Bloxygen until you report results
-
I haven't used CS but have slung lots of epoxy! Epoxy is a 'coating unto itself'. It doesn't react with coatings it covers and after curing, it doesn't react with coatings used over it. Most 'table top' (eg Etex) and rod epoxies (eg Flexcoat) are modified with solvent to flow out better or soak into what they're covering. If the CS has a thin consistency, it's solvent modified too. To get a slicker coating with good leveling, you probably want to apply a thicker coating or use multiple coats. To make it thicker, you might try giving a little rest after mixing so it will cure a little before you brush it on. Many Etex users do that. Or you can mix it with a thicker unmodified epoxy like Devcon Two Ton (careful here, you don't want to use a quick cure epoxy like Devcon 5 Minute that will turn brown!). Again, I've never used CS but if its like other brands, there's no reason to use a sealer between the paint and the epoxy.
-
I use water based Superhide. It has better adhesion than other acrylic paints and I've never had a problem with it sticking to plastic baits. Covers well, too.
-
I just shoot'em with Superhide White. The only time I use a primer is on raw wood.
-
Bubbles occur when a sealer soaks into wood end grain. Sand out any rough areas with fine sandpaper after it dries and apply another coat. More bubbles usually won't occur because the end grain is now sealed. Sand just enough to smooth out any rough surface; you don't want to get down to raw wood again. Solvent based sealers usually work faster because they don't raise grain themselves. Water based sealers contain, ta da! water! - which raises wood grain. They also work but typically require more sanding and more coats than solvent based products.
-
Air drying versus heat drying. JMHO, it probably doesn't matter. My attitude is we're just getting the color on; the durable clearcoat is what's gonna keep it on the bait. It will stay on exactly as long as the clearcoat is intact and will come off immediately if the clearcoat fails, heat cured or not. That said, I always blow dry paint so I can move on to the next color asap.
-
It depends on how you applied the paint. I always blow dry each color shot except for painted eyes, which take at least an hour to air dry. I've applied D2T over blow dried paint immediately, no problem. But most often, I glue the lip in with D2T after painting and the bait gets at least a couple of hours before dipping in DN. The delay between painting and DN is because there are other steps to take care of, not because I think there needs to be additional paint cure time.
-
Personally, I think thinned Devcon is the best undercoating and it's worth using a little of it to get its leveling and water resistance. Another dipped undercoat is a very mixture of propionate (aka prop) dissolved in acetone. It requires multiple dips (5-8 typically) to get a really smooth coating but dries quickly between dips. I think a couple of TUers sell prop pellets. Another I'm trying out now is Target Coatings EM-9300, a water based "polyurethane". So far I prefer epoxy or prop.
-
Paint Cracks And/or Bubbles After Clear Coating
BobP replied to MikePaintsBaits's topic in Hard Baits
It can be either the 'primer' or the paint. Not a lot of us use Auto Air, so I don't know whether that might be a problem. Suggest you check the Auto Air site to see if they have recommendations about topcoats. 68KingFisher probably has a lot of experience with AA, may be able to help - but think he uses an auto clear, not DN. DN has solvents that are quite 'active' and when it gets cold they take longer to flash out. You can judge that if you have used the same primer/paint/DN in warmer weather without problems. Frank is right about epoxy - it never reacts with other coatings in my experience. -
Just be sure to wear a mask rated for solvent protection. No kidding!
-
You might get other answers on the wire bait forum from guys who paint blades. I mostly do wood crankbaits so when it's time to paint spoons, I use acrylic latex paint and clearcoat with Dick Nite moisture cured polyurethane (which is designed to coat Dick Nite spoons). I wipe the metal with solvent to clean it and airbrush the paint. For solid color spoons, spray a white basecoat before applying colors. You can shoot transparent acrylic paints without the basecoat to get transparent effects. The polyurethane clearcoat is the step that makes acrylic paint durable. Dick Nite seems to soak into and through acrylic paint to bond well with metal. Just dip the spoon and hang it to dry, then let the moisture cure process proceed for 3-5 days before fishing the bait. Check the Dick Nite website for the whole array of paints he sells, which he also uses on his commercial spoon products. I think most of them are lacquers. Crankbaiters don't usually use vinyl paints. I see it mostly on some jigs, and it is a quite different coating system with distinct primers, paints and clearcoats. I think vinyl inherently has a soft surface. Whatever pressure that will shoot a pattern you can control is right. For water based acrylics, most of us shoot 20-45 psi. Less psi and nearer the surface for finer lines, farther away for shading. The spoons I've done with acrylic/Dick Nite have held up well to fishing abuse. Lacquer paint would probably be even better but I don't want to shoot solvent based paints due to the health hazard.
-
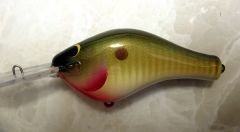 This is my fave of the recently posted. Love the color choices!
 -
A few other companies sell moisture cured poly, like Garco (Amazon.com has it for $30/gal) but I haven't tried them and can't recommend. Most of the other companies sell it as a floor finish. If you experiment, be sure to get one that is clear, not amber in color. There are not a lot of other options if you want a very durable one part finish for dipping baits. A drying wheel makes any epoxy easier to use but it isn't absolutely necessary with Devcon Two Ton because it's thicker and cures faster than most. I have brushed Devcon and hung baits to cure, switching them head/tail for the first 40 minutes to prevent sags, and it worked OK. Thinner epoxies like Flexcoat and Envirotex Lite (Etex) need a wheel because they are solvent modified and runnier than Devcon. The Target Coatings 9000 series water based coatings have been discussed on TU and a few other bass fishing sites. Some like them, others have had poor durability and peeling. I haven't seen enough history on usage, details about application, or how it fits into an overall finishing system to make an informed decision to use it as a clearcoat. If I run out of DN, I'll use Devcon until Dick Nite begins selling again. All clearcoats have a learning curve to get best results and these are the ones I know how to use without the 'drama' of hit-or-miss results.
-
Most crankbait "laws" are true only to a point. If you move the line tie too close to the nose of the bait, it becomes uncontrollable, blows out and begins to spin. I agree with Skeeter that the lip is too large if you want a medium diver (8-12 ft). My guestimate would be 15-18 ft for that lip size. And your comment that it's balsa reinforces concern about the weight. Balsa has a lot of buoyancy and you want a slow rise. A float test with all the hardware installed would give you useful info. Hang lead on the belly treble until you get the rise speed you want, then you'll know how to doctor the ballast on this one, and what to plan for subsequent ones (of course you weighed and noted the original amount of ballast!). There are things you can do to this bait to start you in the right direction without starting over. If the line tie wire is not solid, run a bead of 2 Ton Devcon along the bottom of the lip to anchor it. You can also bend the line tie toward the nose to get a little more action. Add to or move the ballast around. Keep tinkering until you get it going in the right direction, then build another bait to address things you couldn't change on this one. Soon you'll end up with a killer bait!
-
I make a lure similar to yours - Poe 400 style body with a big circuit board lip. My lip is wider but otherwise looks pretty similar. One thought I have is your ballast may not be enough to stabilize the lure. Mine weighs .95-1.0 oz and has an integrated belly hanger plus added ballast in the chest. The added chest ballast changes the swim attitude of the bait to more head-down, which increases the wiggle. So if I were tinkering, I'd first add .2-.25 oz of ballast in front of the belly hanger, getting the weight up to around .75 oz. - and see how that works. You definitely want slow float buoyancy. If it starts to wiggle but feels like it's "staggering" on the retrieve, even more ballast tends to steady it down. I was surprised to learn how much ballast a big crank with a very big lip takes. When you get to baits designed for 20 ft depth, they live by different rules where fore/aft balance and slow float ballasting are critical. BTW, the line tie should be about 45-48% of the distance from the nose of the bait to the end of the lip.
-
All of the "Lexan" (the G.E. brand of polycarbonate, the generic material) that I've seen comes with adhesive paper or plastic protection on both sides of the sheet to prevent it from being scratched. Polycarbonate will bend and remain somewhat bent after heavy stressing but it will not break. It just is not brittle like plastic. That's why Lexan is used for safety glazing in windows. I think G.E. invented Lexan for cockpit canopies on P-51 Mustang fighters.
-
I think epoxy makes a superior undercoating if you use one that has enough cure time to brush it on the lure, and which will level out to form a nice smooth surface. 5 min epoxies do neither. The only time I ever brushed on 5 min epoxy was by mistake when I picked up the wrong syringe. It was a disaster.
-
Hook Hangers In Balsa Punker And Delta Rat-style Balsa Baits
BobP replied to Cthulhu's topic in Hard Baits
JMHO, if you're going after 'teeners', it should ideally be thru-wired. My backup to thru-wire would be using hand wound screw eyes of maximum length epoxied into maximum density balsa. As far as ballasting, it's impossible to determine how a bait made from a specific batch of wood will float unless you do a float test. It can tell you where and how much to ballast the bait, which makes the difference between a great bait and an 'also ran'. Test after the bait is waterproofed but not yet painted. Install all hardware and trebles. You can use pins/tape to move the ballast fore/aft. On most walking baits, the ballast needs to be behind the belly treble - typically about 2/3 of the distance from the nose toward the tail of the bait. At that position, you can adjust the weight so the lure sits in the water at any attitude and depth that you like. -
I'm sure it will work fine as a glue and probably as a sealer if you use the slow cure variety. Nobody has reported on yellowing yet, so I wouldn't use it where it will show on the finished bait.
-
IMO it's fairly easy to do without an expensive rod lathe. I didn't want to "get into rod building" but wanted to build a few rods, and built 15-20 over the last decade. You need a couple of V Blocks on which to manually rotate the rod while wrapping the guides. I do think a home-brew motorized stand to rotate the rod while the epoxy cures is almost a necessity. I made one out of a 10 rpm motor, a piece of PVC pipe with end cap, and 3 thumb screws tapped into the PVC. Wrapping guides is straightforward once you see how it's done. And assembling handles is easy once you shape the parts to fit. I used a carriage bolt and washers to build grips out of cork rings; shaped them by clamping the bolt in an electric drill held in a bench vise. Foam grips should be easier. Look at pre-made foregrips to use as the grip on a split grip rod. I recommend U-40 Rod Bond epoxy paste for assembling the handle. It has a long work time, doesn't drip out, and is very strong. In my experience, you only save money building on blanks in the $100+ category. For rods built on less expensive blanks, the factory probably sells it cheaper than you can build it. So on the $200 Cumaras, you're in the right price neighborhood but if you want a rod with an action just like a Cumara, you'll have to find a Cumara blank (does Shimano sell them? I suspect not). Otherwise, you need to do research to see if you can find a blank with similar attributes. If you buy a high quality blank of another brand, you should be able to build a rod that exceeds the Cumara's blank quality for $200. Take a look at the Rodbuilding site for more info/answers - http://rodbuilding.org/list.php?2
-
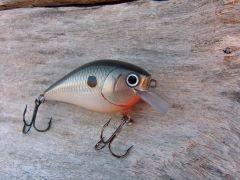 Super nice shad pattern!
 -
I use an Iwata HP-B .2mm and an Iwata Revolution .3mm
-
I'm sure a 125 max psi tool compressor with a 3 gal tank would be more than adequate. Different airbrushes require different CFM's but they are all tiny compared to most air tools. It will be fairly loud when the compressor runs, but a tool compressor seems to be the price/performance leader for airbrushing when noise is not a big factor.
-
I shoot Createx, Smith Wildlife, Polytranspar, Van Dyke - you name it - through my .2mm airbrush at 40 psi (or less) without thinning. The only acrylic paint it won't shoot are those with large metallic flakes like Smith Pearl Chrome. For that I use a .3mm tip airbrush.
-
http://www.howtoairbrush.com/index.php/site/lesson/compressors_for_airbrushing/ Ben, I'm not familiar with CFM's but there are airbrushing sites (check the above link) where you can explore what compressor might be ideal for you. In my amateur opinion, Max 40 psi is too low because the sustained psi of a small airbrush compressor is usually 10-15 psi less than Max Psi, or 25-30 psi in this case. Small airbrush compressors can also tend to pulse air rather than supply a constant solid air stream. I for one want a compressor that will supply at least 40 psi sustained. Of course, there's more to a compressor than just the psi - you also want to think about how noisy it is for your environment, whether it is oiled or oil-less, what connectors, filter and pressure regulator is supplied (if any), size, etc.