


BobP
-
Posts
5,782 -
Joined
-
Last visited
-
Days Won
193
Content Type
Profiles
Articles
TU Classifieds
Glossary
Website Links
Forums
Gallery
Store
Everything posted by BobP
-
Coating thickness - Yep, it is much thinner than DN. However, it is also slicker, tougher and so less prone to hook rash. I dip in DN which I guess yields the thickest coating possible per application, and it would require at least 4-5 dips to be as thick as D2T. But why would I? One reason I use the stuff is to get a more "factory look" finish.
-
I use an Revolution BR with a .3mm tip and it's super nice. Same all metal, high build quality of Iwata's more expensive brushes at a reasonable cost, without the bells & whistles that I don't find useful (like the "+" trigger stop feature on the HP B+ which I also have). Within the Iwata lineup, JMHO, just look for the tip size you need and the quality will be there.
-
Don't know the effect you're after, but one of the epoxies used by bait builders - Envirotex Lite (commonly termed ETEX here on TU) - is designed to make a very smooth, durable, high gloss surface. It is in fact a pour-on table top epoxy suitable for bars, etc. It's sold in hobby shops like Michaels and Hobby Lobby for around $15 per 16 oz.
-
I make baits in small batches of 2-6. You can buy pre-shaped lips but they never seem to be just the right size and shape for what I want so I cut mine from sheets of polycarbonate (PC) or circuit board. 'Rolling your own' is less expensive and you can get exactly the lip you need. Here are a few tips on cutting and shaping for those who might want to try it. First, start with a lip template. I draw lips with a freeware CAD program that prints them out in exact size on my standard inkjet printer - or I trace an existing lip. Transfer the drawn lip to a clear plastic sheet, cut it out and voila. I label the templates and keep a library of them for future use. I do lips one at a time (some glue sheets of PC together and gang cut them). Use an UltraFine Sharpie pen. Here's the trick. Remove the backing from the top of the PC, leave the backing on the bottom, and trace the lip directly onto the clear PC. Wait a minute after tracing the lip for the Sharpie to dry. You don't want to smudge it. If your lip is a model with the line tie out on the surface of the lip, include that point in your template, mark a dot where the hole for the line tie goes, and drill the hole next thing so you won't smudge/erase the dot later while handling it. I use Wiss metal shears (yellow handle straight cut, about $12 at Home Depot) to rough cut the lips. Cut about 1/16" or so outside the Sharpie line. Now you're ready to sand the lip to final shape. I use a fine grit Dremel sanding drum for this. This is where the aforementioned "trick" comes in. Sanding with a high speed tool will remove polycarbonate but it will not remove its backing, which tends to curl back from the edge you are sanding, obscuring the lip line. That's why you removed the backing from the top of the PC. On the other hand, if you also removed the backing from the bottom, the Sharpie line of the lip would be hard to see on a transparent surface. Leaving the backing on the bottom of the lip gives you a nice solid white background against which the line is easy to see. After shaping with the Dremel, remove remaining Sharpie ink with denatured alcohol or naptha. Other solvents (lacquer thinner, acetone) will cloud/melt PC, so don't use them. Finally, use a Dremel wool polishing cylinder to polish the edge of the PC. You're done! You can make very accurate lips with this method. It's not hard, it doesn't take forever, and it doesn't require the dexterity of a brain surgeon. Shaping circuit board is even easier because there's no backing to worry about and the material sands very easily. BTW, I use 1/16" PC and 1/32" circuit board for bass baits.
-
Expanded PVC (Azek is a brand) is used for exterior house trim and is sold at most home centers. It has a uniform structure (no grain), will not absorb water, and it floats. The PVC I've tried seems to have a density similar to basswood. IMO, how well PVC or any wood will work depends on the type of swimbait - wakebait, shallow diver, or sinking. It's mostly about how much buoyancy you need in the bait. Buying wood at a home center can be a hit or miss proposition. Sometimes you can find straight, close grained wood that is relative dry - but often not in my experience. Home center wood has been transported in bulk, often stored outside, and so has a much higher moisture content than wood from a specialist or hobby wood provider.
-
Club members can pay their periodic dues, billed automatically via PayPal.
-
BF, there's still a lot of info on the specific subjects you listed, both here in the Hardbait forum and in the Member Submitted Tutorials, which you can access using the menu bar at the top of the page. After you access the tutorials, go to the bottom of the page and change the time period from "Last 30 days" to "Since the Beginning" and you will get a wider range of topic to peruse. BTW, some topics on your list naturally show how confusing it can be to read topics by guys who build crankbaits differently. For someone just getting into the hobby, here are short answers to some of them, using a basic but perfectly good "build scheme". Glues - You can use Devcon Two Ton epoxy (aka D2T)to waterproof wood before painting, to topcoat the finished lure, and to install hardware. Some use other glues, but D2T can do it all. Woods - The most popular woods are balsa (for shallow baits where you want maximum buoyancy), cedar, and basswood (hardwoods that work well for medium and deep divers). For a first batch of baits, the good working characteristics of basswood are hard to beat. Hardeners - epoxy is a good hardener/waterproofer. Dilute it with lacquer thinner before brushing it on so it will soak into the wood better, but use it full strength as a topcoat and to install hardware. Materials - You can buy wood and paints at a hobby shop like Michaels or Hobby Lobby, or you can order it on the internet. Several companies like Janns Netcraft offer pre-cut wood blanks, lips and other hardware if you don't want to "roll your own". Paint - Probably 95% of all hobbiests use acrylic latex paint, and most of them apply it with an airbrush. It's non-toxic, easy to apply, quick to dry, and simple to clean up. The paint makes the bait pretty. The topcoat keeps it on the bait and makes it waterproof. Createx airbrush paint is the brand most widely sold and used, but there are other companies on the internet. Tools - I use a scroll saw, a sander, and a Dremel with lots of bits. Other guys use more, less, or different tools. It's about shaping wood, making it smooth, installing lips, ballasts, and hook hangers. There are lots of ways to do that.
-
By the way, Haz, that's a nice new avatar!
-
My initial reaction is "Huh?". I've been using miscellaneous brands of polycarbonate for 10 yrs and this is the first question I've seen about "UV stabilized". Maybe UV stabilized is an advantage in Lexan that is continually exposed to strong sunlight, say in a large south facing window, but I have seen no difference whatever among various brands when used for crankbait lips. JMHO, no cause to worry (or to pay extra for UV protected Lexan).
-
I doubt you can polish it out. I polish the edges of Lexan lips with a wool Dremel cylinder to clean them up but it won't polish Lexan to original status. When I want to clear a scratched lip, I dip it in Dick Nite polyurethane. Epoxy will do but you usually end up with a wavy surface - and it can yellow. As a practical matter, it may be less time consuming to install a new lip if you think it must be fixed. However, when it gets wet, many scratches disappear.
-
Got a pair of Vise-Grips? I use round nose wire pliers (avail at Michaels or other craft shops) to double the wire, slip it over a drill bit in a bench vise, then clamp the ends in Vise-Grips while I twist it.
-
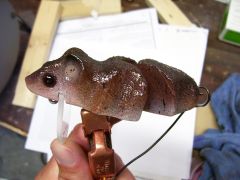 That looks real enough that my fishing partner would smack it with an oar to keep it from climbing in the boat! Nice carving!
 -
Actually, Loctite owns Devcon and that may be why Walmart stopped carrying Devcon and switched to Loctite. I'm not saying they're the same epoxy (who knows?). D2T works well but the main reason it's used for sealing wood is because you have it laying around anyway, waiting to use it as a topcoat. Any slow cure epoxy should work fine as a sealant, including a "30 minute" version of Loctite.
-
You have the basic technique but it sounds like you're shooting too much paint. Scales show up best when the base/top colors contrast, and gold vs white isn't much contrast. If you spray too much paint onto the netting and it soaks or pushes through to the underlying surface, you cover the base color and lose the effect. Try shooting it more lightly and dry it with a hair dryer while the net is still in place. After you remove the net, you can shade it into the back without erasing the effect. BTW, if you thin your top color paint too much, it can also be a problem. You have to strike a balance between thin enough to shoot smoothly and "dry" enough not to run or seep under the netting.
-
IMO, if they don't catch fish at least as well as commercial baits, it's a waste. So far, I'm happy. I try to build a crankbait that is significantly different from baits I can buy. Maybe a different action, maybe one that hunts on the retrieve, or one that's more durable, or comes through cover better, or one that mimics a discontinued classic bait, or even just one that doesn't cost an arm and a leg. Your custom made bait will be different. And many times, "different" gets bit just because the fish have never seen it.
-
Hmm, use soft wood and coat it? Or just use harder wood? Sometimes it seems to me that too many guys try to ice skate uphill.
-
Nice idea. I'm not so sure I'd change anything! Spoons roll, swimbaits swim. Both catch fish.
-
I'm pretty sure it's the same stuff, but if you want to be sure you can order from: The Old Texas Woodcarvers Shop - Wood Carving Tools - Carving Tools, Books I've ordered a couple of times from them and they have good service and a wide selection of adhesives, Dremel bits, etc.
-
I think these are the ones you want: Unpainted Crankbait Bodies, Unpainted Fishing Lures They're one of a very few unpainted bodies that I've been truly happy fishing. At 1/4 ounce, they are slightly smaller than a RC1.5 but have the same body shape and they run great. I have tried some of the Predator fat shallow baits. They are much larger, about 1/2 ounce, and the lip design is obviously not similar to any RC bait.
-
Ken, CAD is not necessarily a high-end deal. I use a freeware program called PowerDraw. Very basic but it draws lines, curves and circles to scale on a mm grid. Why CAD? When you print out the lip shape on a standard inkjet printer, it's the same size you drew in the program, so you can easily make a lip template from it. There are other freeware/shareware CAD programs, this is just one I found when I looked. There is a minor learning curve for using the PowerDraw drawing tools but it only takes minutes, not days, to get started. I was not satisfied with my accuracy in hand drawing lip templates and this helped a lot.
-
I think most "small" airbrush compressors are designed for graphic artists and nail painters. Something to sit on the desk inside the salon and shoot thin paint and dyes. IMO, 68KingFisher got it right and it needed to be said with emphasis. If $75 is what you have for a compressor, get a tool compressor. No question whatever that it will develop the pressure you need to paint crankbaits. And maybe you can use it on a spray gun, fill auto tires, drive a brad nailer, etc. Yes, you can find an artist's airbrush compressor that delivers 40 psi constant working pressure, 50-60 psi before you pull the trigger. They tend to be pricey. My Badger retails for $190 and manages just that minimum 40 psi. But the main point is that many beginners see "30 psi Max" advertised and get seduced into buying a $70 Chinese compressor. Then they pull the trigger and find that 30 psi means a working pressure of 15 psi, too low for painting crankbaits. To low for just about anything except dying Easter eggs.
-
I think installing the lip is the least sure-fire step in building a crankbait. I haven't heard of any great method if you're a hobbiest building a variety of baits. I use the laser level method on long lips and it works well if the bait body is symmetrical and the hardware is well centered. It's a big help if you can mark a small center dot on the tip of the lip. I use a CAD program for lip templates and that makes it easier to get an accurate line tie placement and a tip center mark. For short lips, I still eyeball it. Yeah, staring at the darned baits from different angles, deciding if the lip is really straight or maybe just a hair off to one side. I use D2T to install lips instead of 5 min epoxy. It gives me 10 minutes to futz around with them before it's too late! If you have a "perfect" crankbait with lip installed, you can probably make a jig mold in Bondo pretty easily that will work for a particular model crankbait. Mix it, lay some Saran wrap on top and press the bait into the mold upside down to get an impression of the back and the lip.
-
These look like the 1/4 oz shallow fat plastic bait sold by Jann's Netcraft. One of the better running shallow blanks available. No gift required, I have some!
-
I bend the wire around a drill bit clamped in a bench vise, pinch the ends in vise grips and twist away while exerting moderate pull on the pliers. It's easy to twist even hard stainless up to .0403" diameter so I don't feel the need for an electric drill or hand brace. The wire is warm after twisting - maybe that's the strain tempering you mentioned?
-
Silverdoc, I own 50% of McMaster-Carr's outstanding common shares. Not! I do like them because the prices seem fair, the shipping is reasonable and fast, and they carry a bunch of stuff. I think their warehouse is in Atlanta.