


BobP
-
Posts
5,782 -
Joined
-
Last visited
-
Days Won
193
Content Type
Profiles
Articles
TU Classifieds
Glossary
Website Links
Forums
Gallery
Store
Everything posted by BobP
-
Well, there are "fondle baits" and "fishing baits". RIGHT NOW is the renaissance decade for crankbaits. There are more choices, myriad designs, innovations, better quality, hundreds of color patterns, etc. I'm not a sentimentalist and don't much care how a lure stacked up against others 25 years ago. If it doesn't catch fish, out it goes. If it was made in 1984 and still catches fish like crazy, well, gimme one! I understand sentiment for historically important crankbaits that were "leading edge" 25 years ago. No harm in that. Collect them, value them, reminisce about the fish you caught on them, pay big bucks to have a preservationist work on them. But I just want to catch fish NOW.
-
Applying heat to epoxy softens it for a few seconds but in the end it just makes it cure faster. Baking it makes it cure REALLY fast. You have about 3 mins after mixing D2T to get it brushed on. You can extend that to maybe 5 mins by thinning it with a few drops of denatured alcohol. Good news is you will be able to peel the epoxy off the lure tomorrow. Bad news is peeling will take off the paint too. You can spray thinned Dick Nite Lurecoat, a moisture cured polyurethane. Read up on it thoroughly before ordering any.
-
Haz, the 200 khz is the narrow high definition beam that concentrates the power of the sonar into the narrowest cone and shows the most detail. It is usually a 20 deg cone width (out of 360 degrees). The 60 khz beam spreads the same energy out into a wider cone that has less energy density and therefore shows less detail, but it can mark fish in deeper water (>600 ft). Most shallow water fishermen use the 200 khz beam most of the time. You need to remember that a 20 deg beam shows a circular area of the bottom that is only 7 ft in diameter in 20 ft of water. That's one reason many good fishermen use sonar mainly to discover COVER that SHOULD hold fish instead of depending on the sonar to actually FIND fish. Regarding fish shapes on sonar, you get a "hook" shape only if you pass directly over a stationary fish, as the beam passes over the fish and records its head, body and tail density. Most times, on most sonars, a fish looks like a WORM on your sonar (like in your pic!). At constant boat speed and sonar scan rate, the longer and thicker the worm, the bigger the fish. A bunch of worms is a school. Anything not connected to a bottom feature is suspected to be a fish. Maybe it's only seaweed but it's a fish until proven otherwise. Anomalous small humps on an otherwise flat, featureless bottom may also be inactive fish. There are lots of fine points about interpreting sonar images and a good source to peruse is the Tactics forum of the Bass Fishing Home Page. There are a couple of experts who often post sonar images with detailed and insightful interpretations.
-
I think Garmin and Lowrance have very good basic sonars. I've used a Garmin on the front of my boat for 8 years and it works great and has a nice sharp screen. Number of vertical pixels is where it's at when comparing sonar screens. The more pixels, the better the unit can distinguish fish from cover or the bottom. 480 x 480 is nice and can be had on some Lowrance units. If you add GPS into the mix, the field narrows. I'll only use Navionics map chips because they're the best - and Garmin uses a proprietary map chip, so they're out as far as I'm concerned. That leaves Lowrance, Eagle and Humminbird. BTW, the map chip adds an extra $100-150 bucks to the cost. Lastly, if you want Side Imaging, you are now down to Humminbird ONLY. The 797 is their base SI unit. SI is wonderful! I use a 987C on my boat and love it. But its big transducer has to be externally transom mounted so it can "see" out both sides of the boat. That's usually do-able on most boats but not always. And guys want to protect that expensive SI transducer from damage (replacement cost $200), so many mount it in a protected higher area and operate a 2nd thru-the-hull transducer when cruising on plane. A Hbird switch connects both transducers to the head unit. The 797 uses an external GPS antenna you need a place to mount. The good news is the 2009 Hbird antennas are now 50 channel and give a VERY exact position (within a very few feet). Anyway, when all is said and done, your $800 797 is now $1000 after adding the 2nd transducer, Hbird switch, and $100 Navionics map chip. To me, GPS and SI are worth the expense and hassle because of where and how I fish. Both features can make you a much more knowledgeable and productive fisherman and a little safer on the water. But they aren't for everyone. You need to decide if those features provide info that fits the way YOU fish, as well as your budget.
-
Can't help on gluing paper onto foil but can give you some basics about ballast. Ballast is weight (usually lead) you install in the belly of the bait to make it float upright in the water. It also balances the body of the bait against the forces exerted by the lip, to swim better. Lastly, it gives the bait more "throw weight". Most guys put ballast near the belly hook hanger - in fact, many build baits using a hook hanger that is cast into a lead ballast weight which is epoxied into a hole in the belly. But you can drill separate hole(s) for the ballast as you wish to affect the bait's performance. With the lip and hooks installed, you can find the natural balance point of the bait without ballast. Slowly push it off a flat surface and, when it begins to tip off, that's the balance point. If you put the ballast in front of that point, it will give the bait a more head-down attitude in the water. Installed at the balance point, it will make the bait sit level and give the bait an "X-ing" wiggle around that point. Changing the float attitude of the bait has a big effect on how the bait swims, so choosing the placement and amount of ballast is important. Too much ballast deadens the action. Too little makes it uncontrollable.
-
No, you can use the D2T directly over the acrylic paint, no reason to "seal" it with anything. They only time a clear acrylic paint would be useful is if you painted anything on the bait with a solvent based color AND you were using a clearcoat containing a solvent, in which case the color would run.
-
After removing finish from several lures coated with D2T and Dick Nite, my opinion is the Dick Nite is tougher. It adheres better to acrylic paint and has a slick finish that is more resistant to hook rash. Is it quicker? Depends on how you measure - time of actual work on the bait or time waiting around for finish to harden. DN is faster to apply if you dip lures but it's much slower to completely cure (about a week) compared to epoxies (about 24 hrs). The Dick Nite lure can be handled in 4-5 hours, seems hard in 24 hrs, but the moisture cure takes days to complete and it's what makes Dick Nite really tough. On a saltwater bait, I'd plan on 3 dips, each spaced 24 hrs apart, followed by a week or two to fully cure out. If you rush the dips, you can get wrinkling and bubbles ruining the finish. But with 3 fully cured dips, I'd put Dick Nite up against any clearcoat, factory baits included.
-
I use a Badger 180 airbrush compressor that I was given. Why do I like it? It was free! But it does have auto shut-off and develops 45 psi working pressure. It doesn't take up much room and I can store it on a shelf in the garage. If I were buying one today, it would be a small tool compressor with a 2 gallon tank (I don't care about the extra noise since I paint in the garage).
-
Hey, carve away! But if you hole it, it's done. I don't think the plastic is thick enough to carve deep enough to alter the action much. And unless you carve out large areas, the integrity will still be OK. I haven't done it in plastic but plenty of us carve wood bait details.
-
I build for myself and friends. If it's enough for a friend to notice, it gets repainted. If I let it go, it just sits in the crank box whispering "Fix me! Fix me!" until I give in. Sometimes I hate the little #9!@#!
-
My issue is how would I know the blank is an actual St Croix SCV blank (blem, 2nd or whatever) SCV's are super light and have very crisp actions. I like them! But I don't think there area many guys, even rod builders, that can grab an unfinished graphite blank and tell you just what brand, grade and model it is. Trust the builder 100% or take a pass.
-
JMHO, it's more of a hassle to ship a rod back and forth to the builder than it is to just fix something like this yourself. Cut the last cork ring off with a single edge razor blade, reglue the weight and epoxy the cork back on the butt. It's what the builder will do anyway. I stick 3 pins through the cork to hold it temporarily while the new epoxy cures hard. You can stretch rubber bands from the pins if you want to apply more pressure to the joint. Wipe off any excess epoxy with solvent. You can fix the problem in less time than it will take to pack the rod and run it over to the post office.
-
I don't know of any Shimano rebuild kits, just separate parts you can order. You should always do a 100% disassembly, cleaning, and relube before you order parts. It's amazing how often that will bring a reel back to factoryfresh - or even better. On the other hand, a reel with new parts will still work like crap if it's dirty. On a Curado, the things that wear fastest in my experience are the drag washer, the brass brake ring, and the copper pad under the cast control knob on the right side of the reel. Smooothies are a great replacement for the drag. You can polish out the brake ring. It will last much longer and work better if you wipe the ring with solvent and dress it with a Qtip wetted with a drop of bearing oil whenever you lube the bearings (2-3 times per year). Flipping over the copper pad is usually enough to get the spool spinning easier. As far as bearings go, the ones getting the most wear are the 2 spool end bearings. I've used Curados for 10+ yrs and never had to change the bearing next to the spool. I can get bearings up to snuff 90% of the time soaking them in aerosol starting fluid and spinning them on a pencil tip repeatedly. If they refuse to spin smooth after 4-5 iterations, buy some 3x4x10mm ABEC7 bearings to replace them ($7-8 each). Reel lube products are critical. I use Superlube grease, Yellow Rocket Fuel or Reel Butter for bearings and Shimano Drag Grease for Shimano fiber drag washers (but not Smooothies). The thick sticky drag grease is important if you want a smooth drag - it's very different from standard grease. You can also use it to lube the main gear teeth, or break in a new pinion/main gear set.
-
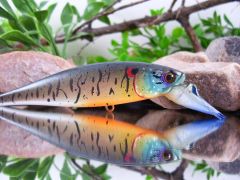 Nice pattern! I bet a smallie will climb all over it.
 -
Foamy, no need for any of us to get testy. Spike was just doing his job as a TU moderator, which is to have lure pics displayed only in the TU Gallery unless they are being used to illustrate a point in a forum discussion about crankbait building. There are hundreds of folks sharing information here on TU. We all can benefit from the shared knowledge but there has to be some organization so guys can contribute info in a way that others can find. It just takes a little good will and willingness to work within the framework that TU has developed.
-
Megan, sure! Some do ONLY repaints. Some are interested in modifying commercial crankbaits and repainting them. Some buy all the components, assemble and paint them. Some want to start with the tree and end up with the lure Most of us jump in at one of those points and then branch out as we gain experience and find other things about lure building that interest us.
-
I'm wary about "max air pressure". You often find that the working pressure is about half of what manufacturers say is the max pressure on an airbrush compressor. If true on the Aztek (I've never used one), you would be shooting paint at 20 psi. Now, that's a do-able pressure but a lot of crankbait guys prefer to have 30-40 psi available. I think for $100 you can find a double cylinder Chinese airbrush compressor with more working pressure. I know several have been recommended here on TU, which you might find through the search feature. If noise is not an issue, you can certainly find several tool compressors in the $80-100 range that will put out more working pressure than you'll ever need. Slap a $20 pressure regulator and a moisture trap on it and you're in business.
-
Sox, you can buy wood blanks from several sources but you'll have to buy the lips separately and cut the lip slots yourself. On flatsided baits, that's not difficult with a bandsaw or jigsaw. On fat round baits, it can be a pain to get them straight. Janns Netcraft sells a painted plastic crankbait, the FS Medium Diver Body, which has a circuit board lip and costs $3. They also sell some precut circuit board lips. You can also find unpainted plastic bodies that have very thin plastic lips that mimic some of the effect of circuit board.
-
I haven't tried it with my airbrush yet. You can get similar results by dipping a toothbrush in paint and thumbing the bristles to flick paint on the lure. I'm not sure which method is more controllable.
-
1/32" thick circuit board is my choice. You can buy sheets from mcmaster.com (yellow) or asp-rocketry.com (white). Draw the lip shape on the sheet, rough cut it with metal snips and finish it off with a Dremel sanding drum.
-
Don't know why not. I wouldn't throw away all my airbrush paint if it froze sitting in my garage, unless I tried it afterwards and found it wouldn't shoot or adhere after thorough mixing.
-
Teak oil is used on teak as a top dressing to maintain its golden brown color. It's not a finish and is not meant to be coated with other finishes. I don't think acrylic paint or most clearcoat finishes will adhere to it. There are several proven choices for undercoating - epoxy, poly, various wood sealers, propionate. Why not use one of them?
-
Not saying DON'T use Devcon, just you don't NEED Devcon:) Nobody builds baits exactly the same as anyone else. Some use a first coat of epoxy and cover it with Dick Nite, feeling the epoxy levels over any little rough spots, and the DN makes it tough and shiny. They're right. It's what they've chosen to make a bait they feel is bulletproof. Somebody else feels 2-3 coats of Dick Nite or multiple coats of Etex epoxy make a perfect finish. They're also right. When TUers discuss finishes, opinions run wild! There's more than one way to get a beautiful durable finish.
-
You don't need Devcon. Brush on 3 coats of Dick Nite and you're done. Wait 24 hrs between coats, then let the bait cure for a week before you fish it so the poly can moisture cure. The only reason I'd put Devcon on first is if the lure had a rough surface and I wanted a coating that leveled out over the rough spots to hide them.
-
Choices - JMHO, any of several clearcoats work well. Here's a thumbnail sketch of the 3 most popular. Devcon Two Ton is probably the easiest to use and it's available at Walmart. It's sold as glue in a 30ML double syringe and it cures the fastest and is the thickest. Envirotex Lite, aka ETEX, is an epoxy designed for coating table tops. It's sold in two 8oz bottles at Lowes and Michaels. It also works very well but is thinner and takes longer to cure because it comes with solvent in it so it can be poured onto table tops. Most guys brush on several coats of ETEX, or one coat of Devcon. Another choice is Dick Nite Lurecoat, a moisture cured one part polyurethane. It gives a slick, glossy coat that is very tough. Most apply it in 2 or 3 coats, 24 hrs between coats. Dick Nite is probably the closest to a "factory look" finish. All of them have their quirks, so you should do some homework with the search feature before you use them.