


BobP
-
Posts
5,782 -
Joined
-
Last visited
-
Days Won
193
Content Type
Profiles
Articles
TU Classifieds
Glossary
Website Links
Forums
Gallery
Store
Everything posted by BobP
-
lurehardware.com is a source if you're looking for premade integrated ballast/hook hangers. It's easy enough using .040 soft brass or soft stainlless steel wire (aka safety wire) to do wire frames. mcmasters.com is a good source for that and for polycarbonate or circuitboard sheets.
-
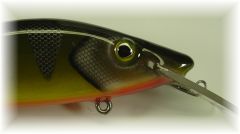
 That's a beautiful bait! Beauty is as beauty does, so it's even prettier since you got it to do what you want in the water First class.
 -
-
-
 Man, those are real beauties!
 -
-
When I googled it, only one source came up and it's in GB. Most TU users get cellulose propionate in pellet form from SWEDE, a TU member, and mix their own by disolving the pellets in acetone.
-
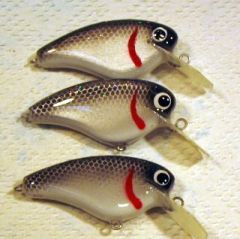 Very nice! I like fishing small crankbaits like that....they catch fish Those look like high quality baits.
 -
I think Swede's way will insert a LINK to Photobucket which viewers can click on to see your pics. If you want actual pics in the TU Gallery, go to that section of the site and click on the UPLOAD button. It will prompt you thru it. Insert the CD into your computer and you can browse thru the pic names, chosing the ones you want to upload.
-
It's less work to glue it in after painting, so you don't have to mask off the lip. On baits with large lip slots, I glue it in first so I can fill in the sides of the lip slot and paint over it, making for a more sleek appearance.
-
I can't speak about the quality but JMHO, if this is to be your only airbrush, you may find the .2 MM tip is too fine. My .2 MM Iwata HP is great for detail work but not for basecoating colors all over a bait. I think an airbrush with .35 MM or larger tip would be better for all-around crankbait painting.
-
Yeah, aluminum foil duct tape makes things easy compared to silver or gold leafing, IMO. I lay the bait on the tape's paper backing and trace its outline, then cut it out with sissors. Flip the first piece over so the foil is up and trace the opposite side. Peel the backing, and apply. Trim it with a razor blade to get both halves exactly the same because positioning the foil on the bait is not an exact science, at least not for me! Texture the foil with the threads on a 1/4" bolt or whatever you like. I usually paint directly on the foil but be careful because it doesn't take much to knock the paint off the slick foil afterwards. BTW, if you want GOLD, shoot a light coat of transparent yellow Createx on the foil. Other transparent airbrush colors can give you some nice effects.
-
On a typical 2 1/4 " bass bait, a Devcon clearcoat is about .025 oz. That's not an issue since I build my baits to a "target weight" within 2-3 hundreths of an ounce. You can thin Devcon for a thinner coating with a FEW drops of lacquer thinner, acetone or denatured alcohol. I don't do it because it lengthens the cure time and I want the thick clearcoat for durability. I haven't had any problems using Devcon to clearcoat repainted plastic baits as long as I remove the old finish first (except suspending baits). That said, ANYTHING you do to a bait changes its performance. I don't repaint, reclearcoat or otherwise mess with a great crankbait unless it's on its very last legs, and I'm more likely to patch it than refinish it. A viable alternative is polyurethane. Very clear and durable polys are now available, like Dick Nite, etc. They produce a very thin clearcoat that's close to the thickness of most commercial plastic baits.
-
You didn't say whether the bait were flat or round (round will carry more ballast than flat) but I agree with Benton about the 1/8 oz. I put .10 or .11 oz in 2 1/4" flat balsa baits and the final weight is .30-.32 oz without trebles. Of course, how you finish the baits and what lips you use also makes a difference.
-
I used it and it yellowed more than Devcon Two Ton, plus it's slower to cure. At around $2 for a double syringe of Devcon at Walmart, why not use that and save the Flexcoat for rodbuilding. JMHO
-
Whtglv, run it by the house (Summerfield) and I'll take a look, clean the big stuff and lube it for better performance. Takes about 1-2 hrs. No charge. Send me a PM if interested.
-
I got a 987 sidescan/chartplotter/sonar last winter. Yes expensive, and yes, it's worth it if you use its capabilities. No other system lets you cruise a bank 150 ft away, see all the structure and move a cursor to a likely target and mark it on your GPS. All without driving the boat over the fish. If you're a structure fisherman, that's worth its weight in gold. Cruise a creek arm with both side beams running and map the whole thing in one pass. I've had no issues with mine since installation and haven't heard or read about any glitches or qualtity problems from other users. I use the Navionics Hot Spots Premium map cartridge, which is the best for inland fishing and seems to be "right on" as far as accuracy of the map versus observed depths from the sonar. The new model 997 has a brighter screen and higher frequency for the sidescan beams, for a bit more detail. If there is any "issue", it's where to mount that big transducer. I put mine down on the back of the boat's pad like a typical transducer. It reads to about 50 mph and no problems so far. Some guys put theirs higher up on the motor bracket so it's out of the water at speed and is less prone to impact damage (you can't sidescan at speeds faster than 5-6 mph anyway). The transducer is a $200 item. They then install a thru-hull transducer and a Hbird switch to select between the two. Just remember you need a clear shot out BOTH sides of the transducer. Putting it on the trolling motor is not recommended since swiveling during a run distorts the side image. I think the large screen units are worth the added expense to get more info on screen, but I haven't seen the small screen units in operation. IMO, Hbird has really upped quality since the company was acquired by Johnson Outdoors a few yrs ago. There's a Yahoo Group dedicated to the sidescan units that is frequented by Hbird engineers, if you have specific tech questions.
-
-
-
Many hobby builders use Devcon Two Ton epoxy or Envirotex Lite epoxy for a durable clearcoat. Devcon 2T is sold at many Walmarts in a 2 part syringe for about $2. Mix thoroughly, brush it on and rotate the bait for the first 45 mins. If you want to dip finish, Dick Nite Fishermun's Lurecoat moisture cured polyurethane is an alternative. There's often an advertising link to the Dick Nite site here on the page, and you may be able to get a sample package of it for the cost of shipping. There have been numerous discussions of these finishes on TU, do a search on them for further info on application techniques, pros-cons, etc
-
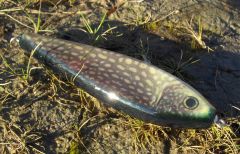
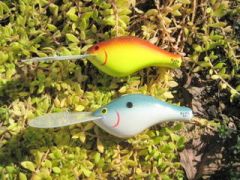 Well.....I don't know except to say "real deep". I was fishing a lake where 40 ft off the bank sits you in 50 ft of water so couldn't bump bottom to verify it. I know it's much deeper than a DT-16. I'm shooting for 20+ and the lip angle has alot to do with it. The chartreuse bait's lip is set at 10 degrees. The pearl bait's lip is at about 3 degrees and is glued to the very top of the old lip slot. However, it has less exposed length. I was worried the chartreuse bait might not swim because the line tie is only slightly less than 50 % of the distance between the nose and the tip of the lip. "Standard" would be around 40%. But it swims nicely and stays deep - in fact, it swims way under the boat when retrieved, which is a good sign. So now I gotta rethink another "rule" I'm guessing the huge lip area in front of the line tie is functionally similar to a longer lip front. I haven't tested the pearl bait yet. I enjoy modifying commercial baits to make them do tricks, probably 'cause I hate shaping lure bodies!
 -
http://www.nationalbalsa.com/prod_type.htm Welcome to the site. You can find some woods like cedar or pine at your local home center. If you want to order online, above is one source for balsa and basswood. There are other sources if you do a search on Google, etc. I found it easier to start out with a hardwood like basswood. You're more prone to make irreversable mistakes on a soft wood like balsa. Basswood is easy to work and its tight even grain sands beautifully.
-
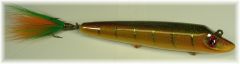
 Throw it? Ha! VERY pretty bait!
 -
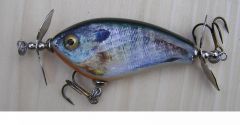
Poe 400's refitted with lips similar to a Brian Bee 24, hence the name. Extra chest ballast for a nose-down attitude when (barely) floating. The chartreuse/brown ran deep with good action and completely under the boat on retrieve (that's a good thing!). Weigh .94 oz with #2 trebles.
-
Wood filler - I use Elmer's water based Indoor/Outdoor on hardwood. If it's a HUGE void, you'll need to build it up with a couple of coats. First rule: everything you do to it changes a bait's performance in some way, no exceptions. Second rule: do whatcha gotta do to make the bait fishable. The worst that can happen is you mess it up beyond repair or so badly that you can't fish the bait with confidence. The silver lining is you'll learn something you'll need for the next bait.