


BobP
-
Posts
5,782 -
Joined
-
Last visited
-
Days Won
193
Content Type
Profiles
Articles
TU Classifieds
Glossary
Website Links
Forums
Gallery
Store
Everything posted by BobP
-
I use 1/32" G-10 or G-11 on most shallow bass baits and have never had one break or fracture. Maybe not as absolute tough as Lexan, but plenty tough enough. G-10 aka FR4, Micarta, circuit board. Most G-10 is differentiated by the substrate used, fiberglass, linen, carbon fiber, etc. The substrate largely determines the color but it's all waterproof and all types have similar physical characteristics and strength (in fact, G-10/FR4 is itself a defined standard for strength and other physical properties). You can get a fair description of the various "G" materials at the mcmaster.com site, where it's also for sale. Their G-10 is a dull yellow and their G-11 is a yellowish green. The trick can be finding a source for the color you want
-
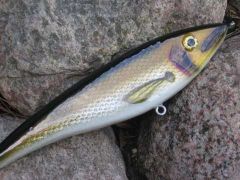 Outstanding realism! Whether it's your first bait or your 1000th, it's a nice looking bait.
 -
I seldom do this because I believe wood baits should usually not have rattles. But there are various ways to do it. Many use a preformed or commercial brass or glass rattle, drilling a hole and epoxying it in. But most rattles are too long to fit a 3/8" wide bass bait and besides, I find the tube/worm rattles are not very loud encased in wood and epoxy. That's the reason they call them "ticker rattles" - you can barely hear them! The method I use (hardwood baits only) is louder but more labor intensive: Drill a hole through the bait large enough to easily accept a 5mm glass bead. Smooth the inside with a Dremel stone. Cut 2 covers about twice the hole's diameter from an aluminum Coke can (plain sissors do nicely). Recess the areas where the covers will fit slightly with a Dremel high speed cutter. Epoxy one cover in place with 5 min epoxy and let it cure. Put in the bead and epoxy the other side. Don't epoxy the bead! When cured, cover the side areas with wood putty and sand smooth. The glass bead hitting the aluminum covers produces more noise than you hear from most wood bait rattles. It also puts out a definite little shock wave you can feel if you rattle the bait while holding the sides. I think that's a good thing. I've tried steel and lead shot but it can unbalance a small bait, so went to glass. It's just as loud, maybe louder. For balsa bass baits, I usually have too much thru wire harness and ballast inside to accomodate a rattle.
-
I read a tip on one of the "airbrush user sites" saying to use your Dremel and 1200 grit sandpaper to remove corrosion and resurface the point on an airbrush needle. You're supposed to chuck the needle in the Dremel and touch up the tip while it's spinning. Hey, I use my Dremel for most of my crankbait making chores, so...... DON'T DO THIS ! The needle for my Paasche VL spun up, wobbled a split second and then bent over 90 degrees. After an hour bending and banging, I think I got it back to near straight. Needles are made from fairly soft steel. If it isn't perfectly balanced, or if your Dremel is not perfectly balanced, spinning it at 20000 rpm is not gonna be a good experience for you - or the needle.
-
Quick Tips...take em all, but leave one of your own!
BobP replied to fatfingers's topic in Hard Baits
Cut a piece of bill material as wide as your bait and about 1" long and drill a hole in one end for a wire hanger. Stick it in the bill slot and use it to hold and hang the bait while undercoating, airbrushing, and while the paint dries. It's handy to grab it with locking forceps while airbrushing, and it keeps paint out of the slot. Apply a little blue painters' tape to the false bill to get a friction fit if necessary. -
I don't want to get into the "Original Wart" versus "2 piece Wart" versus "Even earlier but not Original Wart" debate ( IMO it's 75% hooey ). But the hot ones are the original Wart one piece mold models. I've got some of each series and find the originals were hard to tune and often were duds. But there's a bunch of guys out there getting them reconditioned and repainted rather than buy new ones, and prices for the old ones are going up fast. Storm now sez they've gone back to the original one piece mold but afficionados are doubtful. Since molds don't last forever, I wonder how many times the molds were changed back when Storm was making the Irreplaceable Original Wart? You gotta laugh at the craziness surrounding baits sometimes!
-
I don't soak brushes, I aggressively clean them in acetone or lacquer thinner and brush them out on a piece of cloth until they are dry and all the bristles have separated. Some of my brushes have clearcoated 100 baits and are still going strong.
-
I use anything that's the right color. Createx or Translatex are what I have right now but I'm not particular. I even use "hobby acrylics" like Apple Barrel to get specific shades. The Iwata handles them fairly well without clogging. But a Paasche VL or Badger 175 handles the coarse paints better so I use them for white basecoats and other "all-over" paint coats.
-
The simplest and safest paint is water based acrylic latex. Createx brand is formulated for airbrushes and is widely available. You just put it in the brush and fire away. Thin with water if needed. Any acrylic formulated for airbrushes usually works equally well. You can also use any acrylic paint including the "hobby acrylics" that are sold in 2 ounce bottles. These paints are cheaper and come in a wider array of colors. Once they're on the crankbait, there is no difference between them and more expensive paints. I guess even latex house paint will work if thinned. The main limitation with hobby acrylics is they often contain larger particles that can occasionally clog an airbrush. This isn't much of a problem with the typical Paasche VL or Badger brand brushes but can be an issue if you use a detailer's brush like an Iwata HP.
-
Quick Tips...take em all, but leave one of your own!
BobP replied to fatfingers's topic in Hard Baits
A Dremel tool chucked with a straight piece of ss wire is a quick way to remove epoxy or polyurethane from hook hangers. Two tricks can maximize the holding power of epoxied bills. Drill a small hole in each corner and fill them with epoxy when the bill is glued. The epoxy forms 2 posts. Second, sand the bill area that will be epoxied. It removes any contaminants and gives the epoxy much more bonding surface than a slick bill surface provides. It's a tip borrowed from rodmakers who sand the parts before gluing up reel seats. -
Quick Tips...take em all, but leave one of your own!
BobP replied to fatfingers's topic in Hard Baits
Building good crankbaits is about getting the details right. Buy a $20 digital gram scale off Ebay. Weigh all your components and the finished weight of your crankbaits and write it down in a notebook, along with notes on features that you used in that batch. I weigh components to a 100th of an ounce. It's the best way to get real quality control over building and tweaking later versions, or recreating crankbaits that turned out to be good performers. It also gives you a index to compare things like different trebles, split rings, epoxy finishes and diving bills. Believe me, after you build 20 crankbaits you will not remember exactly how you did the first one. If that one was the "wondercrank", you'll be one sorry son-of-a-gun if you don't know how to do it again. -
Any of the Iwatas with a 1/16 oz gravity feed cup will hold enough paint for 2 or 3 lures and when you need more, just squirt it in the cavity. I wondered about this too when I began considering Iwata but found that the HP-B+ I bought is just about "perfect sized" for painting crankbaits. I think you'll love the Iwatas. IMO, they're a cut above.
-
When all is said and done, why not just go to a Michael's Craft Store with one of their 40% off coupons from the newspaper and get yourself a cheapo $20 Badger single stage airbrush powered with Propel CO2. Spray your lures in the kitchen sink and clean up in 2 mins with a sponge and soap. OK, OK, I know ..... the sink is always full of dishes!
-
Badger 175T forr basecoating, Iwata HP-B+ for shading and details.
-
I second Cheesehead's recommendation to try aerosol paint. Spray looks better than brush unless you are Michaelangelo. Then, try stencils for the details. An exacto knife and a plastic sheet will do that. You can screw up a STENCIL and easily cut another rather than screwing up the lure.
-
Guys share info according to their generosity, commercial intentions, ego, paranoia, openmindedness or whatever else winds their clock. That won't change but fortunately there are enough generous builders and enough different opinions on TU to make it both fun and worthwhile to participate.
-
I just walked in from painting in my 50 deg garage and the paint was noticably thicker than in warm weather. But it's no biggie. Some airbrush paints tend to thicken in cold temps but Createx is pretty good. If you feel it's too thick, just add a few drops of water to thin it. Drying baits -no need to dry paint on a lure turner. Flash dry them with a hair dryer if you want to speed drying between colors. Use the low setting so the paint won't crack or blow around on the lure. The lure turner is for leveling the clearcoat only. Alternatively, you can hang them tail down, then switch to tail up every few minutes until your epoxy starts to harden (about 30 mins with Devcon 2 Ton). It's a big plus to brush epoxy on at room temperature because it will make a much thinner coating and level better. I paint outside but taken them inside to clearcoat during the winter. Just don't get epoxy on your wife's kitchen counters or dining room table! Plenty of newspaper is the rule.
-
 I'm beginning to recognize which are your lures without reading your name - mostly because yours are colorful but have nice subtle color gradations and naturalistic paint schemes. Outstanding!
 -
Just like Blackjack says, but check whether the bait's is clear plastic - on a molded lipped bait, if the lip is clear, the body is too. Sand the bait with 400 or 600 grit paper, apply the new paint, and cloudiness from the sanding will disappear when the clearcoat fills in the small scratches.
-
Soft stainless steel is much softer than regular ss and just a bit stiffer than soft brass. I buy it from mcmaster.com It's as easy to bend and shape as soft brass. Either one makes good line ties. I use .040 brass or .032 soft ss for bass lures.
-
You can buy a full 4'x8' sheet from manufacturers but most hobbyists don't want a lifetime supply. mcmasters.com carries a yellow G-10/FR4 board and a yellowish green G-11 board in various thicknesses sized 12"x12". The G-11 is a little stiffer, tougher and costlier than G-10, which is the standard lip material. If you want white G-10, you can get it from asp-rocketry.com in 9"x12" boards. Most other sources I see for board only carry copper clad stuff for PCB construction. Plain circuit board in small sizes is hard to find online, IMO. BTW, circuit board uses various substrates including fiberglass, linen, carbon fiber and other stuff, which determines its color. All are waterproof and have similar performance characteristics for the particular type, e.g. G-10.
-
lurehardware.com sells integrated ballast/belly hangers in various weights.
-
Generally, you don't want to spray alot of paint when doing scales through netting. Just enough to get the effect. Spray at an upward angle at all times so paint bouncing off the lure flies up instead of downward on the rest of the bait. If you're shooting too much volume at too high a pressure, turn down the pressure. I spray my netting, flash dry it with a hairdryer while still in place, then peel it off and spray a solid back and shade the paint down the shoulders to look natural. I clean my brush with plain water from a spray bottle, with the hose attached and shoot water until it's clean. But disassemble and clean it thoroughly after you're finished painting.
-
It's probably similar to other "table top" epoxies like Envirotex Lite. I've used various table top epoxies but not this one. All epoxies have good hardness when fully cured. Regardless of "initial cure" time, they usually reach nominal hardness in 24 hrs and final hardness in about a week at room temperature. I can't comment on clarity, leveling, or UV resistance to yellowing.
-
Many TU guys use Devcon 2 Ton or Envirotex Lite. The Devcon 2T comes in a double syringe at Walmart for $2. Don't get Devcon 5 Min epoxy by mistake! Envirotex Lite comes in 2 ea 8 oz bottles sold as a table top epoxy at craft stores like Michaels. I've used both. Both work fine over water based acrylic paints. D2T cures to touch in 4-5 hrs and has a 5-10 min work time (brushing time). EL cures in 6-8 hrs and has a longer work time. The EL contains solvent and can cause solvent based colors to run. An EL clearcoat is usually thinner than D2T, so may require multiple coats depending on the application. Epoxy should be applied and cured at room temperature. The DickNite Lurecoat is a moisture cured one part polyurethane with rather demanding handling and application parameters, but it does yield a nice clearcoat. JMHO, the Devcon 2T has the shortest "learning curve" to get a professional looking clearcoat. There have been copious discussions on the above; search for more details!