


BobP
-
Posts
5,782 -
Joined
-
Last visited
-
Days Won
193
Content Type
Profiles
Articles
TU Classifieds
Glossary
Website Links
Forums
Gallery
Store
Everything posted by BobP
-
Dave makes a good point. Turning the belly hanger perpendicular to the axis of the lure instead of in-line makes it possible to mount the treble so it won't rash the lure as much - that is, of course, if you're using standard treble hooks. If you're using VMC "In-Line" trebles, they are configured so that they won't rash the paint on a lure with a standard in-line hook hanger. I mount the tail hanger on baits horizontal for the same reason - it lets me to mount the treble so that 2 tines sit equal side-to-side with one tine either up or down (you choose). I think the reason that the "standard" direction for a belly or tail hanger is in-line with the bait axis is that the hook hangers on plastic baits are inserted between the body halves when the lure is joined, so it seems natural to us that they "should be" configured this way, when in fact it's just a by-product of the construction process.
-
Sure, taxidermy acrylics work just fine. I use about 50/50 Createx and taxidermy paint and I like the taxidermy because they have colors, pearls, and flakes that you just don't see in standard color airbrush paints. Personally, I prefer to squeeze paint into the brush and fire away without mixing custom colors or thinning paint - the taxidermy colors usually come ready to shoot so that makes them very convenient.
-
Properly measured and mixed Devcon is what I use on trolling lures, which get the hardest use and are most subject to hook rash. Is it actually tougher than other choices? No, I don't think so. But it is thicker and takes longer for hooks to wear it down to the paint layer. MCU is tougher but the coating is much thinner and gets penetrated sooner than Devcon. In the final analysis, lures get hook rash no matter what the topcoat.
-
Etex Not Tacy But No Real Hard Can I Devcon Over It"?
BobP replied to bluedragon2k9's topic in Hard Baits
Etex and other "table top" epoxies contain solvent, and maybe your temp was not high enough to make it flash off the lures. Will it ever get really hard now? Maybe, maybe not. But a fresh coat of Etex cured at the correct temp will fix it IF it is measured correctly and mixed thoroughly. -
I bet the Pledge solves the problem. I tried using it as an extender for some Createx, got some in the barrel of my brush and had to use pliers to remove the needle after the stuff had dried and cemented the needle into the packing - so it's definitely not the same thing as the clear acrylics sold for airbrushes.
-
In my book, the main consideration in hook selection is whether the hooks can tangle and whether the front hook can foul on the lip of the bait. I don't want either. Body size per se is not especially relevant - it's more about where the belly hook hanger is located. I keep a variety of regular and short shank #6, #4, and #2 trebles on hand to solve the problem. There is a trend among fishermen to upsize trebles wherever possible, which I agree is advantageous but I also want the trebles to look "right-sized" for the bait. Dave is certainly right that the hooks you put on will influence its performance in the water. But the difference between a set of #6 and #4 trebles is usually about .02 oz, which isn't huge in the overall scheme of things. On the other hand, even very tiny differences in a crankbait can make appreciable differences in its performance, so some experimentation is a good thing.
-
Topcoats have been the #1 topic on TU for years. For a thin very durable topcoat, there is simply nothing more durable and glossy than moisture cured urethane for plastic baits. If you choose to go that way, you definitely should read up on application and storage issue with MCU. There are various MCU's and I've tried most of them. To me, the best by far is Dick Nite MCU, (S81), which you can buy direct with a TU discount here: http://www.dicknite.com/TU_Lander.htm Best practice with MCU is to use the "tap the can" method of storage and a quick brush-on, followed by hanging the lure to drip off excess and dry.
-
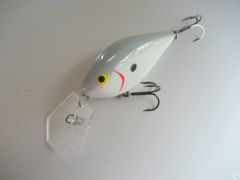 Kayjay, the lip is the same as the blade on a Chatterbait, except it is Lexan instead of metal. The line tie point is actually on the underside of the blade in the pic. When retrieving, the blade pops up at a 45 degree angle to the bait and begins to 'chatter' back and forth, shaking the body of the bait. I wanted a bait that would sink quickly and could be slowly retrieved along the bottom while chattering. An actual Chatterbait does this and basically is a jig with the added vibration caused by its blade. Barry - I know it won't work in weeds like a Chatterbait due to the trebles - but I wanted a bait I could fish deep on ledges without grass, or for suspended bass. What really prompted me to build it was having to buy expensive swimbaits to use as Chatterbait trailers. Just thought I'd try building a permanent shad type body and save the expense.
 -
Poplar has an average density of 26.2 lbs/sq ft, which makes it a little heavier than basswood or cedar (20-23), considerably heavier than paulownia (16), and more than twice as heavy as balsa (12). There's certainly nothing wrong with using it as long as its density is in line with the type of crankbait you want to build and the performance you want for that bait. That said, many bass bait builders would opt to use wood types that best suit the specific kinds of crankbaits we want to make, from balsa for shallow runners where we want a lot of lively action, to paulownia as an intermediate density wood for some baits, to the more dense woods like cedar or basswood for deep divers. Poplar, from what I read here on TU, is more popular among musky bait builders where its density is not overpowering the hardware on a large crankbait, as it can on smaller bass baits. But if you have poplar on hand and enjoy working in it, there's no reason not to use it unless its density becomes a limitation in building the bait you want to build. Dense woods in small baits are a particular problem because it is hard to add the hardware, lip, and ballast to one and still have them float or suspend. More buoyancy = more lively action in most baits, so it's a consideration. Not trying to talk you out of using poplar, just pointing out considerations. Working in different wood types is pretty much the same routine - but designing a bait is easier and requires less trial and error (i.e., fewer failed baits) if you have built lots of baits from the wood and have developed a feel for how it works/doesn't work in those baits.
-
Sure, drilling air holes increases buoyancy. However, there are issues. Where exactly do you need the extra buoyancy in the lure so that its performance will be increased, or at least not negatively affected? If those areas coincide with where you need to implant hardware, that's a problem. How are you going to patch the holes you create? Can you be sure to center the cavities so the lure will maintain its left/right balance? It's probably easier and more accurate to split a lure, make the cavities, lay in the hardware, and glue it back together than drill holes in the body and have to patch them I think the more finicky a lure gets, the more likely it is to have performance issues so I just bite the bullet and get the right wood for the specific style bait I'm building. The cost of wood is negligible compared to the other lure components and the work you put into building a crankbait.
-
Just an experimental hybrid. Basswood, .34 ballast, Solarez undercoat, D2T epoxy topcoat, Lexan blade. Total weight is .85 oz I want it to sink moderately fast and use it to replace a 3/4 oz jig head and a plastic swimbait. Getting tired of buying expensive swimbait plastics!
-
I get mine here and usually order some other carving supplies from them at the same time: http://www.texaswoodcarvers.com/Tool_Catalog/Adhesives.htm#Epoxy%20Glue
-
Tool compressors are more cost efficient than dedicated airbrush compressors but they work best with an air control valve calibrated for 0- 50 psi or thereabouts and a moisture trap. You can add a combo valve/trap for around $25. Of course, tool compressors are very noisy and most wives would call a time out on one inside the house. I use a 6 gal compressor in my garage and like the setup. If you decide a dedicated airbrush compressor is what you need, be sure to get one that advertises 50 psi or more. Manufacturers list the maximum pressure a compressor develops. They lose about 15 psi of air pressure a second or two after you press the trigger on your airbrush, so if you buy one of the cheap Chinese compressors that advertise 30 psi, the sustained pressure you will get out of it will be around 15 psi, which is not enough to shoot some pearls or flake paints reliably.
-
I put a small drop of reel bearing oil in the top and one in the hose inlet of my Iwata when the valve assembly begins to get sticky. Haven't noticed the brush blowing any oil onto my paint, so it appears to work OK. I don't think a drop of airbrush cleaner has any lubricating effect. In fact, it might exacerbate the problem since it just softens and relocates dried paint within the valve unless you rinse it out after application.
-
I often buy paint through taxidermy.net. It's a gateway site to an array of paint manufacturers who specialize in colors tailored to animal and fish reproductions. Most of the companies sell both a lacquer and an acrylic version of each color. The paints usually come ready to shoot (no thinning needed) and the cost is reasonable. Among the manufacturers Smith Wildlife is one of my favorites. You can mix and match acrylic brands with no compatibility problems.
-
calden, auto clears contain isocyanates which are very toxic chemicals. Most guys spray them, which requires advanced breathing protection. You pay your money and take your chances but your dipping regimen seems to avoid most of the dangers of breathing the stuff.
-
I prep plastic baits by doing exactly as you said. As far as MCU goes, i dip or quickly brush it onto a bait that is thoroughly dried with a hair dryer and then simply hang it up by its lip to dry. That allows all the excess MCU to drip off the tail so it will not wrinkle the paint. As far as your "fun hobby", I just do baits the way I want them and the hell with guys who are so anal they must have special, hard to recreate color schemes. if you work with acrylics and not lacquers there are some color schemes that just aren't possible - and vice-versa.
-
Nice resource Ben. Thanks! A few of the manufacturers are defunct, like Suddeth and D-Bait who have both stopped producing crankbaits.
-
I usually dip my 1/4" brush in denatured alcohol (DA) after mixing enough epoxy for 2-3 baits, drip it (a few drops) into the epoxy, and then mix it in. It really helps removing bubbles. You can control the viscosity of epoxy while working in cool temperatures with DA and it does not affect how well the epoxy will harden, nor does it greatly extend the cure time, plus it gives you an extra minute or two of brush time. DA is the only additive I use with epoxy. When I use epoxy to undercoat a wood crankbait, I use a little more DA to thin the mix down and get a coating that is thinner and penetrates the wood a little better. I don't use a heat gun on epoxy - it just makes it begin to harden too quickly.
-
Epoxy resin is like honey. It can crystallize if it stays cold for long enough but if you heat it up, it returns to liquid state. Not recommending this, but I usually put it in the microwave (with the top off the bottle) and give it short shots of MW until it turns back to liquid. Don't use it until it cools off though. It will be hard to measure in its very hot liquid state and will cause the epoxy to harden very quickly. Recommended practice is to sit it in a pan of warm water until it liquifies.
-
Unless it's a suspending bait, I don't try to strip all the paint off - I just rough it up with 400 grit sandpaper, wash the bait with soap and water, then repaint. If you get acetone on the lip, it will cloud it permanently. I don't know of any solvent that will quickly remove the paint without also damaging the plastic underneath - including acetone. I have removed paint with a blow torch and it works quickly. But you need a fine touch to avoid setting the lure on fire, causing the lure to blow up, or melting/discoloring the lip. On a suspending bait, I just sandpaper off the paint. It takes time and destroys any 3D details but it's the safest way unless you have a media blasting booth.
-
Mark - Wiss snips (straight cut, yellow handle) are what I use. It's faster than a band or scroll saw for single lips. Making the lip perfectly symmetrical is the critical thing. That's why I use a CAD program to draw and print out the shape. Then I transfer it to plastic or a piece of G-10 for a permanent template. You can try the old "paper doll" trick to cut them out freehand but that is not exact enough for me. From past builds, I have a box with about 50 lip templates in it. Nowadays, I usually can find the lip template I want to use from that library without going back to the computer.
-
Guys, I honestly don't understand buying pre-made lips because I use so many shapes and sizes that just aren't for sale anywhere. I would feel really constrained in designing crankbaits if I had to use store bought stuff all the time. Get a few sheets of 1/16" polycarbonate and 1/32" G-10 and you have the raw material for hundreds of lips, which you can whip up yourself in short order. A free CAD program like Powerdraw and any ink jet printer to draw your lip template. A pair of metal snips and a Dremel sanding drum to shape them. Voila, as many lips as you need, any shape/size you want, anytime you need them, and it's a fairly simple and quick process. eplastics.com looks like a very good source for white (aka "natural") G-10 sheets. It's often hard to find sources for "white" G-10 since it comes in a wide array of colors and most sellers/users don't pay attention to that. McMaster-Carr also sells G-10 and other specs of circuit board under the generic name "garolite". The G-10 I got from them awhile back was a butt ugly dull greenish yellow. Their G-11 garolite is a pleasant looking light green, but sold at a slightly higher price. If I wanted some G-10 right now, I'd go with eplastics.com as CrankyMike suggests.
-
Diving Lip Design, Shape, Size, Angle, Prototype Testing?
BobP replied to MarkNY's topic in Hard Baits
Dave mentions an important point about symmetry. I started out whacking away at a blank, hoping to get it right but sometimes ending up with a toothpick. After shaping a lot of crankbaits bodies, I understood that it was impossible for me to just eyeball what material needed to be removed from a blank to keep it symmetrical. Wood grain will fool your eye every time. If you round over baits with a router, good on ya, but that won't work with all bait shapes. If you hand shape baits as I do, taking the trouble to mark the limits of where you plan to round off the corners and how you plan to taper the nose and tail will go a long way toward getting a symmetrical bait body. A compass, a small plastic ruler, and a bendable plastic straight edge are your friends. Yes, it's a PITA to draw all those little bitty lines. But the end product will look straight and swim much better. Crankbait building is basically an exercise in control and precision. -
Diving Lip Design, Shape, Size, Angle, Prototype Testing?
BobP replied to MarkNY's topic in Hard Baits
To get a straight running crankbait, symmetry is critical. You need the ballast, the lip, the line tie, and the hook hangers on the center line of the bait's body. You can't really do this on a wood bait just by eye - do it mechanically so wood grain will not fool your eye. I use a drafting compass to draw a center line around the bait, then flip the bait to the other side and do it again to guarantee the center line is actually on center. Do it immediately after cutting out the bait shape, while all the wood edges are still "square". I prefer to have the line tie close to the lip surface on most baits. It gives you harder and wider action. Making a lip slightly wider than the body of the bait usually gives more stability. If everything is straight and you are still having instability, I'd try increasing the ballast slightly. Looking at most commercial minnow style baits including jerkbaits, the lip angle is usually very close to 45 degrees which often yields the best mix of action and dive performance. For every "rule" spouted about crankbait design, there are exceptions that can make you look foolish. After awhile, you get the idea that the "performance rules" that are in your head are really just tendencies that beat against other performance tendencies - not all of which you understand. In my experience, the easiest way to approach design is to look critically at a successful commercial crankbait. They have usually been designed and tested to tweak the design for good performance and so are good guides to what works and what doesn't. Start with them and then tweak your design through successive prototypes until you get exactly what you want.
