BobP
-
Posts
5,782 -
Joined
-
Last visited
-
Days Won
193
Content Type
Profiles
Articles
TU Classifieds
Glossary
Website Links
Forums
Gallery
Store
Everything posted by BobP
-
I bet Devcon just wants to increase the appeal by updating the packaging. I wouldn't hesitate to buy it - just about any 30 min slow cure epoxy works fine. Devcon became a standard among bait builders because Walmart used to sell it in double syringes for 2 bucks. But similar brands work just as well according to all reports.
-
I personally don't like colored hooks but I've noticed that there is quite a difference in how long the color stays on different brands. Mustad - not so good. Gamakatsu - pretty durable color.
-
I'm like Ben - after the satisfaction of building a batch of lures, I think "Crap, now I have to finish them". But when it goes right, I guess my favorite is silver foil with whatever colors added. I'm resigned that I'll never be better than a 'meat and potatoes' airbrusher. So in that light, my favorite pattern to actually paint is Firetiger: orange-chartreuse-green-black with the details shot through a paint template. Easy peasy.
-
I insert pieces of scrap lip material in baits while I paint them and hold the baits in locking forceps. The scrap lips are friction fitted into the lip slots with blue painters tape added as necessary. The scrap pieces, or "false lips", have holes drilled in them and I hang the baits on nails on the shelf above my work bench with wire hangers shaped from ss wire. I use the same hangers to suspend baits by their belly hangers while the epoxy cures after I install the final lips. And when I coat baits with propionate undercoating or topcoat them with moisture cured urethane, I hang them up with the same hangers to dry.
-
There are split rings designed to release the bait when snagged but I've never used them. I fish from a boat and use a lure retriever but if you fish from shore and get snagged beyond the reach of your retriever, you're back to square one. I'd be thinking along the lines of Mark's advice to modify your trebles to make the bait less snag prone. If you use thin wire trebles that have less-tempered steel, they can be bent and modified (the cheap bronze Mustad trebles work). Cut the barb off of the downward facing tine on the belly treble and bend the remaining wire downward so that it trails toward the rear of the bait at about 45 degrees. Not only will you have removed the treble point that snags most often but the bent wire on that treble will make the crankbait jump over obstructions. I used to modify inexpensive Bandit 100's and 200's (they came with Mustads) this way and use them to snake crankbaits through some very gnarly wood cover. Using more bendable trebles will also let you force a bait out of a snag if you use 15 or 20 lb test mono, which a lot of guys prefer for shallow crankbait fishing.
-
Nemo, I feel your pain about losing lures but the fact remains that maneuvering a crankbait to hit cover whenever possible is the best way to increase your catch rate with crankbaits. Why? Because it triggers neutral or negative bass into a reaction strike. And MOST bass MOST times are either in a neutral or negative mood. There are times when bass will try to eat anything moving that will fit in their mouths - but that is rare. If you are a pond angler who fishes from shore you have an advantage over us guys who fish larger waters from boats since your bass are typically less educated and have a narrower range of prey species to eat. That makes them susceptible to lures and retrieve methods that wouldn't get a whiff from any bass in a large lake with more fishing pressure. Would I buy $25 custom crankbaits and throw them with abandon from shore in a farm pond? No. I would buy the cheapest shallow running crankbait (probably a square bill) with the best non-snag nature I could find and throw THAT with abandon - and probably only after trying some other non-snagging reaction baits like a swim jig, a bladed jig, or a spinnerbait. No lure will catch fish every time without fail. The skill of fishing is 1) finding the fish, 2) selecting the right lure, and 3) presenting it in a way that fools the little devils.
-
Skeeter, I agree with everything you say but the idea that "it's more about where you fish, not so much what you fish", while absolutely true, is a little beside the point if we're talking about hunting crankbaits. I have two comments. The first is that you can make any crankbait "hunt" if you are fishing it right and bouncing it off of everything you can while retrieving it. A lot of guys just can't bring themselves to do that but it's what you need to do if you want to catch fish with crankbaits. The second thing I think is that building baits that hunt is a chancy proposition because they have to be right on the edge of instability in order to hunt properly. Unless you have supreme consistency in all your materials and your build processes (which us hobby builders seldom do), you are going to be disappointed. When I built hunters, I could get about 50% of them to hunt correctly. 30% of them would run true but wouldn't hunt. And here's the kicker - 20% of them were baits I couldn't tune and had to throw away. To me, trying to build hunters is a fool's errand if I have to sweat over baits and then throw a significant number of them away. BTW, I think manufacturers that build or have built baits that are supposed to hunt have the same problem. That includes the famous 'original' Storm Wiggle Wart and the Rapala Scatter Shad. One thing that is often forgotten is that many of the original Warts never hunted or were un-tunable duds. I bought a few Scatter Raps when they first came out and they would "sort of hunt" at slow speed but would always spin if retrieved much faster than dead slow. In my book, a real hunting crankbait will hunt at any speed, including warp speed. If it doesn't, it's relegated to "special purpose, very stained water and very hungry bass" occasions only - and it never goes fishing with me. JMHO
-
All epoxies tend to yellow with exposure to UV light, as do most clearcoats. Measuring accurately and mixing really well tends to retard yellowing and it makes for the strongest epoxy coating. I mix enough Devcon to coat 2-3 bass baits at a time, which is about the maximum I can do before it begins hardening. For bass baits, I'll measure the components with epoxy syringes, 1 cc of each component per lure to be coated. To extend the brush time by about a minute, I simply dip my brush in DA and shake a few drops into the mixed epoxy, blending it in. It thins the mix slightly and makes brushing a little smoother but will require about 50% more rotation time than un-thinned Devcon. However, the overall cure time will be about the same as virgin Devcon - hard enough to handle lightly in about 5 hrs, hard enough to fish in 24 hrs. I'm unsure about how to remedy the extra weight problem as long as it's epoxy. One remedy is to remove all the existing finish on the bait, which may or may not be possible on a specific bait. There's a tradeoff you have to make between a thinner epoxy topcoat and more durability with a thicker coat. You can thin Devcon further than above and get a thinner coating or you can switch to a "table top" epoxy like Envirotex Lite (aka Etex) which comes pre-thinned with a solvent. I prefer to avoid the hassle of multiple coats so I stick with Devcon. Where thickness is an issue, I switch to another type of topcoat, especially moisture cured urethane - which is very tough but tricky to handle and store.
-
I also go with a standard green mixed with small amounts of brown until I get the green pumpkin I want.
-
I use epoxy putty quite often and never had this problem. The stuff I use (whatever brand Home Depot has at the time) hardens in about 5 minutes and whatever the shape is at that point - it's what you get and doesn't change. The putty is quite hard when cured so I don't understand how it could become dimpled afterward.
-
On a bass bait, it's really no advantage to add a second coat of Devcon 2 Ton. If you think about it, you're removing a scratch by scratching up the epoxy even more with sand paper - and removing even more of the protective epoxy. Like Mark says, it all disappears when the crank gets wet so there's really no point. The only time I'd re-coat is if the epoxy is damaged down to the paint layer, and I might opt for a spot repair versus a whole-bait re-coat. If wear gets down to the paint layer, acrylic paint will begin to absorb water, expand, and eventually push the epoxy off the bait. In that case, I'd opt to peel all the epoxy off the bait, repaint, and re-epoxy.
-
Another good crankbait airbrush is the Iwata Revolution BR, which has a .3mm tip and a small gravity feed cup. At around $90, it's less expensive than most Iwatas but still has the 'made in Japan' quality. It has none of the enhanced features like MAC valve, trigger stop, etc of some Iwatas (for which Iwata charges a lot of $$!) but is a rock solid airbrush that you can use for just about any crankbait painting task. Note: I almost never thin airbrush paint but rely on paint templates for my detail work. Crank up the pressure and shoot it!
-
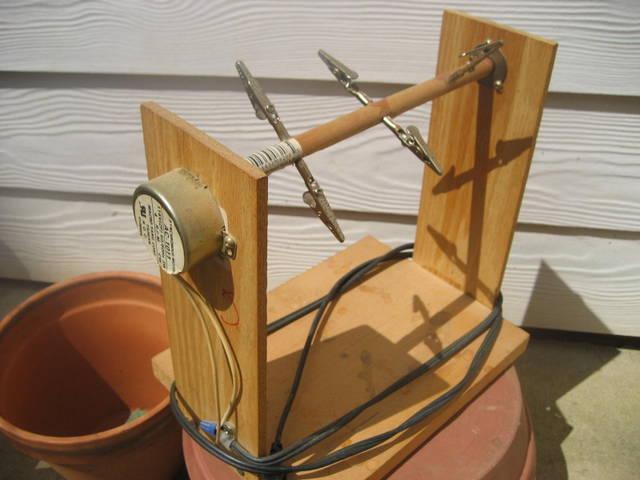
For my turner, I found a package of alligator clips at Home Depot that fit on 1/8" wooden dowels. The axle is a piece of 1/2" dowel with three holes drilled in it (making for 6 spokes) and the 1/8" dowel spokes epoxied in, with the alligator clips crimped onto the spokes. I found an A/C low rpm motor on the internet, a Micro Yang 4 rpm disk motor that's small but produces a surprising amount of torque. It cost $7. I've been running mine for more than 10 years with no failures. Not pretty but it gets the job done.

-
It doesn't matter on which axis baits are turned - either works equally well. So which you choose has more to do with practicalities like the size of the baits you build, and how you will attach the baits to it. My small turner has an axle with 6 alligator clips that clamp onto the lips of baits (protected with a little blue painters tape). Works well for me since I build small batches of bass baits and rarely paint lipless baits or baits so long that they would hit the frame at the bottom of the turner. My turner runs at 4 rpm, slow enough that I can clip baits into the alligator clips while it is running.
-
Guys here on TU have used Solarez UV cured PE resin from Wahoo International. It's sold primarily as a surfboard coating. It has a low gloss sheen. Haven't heard anything about Ange.
-
Takes awhile to get the hang of it? OK, I'm game. Being able to steer a crankbait under a dock or overhang without bending the line tie or building a crankbait that is purpose designed to run left or right? - pretty valuable. Ordered a couple last nite.
-
The only place I've seen Little John knockoffs is: http://www.unpaintedlures.com/
-
I glue in belly weights/hangers with either slow cure paste epoxy (Rod Bond) or epoxy putty (if I'm in a hurry - any brand from the local home center) and there's not much to repair afterwards. I undercoat baits after installing the belly weights and tail hangers, so the undercoating will fix any small blemishes. If not, I use interior spackling compound because it dries fast and sands easily. It's not strong but it's only a cosmetic repair and it's getting covered by an undercoat and a topcoat, so it doesn't need to be.
-
Take a look at pics in the Gallery to see how to mount line ties in lips. I suggest using soft temper stainless steel wire to make a twisted screw eye, then bending it to insert through a hole in the lip and back into the body of the bait below the lip. Your question about how it and the lip angle might affect diving depth is right on, but the answer would require a whole tutorial in lip design to answer. A short answer is that shallow diving baits tend to have the line tie in the nose. As a lip gets longer and longer to try for more depth, the line tie in the nose becomes unworkable at some point because the lure will begin to spin uncontrollably when retrieved. Lures designed to dive beyond about 5 ft generally have the line tie out on the lip surface. And exactly how far out on the lip surface is very critical to getting the best action from your bait. You should explore various TU threads to get more info. One of the best teachers is to take a critical look at commercial baits to get a general sense of how their lips were designed. They all work. If you make a similar bait and follow their lip design, yours probably will too.
-
Jonister, a problem with generalizing floatation from blocks of wood on hand is that your results are valid only for that batch of wood, and sometimes only for one particular piece of that batch of wood. This is because wood density varies according to where in the tree the wood comes from and also according to its current moisture content. I think basswood is more consistent than many other species (especially balsa) but you still have to ballast baits on a batch by batch basis, if not every lure. There are charts of material densities available online which include wood species. They are a great guide to choosing wood species for different kinds of crankbaits but remember that the densities listed are averages of a number of samples of a certain size that have been dried to a specific moisture content. Your piece of wood will probably vary from that average.
-
You might check a Sherwin Williams or other paint store in their floor finish section. I've tried Famowood and Garco MCU which are floor finishes. They don't work quite as well as DN but... KBS Diamond Finish Coat is also a MCU.
-
X2 what Nathan says. Guys often hurry the mixing and don't realize that the hardener/resin have to be blended to the molecular level for the chemical reaction to take place and the epoxy to harden. And if one component is not measured right, some of the component that is in excess will not react and remain in its liquid uncured state. Best practice is to use epoxy syringes to measure and then mix the hell out of it. I used to measure by eyeballing equal pools of epoxy. Most times, that worked just fine. But as the very last step in building a crankbait and considering the hassle involved if it doesn't harden, "most times" just isn't good enough any more.
-
"The amount of weight needed for ballast and the position of weighting needed will make the lure more awkward to cast than a heavier material.... Unless you can create a weight transfer system. Production baits that have this system allow you to cast farther which is basically the name of the game when achieving depth. Combine this with the cost difference of production and custom lures and it is easy to understand why they are more popular. Is it a waste of time? Of course not. This is what we do. Custom and homemade baits do catch fish and at times out fish production baits. In this particular instance though the advantage may be less, the work more, and the demand for consistency lure to lure higher." I think CarverGLX nailed it as far as the practicalities go.
-
I make a few deep divers including one that goes 20+ ft. The local lake I fish is very deep so even the deepest diver can't get me down to 30 ft or deeper where the bass often hold. My typical winter spoon fish are 55 ft deep. Do I fish my own cranks? Yep. But I have to say that a really good deep diver with good action is the most difficult type of crankbait to make. You have the reputation of doing that, and kudos to you! Custom crankbaits is a business that is always swimming upstream. The offerings of commercial deep divers have expanded in the last 5 years and the bass fishing public tends to follow the lead of pro anglers using sponsors' baits. Plus guys have discovered that there are alternative deep baits - soft swimbaits on bullet jig heads, heavy jigs, flutter spoons, bladed jigs, hair jigs, etc. Fishing technology and bait fads never really stand still. I don't think deep cranking is a dying art - But ,I think its popularity has declined a bit after peaking a year or two ago. It is very popular on Tennessee River lakes where ledge fishing is the norm in summer. But its popularity has forced many pros to switch to alternatives to catch bass that are now highly educated. The BassMaster Bass Fest on Chicamauga Lake TN was a case in point. Of course, this is just observations of an old man sitting in his recliner all summer watching BassMaster and FLW TV!
-
Brite-Bak adhesive foil from Venture has been the easiest to use in my experience. It's thin enough that you can burnish the edges and make them disappear without coating the foil with epoxy. Some like to epoxy over the foil to get the paint to stick better and hide the edges, but I never felt the need to do that. I lay the bait on the foil's paper backing and trace its perimeter, the flip it over to trace the other side. Cut it out with scissors, stick it on the bait, smooth down the edges, and texture it with a knurled tool handle (I use the little removable knob from some Vise Grip pliers). I've tried spray glue and various foils but it was always a messy process and my results were not very pleasing. The Brite-Bak is quick and easy by comparison, at least for me. It does come in various colors but all I ever use is the silver. If I want it tinted, I apply a thin spray of transparent Createx. Note: The Brite-Bak "gold" foil did not work well for me. It was brass color, not a gold, and it would discolor eventually after finishing the bait. I think Venture pulled that one from the market. Don't know whether they have come out with a better gold foil but a shot of transparent yellow on the silver does the job for me.