


BobP
-
Posts
5,782 -
Joined
-
Last visited
-
Days Won
193
Content Type
Profiles
Articles
TU Classifieds
Glossary
Website Links
Forums
Gallery
Store
Everything posted by BobP
-
BTW, I suggest you thin epoxy with denatured alcohol. I've had uncertain results using lacquer thinner including weaker film strength and failure to cure hard.
-
I clean the hangers when the lure is ready for split rings and hooks and they are usually completely clogged. I use a Dremel with a micro drill bit (maybe 1 mm) and it's easy to zip finish out of the hangers with that. Takes about 30 seconds per lure.
-
I think that with improved manufacturing technology, crankbaits have been getting more uniform in terms of performance than they ever were in the past. But there is still variability in every model produced anywhere. Pro tournament fishermen who specialize in crankbaits used to get 100 crankbaits of one model from a sponsor and test them to winnow the baits down to maybe 10-15 crankbaits that had just the right action. I bet they still do. As far as custom wood crankbaits go, the possibility of variation is even greater. It's a curse because it proves to me that tiny tiny, virtually unnoticeable differences between crankbaits can make one a hero and another a zero. The only bright spot is that if you fish lots of crankbaits, you will eventually begin to form an impression of what a good crankbait feels like at the end of your line.
-
Google "paint adhesion promoter" for lots of info, including a few YouTube demos. I think it's true that a majority of hobby plastic lure painters don't use one, opting instead to dip the lure in acetone (which may not promote adhesion but will certainly clean oily contaminants off) or lightly sanding the blank to give the paint something to grip. Painting lures is different in that we topcoat paint with a durable waterproof product. As long as the topcoat is not breached, the paint will stay where you put it. If it is, nothing much will save the paint, especially acrylic latex paint, anyway.
-
Brown, Caribbean Blue, Green, Neon Yellow, Orange, Red, Gray, Pearl White - all Createx Transparent colors - are a good basic array. You also need a heavily pigmented white to lay down a color basecoat. Polytranspar Superhide White is my favorite for this, ordered from taxidermy.net. I've accumulated 30-40 colors. They include pearls and flakes that I like to use to make lures look more realistic. Createx colors can be mixed to make intermediate colors and the basic Createx palette is the best place to start.
-
Grumpy, I paint plastic crankbaits just like you describe without problems, with the exception that I wipe them down with denatured alcohol to remove oil or other contaminants before I start. I think your problem is that once a waterproof topcoat is breached, an underlying water based coating like Createx is gonna start to absorb water and expand. You have two basic options. Either stop using water based paint, or improve the topcoat so that it will not be breached. You might also give your plastic blanks a light sanding with 400 grit sandpaper to give the paint a better mechanical grip.
-
Rounding off the edge of a straight plank and the edges of a curved 2 1/4" crankbait are very different. I doubt I have the hand strength to use the 3/16" or 1/4" rounder on a small piece of hardwood and like Mark, I was also wondering how you would ever sharpen the darned things. I use a Murphy carving knife, a Dremel sander, and hand held sandpaper to round edges, carefully pre-marking the limits and tapers with a compass. Yes, it's time consuming and takes some experience to get it consistently right but bait symmetry is very important. If I did lots of a single flat-sided bait shape, I'd use a router table with routing templates for safety. But I don't. One tip I saw on a YouTube video recently was using a side template to check the contour on the side of a bait while you round it off, to get both sides to the same contour. Of course, the symmetry is only guaranteed at the one point on the side of the bait which the template fits, so the template check is more useful in rounding long tubular shaped minnow baits like jerkbaits than for bass crankbaits, unless you use multiple side templates. One thing about building crankbaits as a hobby: it WILL eventually teach you to become more patient and methodical.
-
Createx heat sets with an iron at 325 F to make it washable on T-shirts. Anything below that temp and you aren't heat setting (i.e., actually melting the acrylic in the paint) - you're heat drying it. Heat a plastic crankbait to 325F and it will explode. Be that as it may, it's still a great idea to blow dry every paint shot as you apply it so when you're finished, all the paint will be dry and ready for topcoating. Personally, I look at the paint while drying it and stop when I can see that all the paint's water sheen has gone. That doesn't take very long. When I use Dick Nite, I apply one coat because I judge that to be enough durability for my bass crankbaits. With other MCU brands, results may be different. You have to judge for yourself how much MCU is enough. I sometimes troll bass baits for stripers and one coat of MCU is not enough for that level of abuse. Some guys use 2-3 coats. You also have to work out how quickly you can re-coat a bait with MCU. MCU has a tendency to bubble if you re-coat too fast or too slow. One user re-coats just after the MCU has dried to the touch in a couple of hours; others wait at least 24 hrs. In this way, MCU is like auto primer that has a re-coat " time window". Most of us use a combo of products that were never formulated or intended to work together by a manufacturer. Guys develop combos of products that work by trial and error and they share them with other TUers. If you substitute a different product in the combo, or apply a product in a way different from what worked for that guy, you are in uncharted territory and strictly on your own as to whether it will work or not. I think that's the main reason that finishes, and especially topcoat finishes are so constant a topic here on TU - users throw something new or different in the mix and can't understand why it fails. Neither can we because we aren't coating chemists. We can only suggest what worked based on our own successes and failures.
-
Collector sites say that most of the original Wart production had "Wiggle Wart" stamped on the bottom center of the lip. But the labeling varied over the years of original production and seemed to change several times. Original Wart colors were designated in a Vxx series (xx is a 2 digit number). The originals also used lead rattles while later models used steel. BTW, there is also a company called Brad's that makes a Wart knockoff called Brad's Wiggler - http://www.gloutdoors.com/bradswiggler.aspx There's a bunch of pretty esoteric stuff online concerning Warts. Believe what you will, buy what you want, fish what you buy, and judge for yourself.
-
There are a few paint adhesion promoters, one is Bulldog, which comes in an aerosol can. Some guys also briefly dip plastic lures in acetone to promote adhesion. But I think the main problem you're having is with the water based acrylic paint itself. If the topcoat is breached, acrylic paint begins to absorb water and expand. It will push itself and the topcoat off the lure eventually. There aren't many fixes for that. One is to change to lacquer paint versus acrylic. Also, I think that not all MCU's are created equal. When I use fresh Dick Nite S81 MCU, it actually penetrates acrylic paint and adheres to the lure body, forming a very durable monolithic coating. On the other hand, other brands of MCU I've tried seem to contain less solvent than DN and they will not penetrate into underlying finish layers the same way.
-
No expert, but I'm pretty sure there are 3-4 different periods of Wart manufacture. The most sought after are ones originally made by Storm from the first molds. Factory molds eventually wore out and there will never be more actual "original warts". There's big collector interest in these, particularly for baits that are still in the original packages. With online research, you can narrow down which bait comes from which era of production. It depends on the Wart's color scheme, how the bait is stamped with the Storm name, and the color of the package. Various bait colors are worth more than others, etc. Look on Ebay for prices - they can be eye-popping! The collector market for original Warts is so high that it would be pretty dumb to buy one, rip off the packaging, and go fish it. Personally, I see no value in a crankbait that isn't catching fish, so think of the whole thing is a humorous oddity.
-
I fish Warts of the several manufactured eras and know a couple of guys who are Original Wart Nuts. I've tried to get them psychiatric help, but... If you get a really good Original Wart, it's an erratic, hunting, fish-catching machine. But it's equally possible that the Wart will have a non-hunting straight retrieve or be absolutely un-tunable and worthless. Luck of the draw, caused by the iffy manufacturing precision on the originals.
-
There are a few problems with epoxy on blades, relative to other coatings. When it cures, it draws away from any sharp edge and leaves a weak thin coating there which will chip off very easily. It is also one of the thickest topcoats available and will tend to yellow slightly over time. Epoxy needs to be rotated during its initial cure period or it will sag. The best topcoat for spoons and blade baits I've ever used is Dick Nite S81 Moisture Cured Urethane. You coat a spoon, hang it up to dry and let any excess drip off the tail of the bait. It dries to the touch in a couple of hours, then it cures over several days to make the urethane very hard and durable. It is a thin coating, very glossy, and will not yellow like epoxy. BUT it is very difficult to store if you are using it in small batches over a period of months, without beginning to turn hard in the jar. There are methods to store it, including "tap the can" that help with that but if you choose this topcoat, you need to read up on its ins and outs. Still other choices exist: 2 part catalyzed auto clear coats, Solarez UV cured polyester resin, solvent based concrete sealers, and just plain old polyurethane finish (which is not as durable as Dick Nite but not as finicky, either). Even clear nail polish will work. One suggestion - many finishes come in both solvent based and water based versions nowadays. Solvent based versions withstand water submersion much better than water based.
-
Wahoo International makes and sells it direct: http://www.solarez.com/productsnew/gloss.html They sell a variety of UV cure products but the gloss resin seems most applicable to crankbaits. As time goes on and other guys explore the possibilities, they may find other UV resin sources that may be clearer/stronger/ etc than Solarez. BTW, yesterday I accidentally tested impact strength by trying to polish a lure on a high speed wool pad in a polishing machine. Lost control, the lure did a two bank shot off a steel shelf and a concrete floor. Result - a small chip similar to what you would expect with epoxy, which I repaired in a few minutes. I didn't see much difference in gloss after I polished the lure, but maybe I used the wrong polishing compound. At any rate, I'm moderately happy with the un-polished result and very happy with the speed of the application process.
-
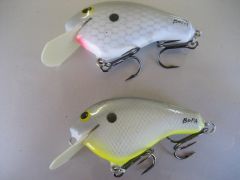
Solarez coated baits - one commercial bait (lightly sanded and coated) and 2 D-bait variants To me, Solarez clarity and gloss rate just below D2T and considerably below moisture cured urethane. Most users would not notice that - it's only when you hold lures side-by-side that it becomes apparent. I see the issue this way: If you build baits as practical fishing tools, no problem, the bass almost surely won't care. In fact, some guys don't like to fish baits with high gloss. If you aspire to museum quality paint schemes that really pop, you probably want maximum clarity and gloss and should stick to a thin and clear urethane for best results.
-
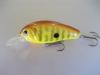
 Paulownia wood, 2 1/4" body, G-10 circuit board lips, undercoat and topcoat are Solarez, #4 trebles, 1/3 oz, dive 3-5 ft.
 -
During the off-tournament-season, BassMaster usually has some good articles on technique, gear, etc. But I get grumpy during the T season when all they have is articles about T's. Bass Times is the same thing, with the added benefit that I use old issues as a disposable work pad on my bench. Stopped my subscription when I had enough pads for a lifetime! I guess even the tournament info is useful if it gives you ideas about the details of what presentations placed well in a tournament. To me, the rah rah BassMaster promotion stuff is just too much. I just got another subscription to In-Fisherman. If they can drop endless articles about using swimbaits on jig heads to catch smallies, I may renew next year. We'll see!
-
The IRS wants to tax your profits. In the case of an excise tax, they want to tax every product you sell regardless of profit/loss. That's SELL, not MAKE. If you make a product and use it yourself, it isn't a product and is never sold - it's a private hobby item or a test product. Same deal if you make it and donate it to someone free of charge. You might consider these transactions as product testing expense and advertising expense respectively if you are running a business. Since you never sell them, I don't think the excise tax applies.
-
I just did a few yesterday, will get a photo in daylight tomorrow and post them.
-
Guys have different criteria regarding topcoats. For me, durability and ease of application are the most important things. Solarez is quick, durable, and yields a satin gloss topcoat unless you buff it out mechanically to a high gloss - which I don't go to the trouble of doing. Satin is OK by me. After curing, Solarez is not quite as glossy as epoxy and it's considerably less glossy than a urethane like Dick Nite. The speed with which you can get a ready-to-fish topcoat with Solarez, plus its moderate cost are its big advantages. We're all learning the little tips and techniques of Solarez as we go along and gain experience. I just wanted to get some tips out on Solarez for those who are trying it for the first time. Other guys may have different techniques, but this works for me. 1. The name of the game with Solarez is to control the amount and movement of the wax flakes that the finish contains. The wax is necessary for the finish to cure hard. It rises to the surface after application on the lure and it "suffocates" the UV chemical reaction to form a hard slick surface. Without it, the finish would remain sticky. 2. STIR the finish in the jug just before you apply it. This disperses the little wax flakes floating on top of the finish and will result in a higher gloss on the finished product. 3. Brush on the finish with an artist's brush and immediately clamp the lure onto a lure rotator for about 10 minutes. This allows the Solarez to level out and the wax flakes to rise to the surface of the finish. The rotation prevents the wax flakes from migrating to one spot on the lure. If you simply hang the lures up, you are likely to get a white blush on the lowest part of the lure as wax flakes migrate to that area. The blush will be more apparent on dark painted areas. 4. To cure the finish, you can either put the lure under a UV light for 3 minutes or alternatively, just sit the lure outside in sunlight for awhile (I use 30 minutes). It's easiest for me just to set the still-running lure rotator out in the sun. Solarez may take anywhere from 5 minutes to 45 minutes, depending on how you apply it and how you cure it. But even 45 minutes is the Land Speed Record for topcoats. Personally, I've had some sheeting and drip problems in cool weather when I tried dipping lures, so I brush it on.
-
Chili, since the basecoat and topcoat are both solvent based, you won't know whether they react badly until you try them. Some do, some don't.
-
If you have 5 min epoxy on the exterior of a bait, it turns a very ugly brown color pretty quickly from exposure to UV light. I won't even use it to glue in clear lips because you can see it through the Lexan. So get some slow cure epoxy (usually advertised as 30 min epoxy) like Devcon Two Ton or another brand and use that. It goes on much easier, you can take a little more time, it levels out beautifully, and it will only slightly yellow after years of use. It does require rotation during early cure to prevent sagging and drips. If that's a show stopper, there are other topcoat alternatives you can explore. Most of us use airbrushes but there are a few who paint with brushes. One of them is littleriver, who does some very nice brush work. Check on his baits in the Gallery and maybe he has some tips if you PM him and ask.
-
Well, I'm not trying to make excuses for Dick - customer service is a good thing, large or small. But considering that he is the sole source for that particular product and he sells it to TU'ers at a discount, I do think we should cut him some slack. I for one wouldn't like to see Dick decide that the TU crowd is just too rowdy to bother with in the future.
-
Yeah, you can't expect a small business like DN to always ship product like Amazon.com. But I will say that compared to the several other MCU's I've tried over the years, Dick Nite S81 is superior in every way. It even lasts longer in storage!
-
Urethane vs epoxy - Urethane is much thinner than epoxy in single coats, however only moisture cured urethane (MCU) is as durable, and although it has lots of excellent performance features, it is also very difficult to store and then use in small batches without hardening in the container. As to being lighter than epoxy, that's TBD unless someone does actual tests on both of them. You can't judge by just the thickness of the coating. Epoxy weighs only 1.1 x water. On a bass bait the size of a Little John, I would estimate the weight of all the finish including a Devcon Two Ton epoxy topcoat at around 2.5 hundredths of an ounce. Doesn't sound like much, does it?


