


BobP
-
Posts
5,782 -
Joined
-
Last visited
-
Days Won
193
Content Type
Profiles
Articles
TU Classifieds
Glossary
Website Links
Forums
Gallery
Store
Everything posted by BobP
-
Hmm - I've never had a plastic bait body break so can't see a difference except the lips may be more or less prone to wear/break. It seems to me that baits with slightly blue tinted plastic lips have been tougher and more durable. They often have had a slightly "greasy" feel that clear plastic doesn't have. Don't know what the different plastic formulation is though, or whether your difference is because of that or some other manufacturing artifact.
-
The Rapala xrays suggest that they build their wood baits by cutting a slot in the bottom of the lure and placing a hardware and ballast frame in there, then filling it in. How high the ballast is placed in the lure is interesting as it has a lot to do with the action. I'd like to see regular pics of their wood baits cut in half to expose the width of the ballast weights. I used to have a vet buddy run xrays of custom wood baits for me before he moved from the area. Never saw anything but a standard integrated ballast/hook hanger in any of the films. The Tackle Tour autopsies are mildly interesting but most of the baits they cut are plastic and you could see the interior arrangement without the drama by just looking at a "ghost" painted model of the bait. But I guess it's just fun to see them hack up a $25 Megabass Ito Vision 110 occasionally.
-
I guess it's player's choice. If the lures were plastic and the epoxy was truly as soft as when you applied it, I'd be inclined to use DA to remove it. "They say" that you can fix soft epoxy by coating it with good epoxy that will cause the soft stuff to harden. But if the goof was something like mistaking your hardener bottle for the resin bottle when you poured out the measures, I don't think it would work - so it sort of depends on what you think the original problem was.
-
All of us who have built quantities of wood baits through the years come to understand how hard it is to exactly reproduce a bait to a standard that guarantees each one will have exactly the same performance. You really have to get persnickety with materials, equipment setups, and custom jigs to come close, and hobby builders willing to go to those lengths are rare - in fact, even custom builders often don't attain a very high level of repeatability. As a hobbiest, I accept some variability in a batch of baits if I can then test them and determine how the variability affected the baits performance. But small differences that are hard to detect can make a noticeable difference in performance, so it can be frustrating. But interesting.
-
If the bottom of the bait is flat, you should be able to use a table saw to cut the lip, if you do it before you taper the bait. Afterwards, you'll need to take the taper into account before running the bait through the saw. Once a bait is rounded and tapered, you might just have to do it by guess or by golly. When cutting the lip slot on pre-formed balsa baits, I use a flexible strip of plastic to gauge the position of the lip slot on the nose and mark it with a Sharpie, then cut it with a thin cut-off wheel in a Dremel. That's not an exact way to do it but if I cut the lip slot wide enough, I can fudge the lip into square when I mount it with epoxy paste.
-
Whew! Good description. I use a simple system, basically working toward a target finished weight for each crankbait style that I build. I base the target weight on past experience and/or the weight of a commercial crankbait that I'm copying. I weigh the shaped and sanded body of the crankbait before I start applying finish, then weigh the lip and all the hardware. On a "standard size" 2 1/4" bass crankbait, I estimate that the finish will add .03 oz to the final weight of the crankbait. Those weights added together, then subtracted from the target weight gives me how much ballast is needed. I typically get within .02 oz of the target weight when all is said and done. Of course, the estimated weight of the finish can be unique to a particular builder; mine is based on the baits I've built over the years. And if you don't keep notes on the weights and build processes of your crankbaits as you build them, every bait is a new adventure in ballasting and you'll need a more involved method. Note: I use target crankbait weight without treble hooks and split rings. If your target weight includes hooks and rings, you must remember to also add their weight into your formula too.
-
Yes, the rubber pad is submerged and it shuts off the spray coming out the brush tip, forcing water or cleaning solution back through the cup to clean out the front of the brush - otherwise known as back-washing. It cleans the brush much better than simply shooting water through it. You can do essentially the same thing by holding a finger over the tip shield (a/b tip) and shooting with water or cleaning solution in the cup. A few airbrushes have cut-outs in the tip shield which render back-washing impossible but most don't.
-
 Like I've said before, it's refreshing to see a style of painting that's wholly different and distinctive - and looks good to boot! Nice baits!
 -
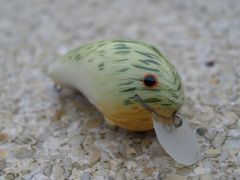
 Thanks Ben. The pic isn't very good - it was dark and cloudy yesterday. The top bait has small scale, the bottom large. This was an experiment building with basswood vs balsa/paulownia and making the baits thicker than the 1/4" width of a typical "D-bait" style crank. I'm looking for more thump and better casting ability. They baits weigh around .4 oz versus the .3 oz with balsa - but they float well and it will be interesting to see how they fish.
 -
Personally, I think "different" stands a better chance of getting bit, so on the rare occasion when I put rattles in baits, I go with a single ball for that "One Knocker" thump. How many lipless cranks filled with BB's do you think the average bass has heard? Lots I bet.
-
I just topcoated some wood crankbaits with Solarez and was happy with the results. Like most topcoat products, there are do's and don'ts associated with Solarez. I had bad results when I tried dipping lures in it. This time around, I brushed on the resin, placed the lures on a rotator to level out for a few minutes, then cured them in a nail salon UV light box for 3 mins each. Solarez contains wax flakes which you can see on the surface of the resin in the container. The wax is necessary for the resin to cure hard. In an earlier test, I dipped lures and hung them up to level out, and the wax flakes tended to migrate to the bottom of the lures and clump up, which resulted in a white blush when I cured the resin. The Solarez also tended to sheet as it hung after dipping, causing waves in the finish. Putting them on a lure rotator to level out before curing seems to have fixed the blush and sheeting problem. I have to note that all the lures in this last "good" bunch were painted in a light shad pattern. I can't see any blush in the topcoat but if any was present, it wouldn't show up much on the light paint like it would on a dark painted bait. I used 2 coats of Solarez to undercoat these baits, then 2 coats for the topcoat. The Solarez seems pretty durable but only time and getting chewed on by trerble hooks and fish will tell the tale. It is a cost effective coating compared to DN, auto clears, or epoxy. No storage limitations. The one caution I have is that you don't want to over-apply it or you can get runs in the coating that are hard to see and will show up after it is cured - and will need to be fixed.
-
Brad - 5 minute quick cure epoxy has two problems. It cures too fast to level out properly, and the hardener it uses will make the epoxy turn yellow or even an ugly brown in a fairly short period of time, compared to slow cure epoxies.
-
Don't know that I recommend it for anyone because it takes good hand control, but I use a cylindrical wood carving bit in a Dremel tool to drill ballast holes. At 20,000 rpm, the bit will either drill its way into or burn its way through the wood. You need to wiggle the bit a little as it drills and back it out occasionally because unlike a regular drill bit, the wood dust is not being carried out of the hole and can cause the bit to grab, which you definitely don't want to happen at 20,000 rpm while holding the bait in your hand. Never got bitten, but I have had baits fly across the garage a few times. But it does make a neat hole.
-
Basswood, G-10 lips, 2 1/4" x 1/2", Solarez undercoat and topcoat, #4 short shank trebles
-
Nathan, no, it's regular flashaboo. The spoon gives off enough light that it lights up the flashaboo too. When I say "lots of glow paint", I really pile it on - 4 coats of viscous glow paint as thick as I can brush it on the spoon. What glows are the strontium aluminate particles suspended in the paint. The larger and more numerous the particles, the more glow you get but the grainier the paint is. The paint I used from Glo-Nation would never pass through an airbrush but I can honestly read a newspaper by its greenish glow in a dark room. Different colors glow for different lengths of time, from 1/2 hr to 13 hrs. I used green that glows the longest. It looks white until you get it in a dark room and the green glow is apparent. As much as I like other fishing presentations, I confess I have a special love of spoon jigging. There simply isn't a way to catch winter bass faster under the right conditions and it catches all sizes of fish, including really big ones. Another tip: if you depend on your sonar to find shad schools (and you should), don't waste time jigging shad schools unless you see larger fish around them. I wasted a lot of time doing that when I started spoon jigging. I have a big Humminbird sonar on the console that works great to find shad schools and it can scan a big swath of the bottom with its sidescan capability. But the little 12 yr old Garmin 480 unit on the bow works just as well to show what the shad are doing, if larger fish are present, and it can track my spoon up and down as I jig it. The ideal sonar picture is a cloud of shad with what looks like a bunch of big worms piled up underneath and around them. Those "worms" are the bass feeding on the school. Not saying that other tactics don't work very well too (blind jigging specific structure and cover, even trolling spoons), but this guarantees hot and heavy bass catching in winter.
-
Here are a couple of glow painted jigging spoons that I like to use for winter-time jigging. I most often use the top 3/4 oz spoon, switch to the smaller 1/2 oz model in water shallower than 25 ft.

-
Here are a couple of glow painted jigging spoons that I like to use for winter-time jigging. I most often use the top 3/4 oz spoon, switch to the smaller 1/2 oz model in water shallower than 25 ft.
-
OK, I see it now: click the "More Reply Options" box. Even a blind pig finds an acorn sometimes.
-
http://www.dicknite.com/TU_Lander.htm In my experience, the absolute best topcoat for spoons is Dick Nite S81 moisture cured urethane, which is sold via the above URL at a discount to TU members. It's a thin coating, very slick, hard, and durable. Dick Nite uses it to topcoat his spoons, which are the primary product of his business. Dip it, hang it, DONE. It tends to soak into acrylic latex paint and bond with the underlying surface. I don't know whether that quality would be a problem with plastic spoons, but it works great on metal. Caution - it requires heroic efforts to keep it liquid during storage after you use it - read other threads on it carefully before you leap. And it's not inexpensive. I use temporary wire hangers when I topcoat spoons. If there is any in the hanger when dry, I zip it out with a micro drill bit clamped in a Dremel tool.
-
Can someone tell this senile old man how to post a pic in a thread response? Please? I'm talking direct from my computer to a response box, in thumbnail or otherwise. Not as part of a New Topic origination where the "attach files" dialog box is at the bottom of the post. I just can't figure it out.
-
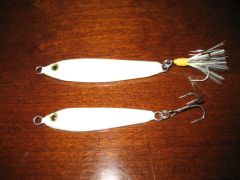 Glow paint coated jigging spoons - 3/4 and 1/2 oz
 -
A-Mac, for deep water jigging, say down to 60 ft, I like a compact heavy spoon like these: http://lurepartsonline.com/Shop-By-Category/Jigging-Spoons/Jigging-Minnow.html. For 50 ft jigging, I personally like a 3/4 oz spoon. For 25 ft or less, 1/2 oz. They mimic small threadfin shad that school in the winter and which fish that eat shad congregate around: largemouth, smallmouth, white bass, stripers, crappie etc. In the best of times, it's like Ben says, a completely vertical presentation: find shad schools with larger fish around them, get over them and drop the spoon down, jigging it with whatever pumping action it takes to get bit. 90% of bites come as the spoon falls after pumping it, so you want to keep contact with the spoon or get a rhythm going so you know when the spoon will hit bottom again. If it doesn't, set the hook! You can often see the spoon on sonar, see a fish approach it - bang. It's video game fishing at its finest and you can sometimes catch a fish every cast! If the shad have been scattered or have been forced to the surface, you don't want to run through them or you will kill the action. Then you get on the periphery of the action, cast the spoon in and hop it off the bottom during a slow retrieve. With so much line in the water, a bite feels often feels like someone attached a rubber band to your spoon. And sometimes you feel nothing as a fish bites the spoon as it falls, but the next time you pump the spoon up, you find it's attached to a bass. At the local lake I fish most often, largemouth and white bass predominate and they never drive shad schools to the surface so it's all happening deep and sonar is essential to find the action. At a large reservoir that has stripers, we look for flocks of gulls that attack the shad from above when stripers force a school to the surface. One thing I've found to be consistently true: Whatever the species, the larger fish tend to loiter at the edges of the action while younger bass constitute the main attack force. On my local lake, mobs of white bass attack the shad and the largemouth loiter. On a striper lake, the small ones are in the thick of the melee and the big ones are on the periphery. Tackle: I put a bunch of white glow paint on my jigging spoons, topcoat them with DN, and add a flashaboo dressed treble. I'm fishing 50+ feet at my local lake and the heavy glow really attracts bites in very deep water. Jigging spoons that come with wire hangers are a lot easier to paint and install split rings on. I've basically stopped buying any other design. Other: I use a baitcaster with 14 lb fluorocarbon, a 6'6" to 7' fast action rod, and tie direct to the spoon without a swivel. Jigging spoons typically don't spin enough to cause line twist problems. Flutter spoons are a whole 'nother deal. I defer to a Texas boy like Ben (they first became popular in Texas) to comment on them.
-
My guess is that the lead plugs in Bagleys were installed by mechanically compressing the plug to expand it after it was placed in a hole. Casting hot lead into a plastic lip might be a problem.
-
Yep, I shoot a white acrylic basecoat and then brush on the glow. I think a white basecoat is recommended for all glow paints and it makes a big difference in how much glow you get from the process.
-
I coat jigging spoons with an acrylic latex based glow paint. It's glow particles are too big to pass through an airbrush so I paint it on in several heavy coats with a brush and then coat it with MCU. It gives off a very bright glow when jigging deep for winter bass.

