

millsryno
-
Posts
374 -
Joined
-
Last visited
Content Type
Profiles
Articles
TU Classifieds
Glossary
Website Links
Forums
Gallery
Store
Everything posted by millsryno
-
I think they have the photo section turned off because it is at capacity.
-
Did you get the $24 press? Let's see a photo of how it works Oh, you couldn't get the tap...misread your post. I had to get mine at Ace Hardware. You have to make sure it is a plumbing standard thread or something like that.
-
Jim, check out that link I posted. you want the first two pieces they have. It is a 3/8 male/male piece and a 3/8 valve found in the sprinkler area.
-
Jim it is real hard to answer that because of all the crap I had to do. I was going in and out of the shop doing stuff. I'd just let it run for a while and come back. I'd guestimate it took 2 hours, BUT, I had a learning curve of about 30 minutes and was dealing with a partially clogged spout I removed half way through the pot. I was pouring with 50 cavities at a time, so that helps speed things up. When I started I was only getting about 1 good worm per 5 cavities. After I got the hang of it I was getting 4 good worms per 5 cavities. A little more practice is needed. I'm going to clean out my gargage this weekend and rearange the shop. I'll pour a pot straight through and time it and let you guys know as soon as I get a chance.
-
There are 5 settings for the RPMs: 570, 900, 1390, 2050, 3050. It comes set at 3050 out of the box and needs to be adjusted. I set mine up at 570 and may try the next batch at 900.
-
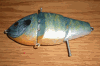
Here is an awesome tutorial on how to tap a spigot. I used 3/8" plumbing for mine. The only suggestions I'd make other than what is in this link is: 1) make sure you get the spigot as low to the bottom as you can. my drill bit actually scraped the bottom just a little. Nothing that JB weld can't fix. 2) I liked the valve turned how I have it much better then how they have it. 3) They are using the Presto Kitchen Kettle. It has a 1.5 gallon capacity. I used a Presto Fry Daddy with a much smaller capacity. The Fry Daddy allowed me to make over 200 5 1/4" stick baits. This includes my remelts. I just trim them and throw them back into the pot. No problems at all. Edit: Here is the right link http://www.candletech.com/budgetmelter/index.htm
-
You are absolutely right. I was thinking from a production standpoint. With sticks it's all about keeping your plastic consistant and producing them as fast as you can. Once you are good at it, the quality is just there and is not something you have to think about...it just happens. Chris's worms were my orignal inspiration!
-
They are aaaaaaallllmost as good. I mix my plastic after every single stick pour when I do it by hand so the consistancy is perfect. Once I get a better mixer blade they will absolutely perfect. I don't have anything to compare it to other than pyrex. Pyrex is easier, but I had no problems with this pot, either. IMO, before I spent $60 on that coating, I'd try one of these units. I think you will like it just as well. Jim, I only poured sticks. You can get as thin of a flow as you want because you don't have to open the valve all the way. The flake was staying mixed well. Out of 200+ sticks I poured, 3 of them had a little too much flake in the compared to the rest. None had a lack of flake. Thanks! Just don't forget to share your ideas and changes with the rest of us
-
If you were not using a mixer this may be a problem. But the mixer does so well that this is not an issue. My temp gun showed about a 5 degree difference from teh hottest part of the batch and the coolest. The heating element in on the bottom outside edge of the pot. I have to be quite honest with you guys. I had thoughts about keeping this to myself. Pots have always been one of those type of things that "seperate the men from the boys". Not many guys have them and not many guys are willing to share info on them. The cost is prohibitive to many people. I was kinda thinking I could keep this to myself and give myself a big advantage over anybody who could not afford one. F that, though. Sharing is what this website is all about! I just hope that everybody is as willing to share their info, too!
-
-
-
-
Here's the pics: Here is a front view. You can get a size comparison vs. the Del-Mart mold in the pic. I filled 'er up this evening and got 200+ sticks out of it. There are a couple side views. Here you can see the mixer I was using. I think I need a different one, though. This one does not do a good enough job. After about 20 sticks or so I have to manually mix it up a little because the salt gets shoved to teh bottom side of the pot. I used a hacksaw to shorten the shaft on the mixer. Here's a couple shots of the spigot. One open and one closed. I was a bit sceptical of the ease of use with this style valve. It works great though. I just tested a bunch of the valves at Home Depot and got the loosest one I could. I poured half the bucket with the 90 degree nozel and it would get a little clogged. When I removed the 90 degree nozel it flowed out really well. Like I said, it's still a work in progress. I may just need to adjust the thermostat a little higher to keep it all meltined in the spigot better. It works fine without the nozzle though. A lot better than I thought. That is JB weld around the pipe going into the pot. I scortched it on accident and probably will have to redo it. I did this when messing with the thermostat (I accidently tuned it the wrong way). you probably won't have this problem. Honestly, I don't see why anybody would want to buy one for $600+ (without mixer) or $1000+ (with mixer). This entire thing cost me under $150 including the drill press and was REALLY easy to build. If I can do it, you can too!
-
I made a mistake. You want your LOW temp to be at 300 degrees. The plastic will stay right around the low temp setting.
-
craw, do you have a link to one of those?
-
Welp, poured about 250 stickbaits this evening with the new pot! There is a little bit of a learning curve but it should definately speed things up. I need to get a mixer attachment. I bought a paint mixer, but it pushes all the salt to the side. I need to get something that mixes it all better. As soon as I get this all figured out, I'll post a how to or something. For under $150 you can't go wrong! Monty, the screw is real easy to find. There is a plate on the bottom of the unit. There are two visible screws. Unscrew the middle screw, this will take off the plate. Inside the unit you will see the thermostat in the middle. You can't miss it. It is held to the frydaddy with one screw. You should see some white junk on the thermostat. Scrape it off and the screw you need to adjust the thermostat is right there. It is very tempermental. Turn it clockwise to reduce the temperature setting. I have one of those lazer sensor temperature guns. I'd highly recommend getting one. I plugged the unit in with nothing in it and tested several settings with the temperature gun. You will get different temperature ratings in different spot in the frydaddy. The key is to point the temperature gun directly in the center of it. Let the frydaddy run a couple cycles as you watch the temperature on your gun. Ideally, you want the high temperature to be 300 degrees. Your plastic will stay right around this temperature when you cook it. I'd recommend only turning the screw 1/4 turn at a time until you get it where you want it. Like I said, it's very tempermental.
-
Can't wait to see it.
-
Travis, that is the exact one you can get on eBay. It is also referred to as a Presto Pot. They use them alot to melt wax for candle makers. The only problem is that it has a 1.5 gallon capacity. This FryDaddy has only a half gallon capacity. jm, I'll post a pic tonight. I adjusted the thermostat and will be experimenting with it. Just got back from Lowe's with the perfect mixer. LedHed, how does that temperature standard work?? If it is something easy to use, I may want to give it a whirl.
-
Veripack must have had a pricing error it fixed Those 6x6 bags were only 25 bucks or so per 1000 6 months ago.
-
-
Thanks Del. A dimmer switch type thing is exactly what I was thinking. The only ones I saw at Home Depot were for wall outlets, though, for lights. I did nto think something like that would work. I am more envisioning a dimmer box where my power cord plugs into the dimmer box and the dimmer box plugs into the wall. When I was a kid we had a train set and you would control the train with a box like this. You would just turn the nob and the train went faster or slower. Any ideas??
-
craw, How well do the legs pour? I am assuming you have to pour them with the mold apart before you pour down the hole?
-
Craw, I will post some pics when I get this all figured out. the fry daddy I am using is smaller than the kitchen kettle you are using. The fry daddy actually fits on the drill press platform perfectly and you can adjust it up and down with a lever. I am experimenting with bits but am thinking a 2" or wider spade bit (drill bit for wood) would work perfectly. I will probably try a 3" one and see how that works next. When I figure out which size is best I will grind off the pointed tip so that I don't accidently drill through my pot. I am setting this up to pour 2 peice molds. I generally pour sticks. With this pot I should be able to pour about 150-200 5" sticks. Anybody good with electricity?? If I can learn how to restirict the voltage I think I may have a pot/drill combo for under $200 that rocks.
-
I went to Wal-mart today to purchase the pot and found one I liked better. It is called a Fry Daddy by Presto. It looks to be a 2 quart size, which is perfect. It does not have a thermostat like the other Presto, it is automatic. I decided to call Presto for the temperature range it operates on. The lady told me that it cooks up to 400 degrees and then shuts off. When it cools to 375, it turns back on again and repeats this process. Hmm, that is too hot. The pot was only $19.99, so I decided to try it out anyway. I stopped by Home Depot and got all the items I need for a spigot and while I was there decided to look at the drill presses. BINGO. They have a Ryobi 10" model for $99 that this pot works absolutely perfect with. I bought that stuff and headed home. I decided to try the pot and the mixer together before I did the spigot. My logic was that it would not heat the plastic to 400 degrees because there is no lid and the heating element is only on the bottom. If the drill mixed it, it would constantly be mixing in cooler plastic with the hotter plastic. Hopefully it would shut off when the heating element hits 400 degrees and ideally the plastic would be below 350. Well, I was close. The plastic heats up to abot 380 degrees. Everything works perfectly except for the high temperature. The drill press is tits and the plastic is nice and uniform heat and consistancy. I have already drilled and tapped a spigot and it looks great. I know the high heat can be worked around. Maybe you guys can help me out. I was thinking there must be some type of dimmer switch or voltage regulator I can splice into the power cord. If I can do this, I can control the heat. Any ideas?
-
Anybody notice a difference in recent M-F plastisol smell?
millsryno replied to GB GONE's topic in Soft Plastics
I noticed that M-F has more of a heat stabilizer smell to it. Is that what you are smelling?