


fatfingers
-
Posts
1,854 -
Joined
-
Last visited
-
Days Won
9
Content Type
Profiles
Articles
TU Classifieds
Glossary
Website Links
Forums
Gallery
Store
Everything posted by fatfingers
-
Yes, the air duct foil works great. It is a heavier foil though and it can be a little tougher on rounded surfaces like Wiggle Warts as an example. The air duct foil tends to wrinkle on rounded surfaces. The other types of foil can be glued down by spraying the bait with an all-purpose spray adhesive. Walmart carries several brands. A lot of guys like the 3M brand. The thinner "gold leaf" or leaf type foils are super thin and wrap a little easier. It takes a while to get a feel for how to handle them as they are very delicate and will tear easily. If you're using the stuff with a color pattern, its no big deal. If it tears, just apply another piece over the uncovered area and then use a brush to sort of brush off the excess foil.
-
Thanks, guys. I did place an order with that outfit and it was filled very quickly with the quality of merchandise I expect. I appreciate the responses and insight.
-
I've used a variety of foils and "leaf" foils. The leaf foils do not lend themselves well to using netting underneath, but if you're going to foil the bait without netting they are great. They are easy to apply if you choose the type that has random patterns. The random color patterns allow you to simply glue the foil to the bait without regard to alignment or pattern. You should consider clearcoating over any foil prior to painting the bait. I use either Devcon 2 ton epoxy or Envirotex. Both can easily be painted. Foil of any type does not like to hold paint very well. It has a tendency to flake off at the slightest touch, which makes it very difficult to handle after the painting process. The paint will even flake off from the brush strokes while applying clear after painting directly over the foil. Clearing the foil prior to painting locks it down to the surface of the bait and gives a surface over which you can prime and/or paint.
-
 Simply perfect. A+, Dean
 -
If you watch closely in that video, you can see that the bait swings out about 8 or 10 inches to one side or the other randomly to get that hunting effect. It seems to do it with just a steady retrieve too. That thing is going to get eaten!
-
Yes, Etch could win prizes. And it's more than just what he's been through...Etch is the first to help others when they need it, even if they don't ask for help. I know that for a fact, from personal experience. He's a great guy. He's currently on page 4 of that link and he's truly got a real shot at winning! His name is Robert Giberson. Click on his name and then click on "VOTE" ...it doesn't cost anything...just push a few buttons!
-
 You have to click on that bait and enlarge it to really appreciate the fine paint work. Very discriminate use of glitter combined with just the right about of splat work. Very nice!
 -
I'm about to place an order with Moore's Lures for some components. Never used them before. I'm wondering how fast they normally fill and ship an order and how reliable they are. Do they "backorder" stuff a lot? Do they ship quickly?
-
It looked good, but was a little hard to see. The swimming action appeared to be pretty lifelike. Any pictures?
-
 Nice work! Looks like you'll be catching them with those.
 -
 Six inch Rocket Shad from poplar
 -
 Homerun, Kellure!
 -
 You even detailed the lip! Great work, Dean
 -
-
Its a commitment, first and foremost. You have buy what you need and there is no way around that. You should consider starting with a quality airbrush. It is a critical tool in the process and it will allow you to hit your maximum potential and advancement with a lot less frustration and expense. If you buy a cheap one, you may wind up buying two and spending more than necessary in the end. A lot of guys, myself included, like the Iwata HP-C. Money well spent.
-
 That thing is excellent. I like how you painted the fade on the tail so that it will provide contrast as the tail spins during the retrieve. That is a very well-planned addition to a great bait. I would love to see that bait in action.
 -
-
 Glider with 3D glitter stripes, stainless steel tail fin. Turned on the lathe from poplar.
 -
 Glider with 3D glitter stripes, stainless steel tail fin. Turned on the lathe from poplar.
 -
 Nice paint work. I like that crackle look.
 -
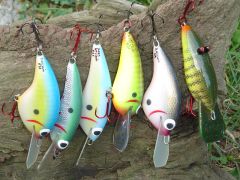 Six classic examples of how great custom baits can be. Great work, Dean.
 -
-
 Shallow running jerkbait with Mustad Extra Strong trebles; painted with enamels, clear coated with Devcon 2 ton epoxy. Turned on a lathe.
 -
I've used Testers quite a bit. It goes through an airbrush very nicely. You might consider thinning with medium automotive reducer. It can be purchased at a store that sells automotive paints. The reducer does a much better job of thinning it than either lacquer thinner or paint thinner. (Lacquer thinner is what you should use for cleaning the airbrush and flushing the airbrush between colors when using enamels). I use two parts of paint to one part of reducer. I just shake the bottle a bit and pour the entire contents of the paint into an empty 35mm film cannister. Then fill the empty paint bottle about 1/2 full with automotive reducer and shake the bottle again to get the remaining paint in the bottle added to the reducer and pour that 1/2 full bottle into the film cannister on top of the paint. Shake the film cannister containing the paint and the reducer to thoroughly mix it together and your ready to paint. The film cannister, which is plastic and comes with an airtight lid, will keep your paint fresh for several weeks. You can use the film cannisters for acrylics also and it will keep acrylics for quite a while tool Enamels have some advantages over acrylics. It dries a bit faster and has less of a tendency toward running if you get a little aggressive with how fast you coat the bait. It also allows you to work a bit faster. Enamels also have colors that are different than acrylics. I have even used both together on the same bait, but I'm careful to clear with SG-100 automotive clear to put a layer of protection between the enamels and the acrylics. You could also use enamels then apply a coat of envirotex and then finish the bait with whatever acrylic colors you favor. The SG-100 automotive clear is also available at a store that sells automotive paints. Using both enamels and acrylics allows you a very wide range of color choices. The disadvantage of enamels is the flammability and the fumes, especially the reduce and the lacquer thinner. Be careful and use plenty of ventilation. Spraying outside with a gentle breeze can work nicely if you have no paint booth. I always wear vinyl gloves when handling the stuff to avoid skin contact and to make the clean up a lot easier when I'm done. With any type of paint, enamel or acrylic, always take your time and thoroughly clean that airbrush when your done.
-
 This one is my favorite. I'd love to try that for some vertical jigging over open waters for stripers, cats, or musky. Nice work.