


fatfingers
-
Posts
1,854 -
Joined
-
Last visited
-
Days Won
9
Content Type
Profiles
Articles
TU Classifieds
Glossary
Website Links
Forums
Gallery
Store
Everything posted by fatfingers
-
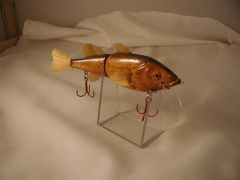
 I built this as a modification of a commercially sold bait. It weighs 3 5/8 ounces. 9 1/2 inches long; #4 Mustad Extra Strong short-shank hooks; #7 Joe Bucher split rings
 -
 Weighs 2 1/8 ounces without hooks; carved from cherry, center weighted; enamels/etex; British metallic green over yellow, white pearl belly, sunburst gill highlight underneath, black back.
 -
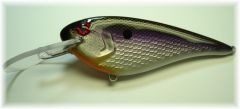 From poplar, foiled, carved gill plates, Tennessee shad pattern with purple underlay, amber gills, unweighted. Weighs 1 ounce without hooks.
 -
That's a nice looking bait!
-
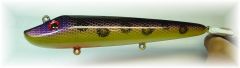 Weighted with .50 caliber shot. Runs really nice.
 -
Congratulations, Nathan. Good to see you get the recognition for your great work.
-
I've been experimenting again lately. I'm adding coats of envirotex over some of my older baits to spiffy them up a bit and cover hook rash and tooth marks. Some need "resealing" after several encounters with rocks and stumps or musky teeth or both. So far, I've seen no downside or ill-effects to this. I can add a relatively thinner coat with the etex as opposed to adding another coat of Devcon. This could help avoid adding any additional bulk to the bait, or risk the potential for fogging, which Devcon seems to exhibit on occasion during hotter weather or certain humidity conditions. Without question, I like certain characteristics of both (PLEASE, let's not debate which is best. I know we all have a preference, but this is not an "either/or" question). I like the flexibility of the etex and I consider that a superior feature for sealing around the hook hangers and line tie on musky baits...which are subject to extreme flexing and stresses when trolling and hooking fish. Devcon is clearly harder, but is more brittle and prone to cracking off near and around those delicate areas of the bait under high stress situations. I'm considering building baits with two coats of Devcon and three coats of etex, or some other ratio/combination so that I can take advantage of the postive properties of both mediums. My question is... do any of you have any longer term experience with laying one over the other?
-
The cups at Walgreens.com are $2.99 per 100. The $20 price for 500 includes shipping.
-
I've considered sitting down and working out a series of larger and smaller scales on one bait by way of carving. It would take a lot of time with a dremel or a woodburner but it would improve one's carving skills. If you'd like a shortcut do a search for the word "foiling" on this board. There are at least a half dozen fantastic ways to achieve a similar effect without carving or woodburning. Some are easier than others, but they all look great and make the bait more effective at fooling fish.
-
If you build a variety of bait styles I would take the advice offered by one of the members of this board...take careful notes. If you're serious about actually duplicating a lure, you need to write down the details of what you did, because in 6 months and after building perhaps 50 baits and a dozen different body styles you may have a hard time remembering where and how you weighted that special one, how many coats of clear produced the desired effect, whatever. I know these things can be forgotten over time. I know it for a fact.
-
U63405, be careful with the etex. It's got a shelf life of about a year from what I've read. I tried some older stuff recently and it wouldn't harden. But you could try a small batch. Husky the markings are in convenient increments, although I can't recall them all from memory at this moment (too many enamel fumes?) There are a few different types around the cup. You can take your pick really. I find that I can mix enough for 5 to 10 lures depending on which marks I choose. I pour the hardener in first and then pour the resin, because the hardner is colored and the resin tends to sink into the middle of it when pouring. Thus the darker tones in the hardener make it easier to see marks on ths side of the cup and measure with precision. I just ordered my second batch two days ago online. The first batch of 200 worked great, so I went ahead and sort of bulk ordered the second time. At 4 cents a piece, its a good use of a disposable container. I mix in one cup, then pour into a second. When brushing envirotex on with an acid brush, I keep the first cup handy to wipe off the brush on the lip of the cup to remove from the bristles any dust particles or excess etex that I've removed with the brush when I'm done with "painting" it on. That way I don't put any dust or contaminated etex into the remaining pure etex in the second cup. Hope that makes sense. In other words, I use the second cup to occasionally "clean" the brush and to dump excess epoxy if I put too much on in one spot on the lure.
-
I found a source for inexpensive 1 ounce plastic disposable medicine cups to mix epoxy. Walgreens.com I bought 500 for about $20. They have the markings on the side so you can mix with precision.
-
http://www.mrlurebox.com/heddon/hed17_small.jpg I have an affinity for this style of bait, for reasons which I can't explain. I have one similar to this built as a small glider on my wheel right now. I'll post it later when I get it detailed and clearcoated. My father gave me a couple of these also, but they're smaller and appear to be made of some type of resin. They run lousy and the finish seems to get cloudy when stored. I'll dig those out when I get a chance and post a few pics (if I can find them amid the chaos of my life:)). Right now I'm on my way to chase muskies at Leesville with my fishing partner, Larry. Wish me luck.
-
 I bet its going to get eaten!
 -
smirk and Stone, I don't own the one shown. I just thought it was not unlike some of the work of our members. I've purposely avoided collecting old baits, because I tend to go overboard with anything I start to collect. Plus the fact that if I found something that looks like a musky would eat it, I could be very tempted to start throwing it. Mostly, I have come to appreciate some of the old patterns and I've tried to add some of the patterns to a few of my recent lures. My father gave me a few of his old baits from about 40 years ago, and I have them hanging on the wall next to the baits I've retired. Here's one of them:
-
Although I have no interest in collecting, I enjoy reading about and researching of old bait patterns and designs. The above captioned bait was made by K and K Manufacturing in Toledo, Ohio circa 1907. It could be quite comfortable in our TU gallery and I'd venture to say that it would probably have a decent shot at the muskies on a few of my local haunts. There is nothing new under the sun.
-
 Beautiful.
 -
 I think you did an excellent job on capturing the color. I could not do that kind of work with rattle cans if my life depended on it. I like this one.
 -
Smirkplug, you're right, it does look like that. Its longer and more slender. It's a great musky bait. The one shown in the bottom of the pic is a Bert:
-
That's great new for a fellow TU member. Fatfingers (wannabe almost famous for knowing Dean McLain who knows this guy)
-
Husky the top bait with the round head runs great if you place the line tie on the forehead of the bait instead of the nose. I tried building the first one with the line tine at the very front and it would not dive. Once I moved the line tie back further on the top of the bait about 3/4 of an inch it ran great.
-
 I like baits that are one of a kind. Nice work. I'd love to see it in the water!
 -
Here is what is on my bench this evening. I'm working on a few changes to the jerkbaits I recently built and I've built a new one. This is similar to the green/gold scaled jerkbait I previously posted. It shows the placement of two muzzleloader roundballs in the belly of the bait. I primered the bait first so that it would be all white. That way when I'm trying to judge where the exact center of the bait is, my eyes are not confused by the wavy lines of the wood grain. When you get to be an older fart, things like that happen. I'll prime it again before I paint it. I glued the roundballs into the wood using Rhino glue, which is available at Walmart. I then sealed the holes, (which I drilled with a 1/2 inch forstner bit), with "plumbers putty." The plumbers putty is available at any hardward store. It is like a Tootsie Roll only bigger. The stuff is blue on the outside and white on the inside. You cut off a piece and knead it in your fingers till it is all one uniform color, sort of a gray actually. Works great, dries fast, sands easy, won't shrink. Here's a larger version of the Shovelhead which helped me land a musky at West Branch last week. Its carved from cherry with one roundball. I'll re-prime it also before I paint it, but you can see where I placed the weight. Actually the bait ran well during testing and although it appeared to need no weight added, I decided to add one roundball to offset the extra bouyancy created by the 5 coats of envirotec clearcoat that I'll be adding after I paint it. Note that the hole under the Shovelhead appears to be larger. I flattened the lead roundball with a hammer since the bait is a bit thin through the middle section and I didn't want to risk drilling out too much of the bait. Lastly, here's my first attempt to build a version of the "Bert," which is a commercially sold bait that has produced dozens of muskies for me over the years. I love throwing the Bert and want to see if I can build something similar. I chopped it out of pine on the lathe, cut a slant on the forehead to make it dive, and then hollowed out the slant cut with the edge of the benchtop beltsander. I'll post pics of how I did that if anyone wants to see how it was done. I built two of these to start with. I'm pretty confident they will run well, but I'm just guessing, based on past experience, as to how much weight will be needed. On the longer one I used two roundballs, on the shorter version, I used just one. I'll post the results of my testing, which I hope to do tomorrow, if my schedule permits. In the photos above you can see how I simply glue in the lead roundballs prior to sealing them with plumber's putty.
-
Quick Tips...take em all, but leave one of your own!
fatfingers replied to fatfingers's topic in Hard Baits
I'm amazed at some of the great tips that have been hung on this thread! Here's one that I think might be helpful. If you prefer to avoid melting and pouring lead to add weight to your baits, try this: Go to a Hunting/Sporting Goods store and purchase "round balls" for a muzzleloading rifle. Bullets are available in a variety of weights, sizes and shapes. The nice thing is that you can mix and match the bullets to achieve the desired weight you need for any bait. You can also purchase bullets in shapes other than round. In other words, a variety of traditional bullet projectiles are available for purchasing. The prices are reasonable and you get usually 50 or more in a box. Also you can use fishing sinkers, but they are available only in a limited number of shapes. Split shot sinkers can be more appropriate for lighter, smaller baits. -
 Some baits just sort of pop when you first look at them. That one does! Great work.