


fatfingers
-
Posts
1,854 -
Joined
-
Last visited
-
Days Won
9
Content Type
Profiles
Articles
TU Classifieds
Glossary
Website Links
Forums
Gallery
Store
Everything posted by fatfingers
-
Surprise action....................
fatfingers commented on StoneCoal Tackle's gallery image in Hard Baits

-
Surprise action....................
fatfingers commented on StoneCoal Tackle's gallery image in Hard Baits
That thing is beautiful. Love the colors and I sure wish I could carve like that. Nice work! -
I had not thought of using it for stripers. I could give that a try at West Branch, Terry. Its out in the paint shop under primer. I'll probably squirt paint at it tomorrow. Thanks, MuskyDan. I'll post something about how it performs later in the season.
-
 Nice work as usual, Pete. Great finish and also a great photo too.
 -
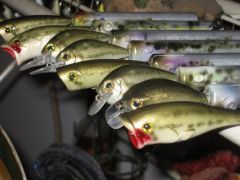
 Thanks, guys. Stone, I made the lip. I make all my lips from polycarbonate or stainless steel. The body is made from Sintra signboard with a tiny bit of weight in the middle of the body. It suspends and just hangs there when you stop reeling it.
 -
Excellent.
-
Thanks, Rj. The rattles worked out great. I bought two packs of them.
-
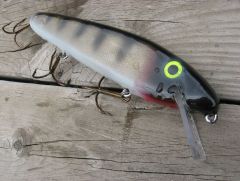
Here's what I've got so far. Its chopped out of pine and it has four glass rattles in the head, which I've decided to leave exposed so that they rattle a bit louder, as opposed to burying them under putty and paint: I put a coat of envirotex on after soaking the bait in sanding sealer. The envirotec smoothes out the finish and provides a good seat for the white Krylon stuff that bonds to plastic (which is what I use for primer on all my baits). *Note the paint on my hands from last nights painting seesion.
-
The lip on this bait is one of the most versatile I've come upon since I started building. It will allow the bait to dive deep or remain high in the water column, depending on how you hold your rod tip.
-
WoW! Nice fish and beautiful baits, rj
-
Thanks, guys. I'm going to give it a go this year and see what happens. I'm thinking that during mid-season, when the fish are often suspended under schools of bait fish over the open water, might be the time to be heaving something out there that looks like an injured shad or other bait fish. I'm also going to be doing some night fishing for muskies around the 4th of July and the night bite on one of my local musky lakes really heats up around the 4th. We also have a period when the muskies are "porpoising" and eating bait fish off the surface over open water. Can't seem to get them to eat anything we throw at them, so maybe a popper might trigger a reaction strike. I'll probably try a few different colors too see if that makes any difference. I appreciate all the responses.
-
Great post, Hoodaddy. I've found that it is very important to seal the bait after foiling and before painting since the foil does not seem to want to hold paint very well. Although it can easily be painted it, remains very delicate and subject to flaking off until it is sealed with some type of clearcoat such as envirotec or Devcon 2ton epoxy. I've recently gone back to envirotec and have found that envirotec is superior (in my experience) for sealing the foiled baits prior to painting and after painting, because the Devcon has more of a tendency to "fog" a bit over the unpainted areas where the foil is allowed to show through.
-
 Beautiful work!
 -
 The pike in my waters would smash that thing! Nice work.
 -
 Fantastic. I love how you do the eyes on your baits. This one is a knockout!
 -
-
I'm going to build some large musky/pike poppers. My question is, has anyone had any success using such a thing for topwater musky fishing? I usually see only creepers and other prop baits built for musky so I'm curious as to any experience anyone has had with poppers. I'll post a pic of the one I built later. (Gotta retrieve my camera from the Botswain's Locker on my boat:lol:)
-
You can use a variety of netting. However, if it is a synthetic, which most of it is, you might consider washing it in your washing machine first to soften it up a bit. That helps to make it easier to place when foiling and it also helps when your using netting to spray paint scales. When the netting is stiff it is harder to get it to lay down flat against the bait.
-
The ingredients are: 1. Blank wooden or plastic lure body 2. Netting, the same type you shoot paint over when painting scale effects onto a lure. 3. Foil...there are two types as you probably already know...the aluminum foil we all use in the kitchen and the foil that comes on a roll from a hardware store or Walmart, which is used to tape furnace ductwork together. The furnace type is far superior (again thank you, Husky for introducing me to this stuff). The furnace type comes on a roll. You cut off as much as you need and peel a paper backing from it to expose the glue that is already on the foil. It stretches a bit, which as Husky told me, "you will appreciate that." 4. Spray glue for the netting. You can use almost any type of all-purpose sray adhesive. I bought stuff called Duro All-purpose Spray Adhesive from Walmart, but its not special, just a run of the mill spray glue. 5. Razor knife, razor blade, or Xacto knife. I strongly recommend the use of an Xacto knife because you can cut a precise line when trimming the foil. (Forgive me if this explanation is too elementary, I struggle writing step-by-step instructions.) Here's how: Cut two pieces of netting long enough for the lure blank and wide enough to wrap completely over the top and bottom of the lure. You'll place one piece on each side. Next lay the netting on a clean piece of paper. I use ordinary printer paper from my computer. Spray one side of the netting thoroughly with the spray glue. Apply the netting to lure blank. Be careful to align the pattern on the netting evenly so that the pattern runs along the lure evenly, not tilted sideways, etc. Make sure it sticks properly. If it doesn't peel it back a bit and shoot the netting again with spray glue. Don't worry about getting a bit of the glue on the lure. Won't hurt anything. Trim the top and bottom of the netting off right down the center line of the back and belly of the lure. Now apply the netting the same way on the other side of the lure. Trim back and belly down the center line. Try to make it touch at the seams. Next cut a piece of the foiling and place it over the netting and carefully smooth it down with your thumb. NOTE: Be a bit careful here. The foil scratches easily during this process and even your fingernails will etch it easily, so use a bit of care. The foil can be slighty stretched but don't be too aggressive because any minor wrinkles burnish away easily when your done. Again trim away the foil along the center line of the back and belly. Its okay if it overlaps a bit. The seams also almost disappear when burnished. When your done, take your thumb and push the foil down into the voids in the netting to highlight the scale effect. Take your time, this adds a tremendous amount of detail to the scale effect. Burnish any crease and all the seams with a smooth rounded object. I use the shaft of a screwdriver. Works fine. I know everyone has their favorite burnishing tool though, so use whatever works for you. The furnace type foil can be aggressively burnished with no ill effects. I hope that helps.
-
Tater, you might consider trying ordinary printer paper with rubber cement. Removes easily.
-
 Nice work again, Pete. I always check out all of your baits!
 -
Sounds great, Rod. Looking forward to trying them. I think rattles can make a difference but I like them a little more subtle than the plastic baits. Should work out great. I have some gliders and a few big crankers I'm working on. Thanks, buddy. Vince
-
 Thanks, guys. Stone, the weights are 1/2 inch behind the front hook hanger about 1/4 inch apart
 -
 Thanks. Its a mixture, Pete.
 -
Thanks, guys. Thanks, rj. I just ordered two packs to try them out. About how long are they?