-
Posts
1,854 -
Joined
-
Last visited
-
Days Won
9
Content Type
Profiles
Articles
TU Classifieds
Glossary
Website Links
Forums
Gallery
Store
Everything posted by fatfingers
-
-
-
I forgot to add that after you heat the lip in the boiling water you can bend it with your fingers since its held firmly by the wooden jig shown above. Sometimes I wear a pair of cotton gloves during the bending process, sometimes not. Lexan does not conduct that much heat so it softens a bit, but isn't too awfully hot to the touch, but be careful and use your best judgement. Of course clear your work area near the stove because boiling water is unforgiving if you dump it by accident. After bending the lip, run it under cold water and its sets permanently in that bent position. You have about 30 to 60 seconds after you get it out of the water to make the bend, so don't rush. The worst that can happen is you have to heat it again and bend it again if you don't get it right the first time.
-
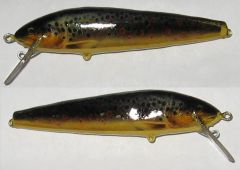
Pete, you can sometimes make a bad lure good, or a good lure better by proper lip selection, or altering the lip after installation, if necessary. First you might consider using thinner lexan, because to a pretty high degree a thinner lexan lip will give you a tighter vibration and is a bit more forgiving. Also if you have to shave (grind off) one side or the other, or the front of the lip to tune the bait, a thinner lip shaves cleaner and easier. 1/8 lexan is incredibly strong stuff on a musky bait if the lip is properly secured during installation, and the epoxy is allowed the appropriate curing time. I've torture tested a lot of them on rocks during high speed trolling and have yet to have one separate from the bait,break, shatter, or even chip. Fish up to 44 inches have had no effect on the lip integrity at all, and I'm confident that no musky will have any effect on them. We've purposely tried to twist them off a few baits and couldn't budge them. I know its a matter of opinion, and I'm not telling you how to build your baits, but I would only use lexan that thick on a bait over 14 or 15 inches long. This year, I'm experimenting with larger baits using 1/16 inch lexan. Keep in mind that larger is a relative term, and generally, I think that larger baits only produce in certain conditions for musky (not a topic I wish to address on this thread; just my opinion after nearly two decades of musky fishing and only on my local waters, not Canada, or elsewhere). 1/16 inch lexan may be another story, but if the line tie is not attached to the lip, and is instead attached to the nose or forehead of the bait, the lexan lip is under much less stress, when a fish is hooked because he's not pulling on the lip. I only use 1/16 for those bait configurations (line tie screweye on the nose), and most of the time, only for baits that I won't be racking off the bottom rock structures in an attempt to trigger a strike (which is a very effective tactic on some waters). I have a lot of confidence in 1/16 inch lexan under those specs. Here's one of the jigs I use to bend polycarbonate in boiling water: I made it by simply making a 1/8 inch cut on the table saw so that the cuts are perpindicular/square and thus allow the bend to be as accurate as possible. Of course if the bend isn't square to the rest of the lip or the body of the bait, the bait will tend to veer one way or the other. Note the burn marks on the jig. I spent considerable time experimenting with a heat gun and a torch and concluded that the boiling water is far less inclined to damage or distort the lip material. Here's a minnow bait that I bent: Before bending: After bending. The lip was actually attached to the bait during the bending process since I wanted to tweak the action of this completed bait:
-
If the body of the bait is not too wide, you may be able to lay the lip on a tabletop beltsander and remove the excess from the one side. Additionally, you might try this: Take a piece of thick flat wood and cut a slot in it the same as the thickness of the polycarbonate that you used. Place the lip in the slot in the wood. Get it in there about 3/8 of an inch and get it in there nice and square. Boil some water in a wide pan. Place the lip and the block of wood under the surface of the boiling water for about 3 or 4 minutes. It should soften the lexan enough that you can bend the tip forward in the same direction that the bait runs (in other words, forward). I'll post a photo of this later, if I have time. You are essentially locking the tip of the lip in the slot on the block of wood to hold if firmly so you can bend the bait after heating it in the boiling water. (Torches and other heat sources will often scorch the polycarbonate to the point where it bubbles and distorts...looks ugly even if you bend if properly.) If that works, you might be pleasantly surprised at how much correction you can get; maybe enough to salvage the bait as a winner. When you're done the lip will look similar to the lip you see on Rapala SuperShads. But you must grind down the once side of the lip, no matter what. That imbalance is usually not forgiven by the water.
-
Thanks, Haz and Thomas. I buy almost all my components, eyes, etc., from Rollie and Helen's Musky Shop, which is an online supplier of everything musky. No matter what size baits you build, you should check out their free catalog to see the latest innovations in lure building. They're great people to deal with too.
-
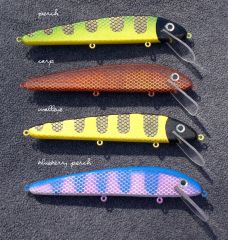
Thanks, hazmail. I am trying to locate something similar to what you've mentioned as I would like to completely eliminate the entire possibility of a flash. I'm going to build another one sometime this year and I'll make some changes. I use Devcon 2ton expoxy for the finish. Here's a minnow bait I just finished; it'll get two more coats of epoxy and be ready to use:
-
-
-
Whoa! Great stuff, Rod! That top one is looking like it would produce big-time on our local waters. You better let me test that monkey for you!
-
That and some of the other recognition this site have received is a testament to the power of this site. I'd love to see that issue of FLW. This place is very well managed and has really grown into something amazing. We're watching a bit of history take place. It will be interesting to see what comes of all this as time goes on. I thank the admin of this place for the information, comradarie and friendship they create with this format. Great work.
-
An Iwata HP-C is a brush that is reasonably priced, pretty versatile, and very popular from what I've read on this board and others. Most that have purchase one seemed very happy with it. You'll need a compressor with a pressure regulator so you can turn the pressure down to better control the amount of paint being ejected through the airbrush nozzle. The Iwata HP-C also provides some control as to the sensitivity of the button you push and pull back to apply the paint. A quality airbrush makes life a LOT easier. If you buy a cheap one, you'll most likely have far less control over the fine details that most guys like to incorporate into the painting process.
-
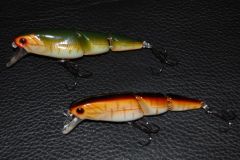
Thomas, welcome aboard. This site is one of the friendliest places on the internet. It is amazing how many great people there are on here and I feel lucky to have come to get to "know" many of them. It is really something to see how people are willing to help here. I actually met one of the members from Romania and he visited me last summer during his first trip to America. We fished together for a day and he caught his first largemouth bass, which they don't have in his country. It was a real pig and hes said, "Is that a good one?" I said, "Oh yea, that's a good one!" His name is Savacs and he builds amazing detail into small baits. The bottom line is having fun with this stuff and this place and the people here make that pretty easy to do. As to the paintbooth, it measure 2 feet high by 2 feet wide by 2 feet deep. Those dimensions seem to allow enough room to work while still creating a space that the exhaust fan can handle. So far, I would probably not change those dimesions if I build another one. The windows on the sides and top are a big, big plus. The top window allows me to stand up and look down through the top when I'm priming baits because when you use spray cans the overspray tends to blow around in there quite a bit. On the next booth I build I will build a separate box to house the exhaust fan. There are two reasons why I think that would be a big improvement. First it segregates the exhaust fan from the work area and the exhaust fan is somewhat noisy. I prefer to have a radio or CD playing in the background when I paint and its a bit hard to hear over the fan noise. The exhaust fan could actually be placed outside the shop in a watertight box, thus creating a bit more space in the shop and eliminating the noise. Secondly, if you separate the exhaust fan and attach it to the box by way of a 4 inch corrugated hose, the hose would capture much of the overspray particles on the "ribs" and would prevent the overspray from collecting on the fan blades...which could cause the fan to start to wobble from the collective weight of the paint captured and dried on the squirrel-cage fan's blades. That info is courtesy of rjbass, by the way and I'm definitely going to make that change on the next one. As to paints, I use strictly enamels and I'm one of the very few on this site that does. Most guys here use water-base paints and swear by them and sooner or later, I'm going to give them a try. For now though, I have access to some fantastic additives for the enamels that allow me to add and control color change effects (to a certain degree) and also to convert most colors into pearls, etc. I have a supply of this stuff so I'm going to stick with the enamels for the near future. Here's one that I just painted that changes colors somewhat in the light as the bait rotates on the centerline axis:
-
-
Rod, I really appreciate the help you've given me. That info you sent me really has me fired up about building the next one. This stuff is nuts. I'm turning into a woodworking guy, with all kinds of tools and stuff. Pebo, I pulled the diffuser off tonight, but it didn't make any real difference so I'll leave them on. I'm working in a rather small room, about 8 feet by 8 feet, so I don't want to risk hitting them with anything.
-
Rofish, that's a interesting idea. Just recently I saw some mirror-like material at a local supply shop and thought about placing it on the bottom of the booth to reflect and magnify the light. My only concern was that it might be heard to clean up because the material is sort of a plastic with a mirror finish. I could use a regular mirror but I'd have to be careful working with the glass in the work area. Pebo, I'm going to take your advice and try removing the diffusers tonight when I go out to paint. Thanks for the great tip. rj, I did something very similar last night. I used a 100 watt full-spectrum bulb with an aluminum shade very similar to the ones you posted. It made a world of difference when I put it on the top of the box shining through that top window. I now have plenty of light. I may consider replacing the side lighting with what you've posted.
-
As a follow-up, I fired up the airbrush and used the paintbooth 2 days ago. (Been on the go, and this is the first chance I've had to comment) The booth works. Pros: The booth is roomy and the bottom of it provides a lot of space to layout the varous paints, reducers, etc as I'm working. It also has ample space for the bench-vise I like to use to hold musky baits when I drape the netting over the bait to shoot the scale effect. It draws the fumes nicely, but it does require that the fan motor is on the highest setting and at the setting its a bit noisy; makes it hard to hear the radio, but I just cranked up the radio a bit and that was good. I'll use a slightly bigger exhaust fan when I build the next booth. I can always turn a bigger exhaust fan down to a lower setting. The Lexan window on the top allow the ceiling light in the room to shoot downward into the box and that was a plus. The Lexan was also very easy to clean when I was done: I just wiped it down quickly with a cloth slightly dampened with a bit of paint thinner and it looked brand-new again. Cons: The lighting is only adequate and I had really hoped to have more than enough. I try to do subtle things with color sometimes and that requires close inspection during the painting process. Sunlight is best of course, but Ohio winters don't provide much of that so I had hoped to generate plenty of light. I still have the option of adding a third light above the top window and I think that will do the trick. I bought some full-spectrum bulbs yesterday and I'm going to try a third light on the top window this evening. I'm also considering placing some foil tape inside the paintbooth to bounce the light around a bit more to sort of amplify the lighting I have already installed. Its turns out that it "feels" smaller than I thought it would...It does take some getting used to, I guess, since I've never painted "in" a paintbooth before as I always painted outdoors in fair weather, so I guess I'll get used to working in a somewhat confined space. Also the dryer-vent hose (that aluminum stuff that you stretch out like an accordian) is fragile and I can tell right now I'm not going to like it. I'll probably be on the lookout for some 4 inch hose in plastic or rubber to get rid of that stuff as soon as it can. I don't like worrying about the hose getting crushed or torn. No time for that nonsense. The bottom line is that it works fine and I'll be able to paint inside during the winter of 2007/2008. I'll add a light, change the vent hose and add a few shelves inside and I should be good to go for this year and perhaps next. As I said on a previous post, with the tips I've gathered from you guys and my experience with this booth, the next one will be much better.
-
Just checked it out, Husky. The can states the following ingredients: mineral spirits linseed oil alkyd resin boiled linseed oil tung oil aliphatic petroleum distillates dipentene
-
I hadn't considered the possibility of wax as an ingredient. I was just sorta thinkin' out loud. I've tried the normal stuff and it works okay, but I'm always looking for something better.
-
Anyone ever try using deck sealer as a way of sealing the wooden hard baits prior to painting? I have some Thompson's deck sealer and I was thinking about giving it a try. Its is supposed to penetrate well and render the wood waterproof. Anyone ever try using deck sealer as a way of sealing the wooden hard baits prior to priming/painting?
-
Bruce, very nice work. One of my favorite things to experiment with is different lip configurations. On wider baits, you might consider trying a "L" shaped lip similar to what you see Rapala use on their SuperShads and even some of their smaller shad baits. That lip requires bending the polycarbonate lip or building the lip from stainless steel. Bending polycarbonate is much easier than you'd think and the L-shaped lip is very reliable for baits with a wider body such as the one you carved. I'll post some photos when I get a chance. Lastly, if you like the style of lip that you're working with, you might consider shortening it a bit and making it a bit wider. Again with a wider body, you have to account for the extra drag the bait creates.


