

.JPG)
Snax
-
Posts
485 -
Joined
-
Last visited
Content Type
Profiles
Articles
TU Classifieds
Glossary
Website Links
Forums
Gallery
Store
Everything posted by Snax
-
Hey, those are very well done! You should be proud. My first baits looked really bad and no where near as good as these.
-
New Bass Pattern I painted other day
Snax commented on MR KNOW IT ALL KIND OF's gallery image in Hard Baits
 Really nice!!!
 -
 Love it!
 -
Try to keep your lead mostly in the front section of the swimbait and don't drill deeper than the center line of the lure so it will track better and not roll at higher speeds.
-
My pleasure Toad. Be very cautious when routing and especially when routing small pieces. Definitely use a clamp to hold the pieces when using your chamfering bit. Even with a clamp I had a lure section fly up and crack me on the bridge of my nose. I use a clamp with plastic grips that hold the work piece which I strongly suggest using. You don't want anything metal to accidentally contact the router bit while it's spinning. Good luck and safe woodworking.
-
The bit for notching I use is a double flute groove bit. There are a few angle options available. I think mine is a 90 degree but I've forgotten exactly. I use a router table with a fence fence to guide the piece over top of the router bit. I set up the fence so that as I slide the lure on it's end to be routed, the bit passes exactly down the center of the lure body making a perfect notch in one pass. I use a different bit to rout the opposite end of the body section that will fit into the notch a little once assembled. It's a 45 degree chamfering bit. With this step I hold the section in a clamp and I make sure that the flat side of the lure is flush against the router table when flipping it over to do the other side. This is done in two steps. Hope this helps.
-
I will say that my personal favorite lure maker is John Hopkins and it's not because no one else is as talented. I just appreciate some of the innovative ways he constructs his swimbaits and of course his painting skills are phenomenal also. Hey, we've all got to admire someone and he's one that really has inspired me to up my own game. Then again, the list is very long of the many others here who I also respect and whos talents amaze me. Keep on sharing the information everyone. It's made us all better lure makers.
-
Dan your PM box is full and I'd like to talk to you about maybe having you mold some of my lures for me. Please email me at muskysnax@yahoo.com so we can talk about it. Thanks!
-
I agree on the actions of the flat profile baits being great! I was going to make all my swimbaits have the tapering body too but found that it made it trickier to use my router to do some of the steps I do. When I have bodies molded for me I'll make them exactly like the real thing at that point.
-
Hi Dan, Would you be interested in molding some lures for me? I would rather pay someone to make them for me that has the experience than try to learn from scratch. Does the featherlite foam hold screw eyes well? I need to make sure they are at least as strong as wood. Thanks! By the way, your PM box is full so if you can email me about this my address is muskysnax@yahoo.com
-
I nominate EVERYONE here!!! I learn from all of you and I thank you all for sharing whatever tidbit of lure making experience you have offered. I've had help with specifics such as glider weighting and such when I got started but since then I've been influenced by many of the talented folks here even if it may not show in my actual lures. It's the motivation to keep on pushing the envelope and to stay humble. There's always someone out there who can humble you no matter how good you get at something.
-
I'd like to know if there are any small holes in the surface too or is it smooth and ready to prime?
-
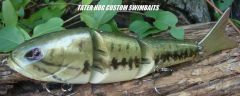
I've made them 1" and 3/4" and both swim very well.
-
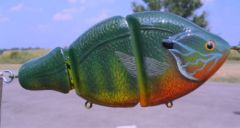
I have some ideas that should make it swim easier at any speed. firstly I see that you don't have any angles on the leading edge of each body section. That would be the first thing you should fix. I use an angled router bit to quickly remove the wood equally on my swimbaits. I hold each body section in a clamp to keep my fingers away from the deadly spinning blade. Secondly, the spacing is a little wide between sections. This is an easy fix too. I use a different router bit to carve a notch into the trailing edges of each body section so that the screw eye is recessed into the notch somewhat. This will tend to make the sections easier to ger moving at slower speeds also. I've attached a photo f someone else's swimbait showing the specific angles I'm talking about.
-
Sweet videos! Had me rockin' out on the couch with the laptop! lol I love making little promo videos for my baits too. I always have some metal wailing away in the background! Gotta love the Vulgar Display of Power album! "A new LEVELLLLLLLL!!!"
-
Do you think that the ceramiclear would be durable enough o protect a wood lures vs the durability of epoxies? I'm already set up for spraying urethanes for my airbrushing business so if it would work as well as epoxy I'd be willing to give it a shot.
-
Here's what Swede had sent to me for how to use his Proprionate pellets... Mix 1bag with 1 liter of acetone & thin it to milk like consistency You can thin the one with least pellets in 1 liter too for first dip to penetrate deeper when soaking the lure. Wait one day before painting after last sealer dip. 1. Get 3 glass jars with lid i use olive jars bout 6" high & 3" in diameter .or bigger to fit your bait sizes 2. Get a glass sheet in dim 1ftX2-3ft for drip protection for placing under baits during drying. 3. Make a hanger for baits to dry on 4. Make S shaped bait holders for use as hangers on baits 5. Get 150g of Probionate. 6. Get 1 liter=2 pints ofAcetone * 7. Put 90 g Probionate in 1 of the jars fill up with Thinner /Acetone to 1" under lid 8. Shake the jars to solve Probionate approx
-
There have been many posts about this subject actually. Try searching for plastic dipping or something similar with the search function. If you want some really good first hand information about doing it right and want the proper stuff, contact Swede here on the website. He'll hook you up.
-
Thanks for sharing! That's what's so great about this site.
-
I believe that Mark was referring to the 1:1 uv formula and not the very new 2:1 which I was fortunate enough to test before it was available to the public.
-
I meant to write that it does not DRIP for as long as the other formulas not "dip".
-
The real advantage to this new 2:1 mixture for lure makers is how clear it sets up with little or no bubbles at all. Usually, when you use a brush to apply epoxy, you'll also end up with a zillion bubbles. You can still give it a quick sweep with a blow torch on low but once any bubbles are popped they don't seem to reappear. This is the major point that convinced me to make the switch from the original Nu-Lustre 55. Plus it has the added UV protection so it won't yellow. While it may not dip as long as the other formulas it does still require the use of a rotisserie to prevent it from running off unless you brush it on super thin which would then require many coats.
-
I agree with everything Jed is looking for in an epoxy. I'd like to add that I'd like to not need to rotate the lures once dipped. Maybe this is too much to ask but it sure would be nice just to dip and hang to dry. No fuss,no muss.
-
'll try and put something together for you Mark as I have had a chance to experiment with this new formula.
-
Mark, You must have replied as I was typing my last post. you make a good point about getting the right distance between the body sections. I found it was easy to get just the right spacing by filling the hole with hot glue and then pushing the twisted wire in until it was perfect. If you first put a piece of tape across the section that is pre drilled before filling the hole with the hot glue, hopefully you'll be able to remove any glue that gets forced out while inserting the wire.
