

.JPG)
Snax
-
Posts
485 -
Joined
-
Last visited
Content Type
Profiles
Articles
TU Classifieds
Glossary
Website Links
Forums
Gallery
Store
Everything posted by Snax
-
ok. I did some testing using twisted wire held into a hole using industrial hot glue on one body section and the other section using the good old eye screw glued in place with expanding polyurethane glue. Here's the results of my stress test... The screw eye ended up bending open before the side with the twisted wire could even budge. I used every bit of my strength to pull open the eye screw side so i have no fear about a fish doing the same. In real life i'll be using two screw eyes per section and two twisted wires so this will never fail before the line or hooks would straighten etc. This is great news for me and will save a lot of extra cutting of slots, lining up the pin holes etc not to mention it will eliminate all those edges where the finish may be weaker. Thanks to those who contributed to my threads and for the great input.
-
Thanks so much for sharing that information Dave! I'll do some more researching into this idea of having baits molded for me.
-
Ha,ha,ha! You guys are too kind!
-
I have spoken to Jed on the subject a little while ago. I know he's had some issues with different plastics and is experimenting still.
-
Very interesting idea! What my ultimate goal is, is to be able to build and clear coat each section and then be able to assemble it at the very end with perfectly fitting joints. That's the reason I'm hoping to be able to simply insert either a screw eye or twisted wire into a pre drilled hole and then seal it in with epoxy or fiberglass resin etc. I do have to say though that your idea looks very good and clean. I need the joints to be very very strong.
-
Here's a tip for the pins/holes connection... Insert the shaft of a plastic Q-Tip into the hole before putting your pin through it. Now the inside of the Q-Tip shaft acts as a plastic bushing instead of the metal pin rubbing against wood.
-
Thanks for the tip on twisting my own from wire, I'll give that a shot. I think if I strengthen the wood first as Mark suggested and then use a twisted wire instead of a screw eye it might do the trick. I also remembered that the industrial hot glue I have at home is incredibly strong and will likely have no trouble holding in the wire as long as the surrounding wood is beefed up first. I'll do some testing here shortly and post my results. Wish me luck!
-
Thanks for the idea about the wood hardener Mark. I'll have to give it a shot if the fiberglass resin doesn't pan out. I just started a new thread about having baits molded for me. In it I mention fiberglass resin. Has anyone here ever molded a lure from it or in conjunction with fiberglass itself? I just found something online about a guy who made tuna lures from fiberglass.
-
I'm considering having at least some of my baits molded from some sort of material so I can spend more time airbrushing and less time cutting,routing,sanding etc. I'd like to get some suggestions on where I could have this done for me (someone here perhaps?) and what type of material to use. As my baits are primarily large musky lures they need to be very tooth proof and be able to hold screw eyes securely. I suppose I could go through-wire if they are molded baits though. There's the issue of buoyancy also. The baits need to float until weighted which also gives them stability and the correct orientation during the retrieve. I saw somewhere that a guy made some large crankbaits for musky from molded fiberglass. Has anyone ever tried that?
-
Yes Mark, it is a Nu-Lustre product. You can contact Eric Chaimberg from Swingpaints here: echaimberg@swingpaints.com Tell him Musky Snax sent you.
-
Ha,ha,ha, you kill me Mark! I'm going to give this another shot today using fiberglass resin in the holes. I figure it might add some structural integrity to the surrounding wood. Vodkaman, thanks also for your great input! You are right in that I over tested the pull strength of the hinges but I need to be 100% confident that no amount of thrashing will cause a pull out. I'm selling my swimbaits for a considerable amount of money and don't want any failures at the joints which is always a weak spot in this type of bait.
-
Mark, This formula is sold with a larger bottle of the resin and a smaller bottle of the hardner so you will use them up equally. It's a two part resin to one part hardener mix. The working time is probably about 90 minutes or so. I have been letting it sit for about 50-60 minutes before brushing it on only because my drying wheel is out of commission and I want to reduce the amount of open time that it will drip off. It's really good stuff to work with and very clear once brushed on with no cloudiness at all.
-
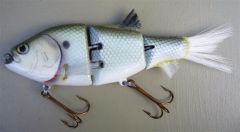
What's up gang? I know we seem to discuss swimbait joints a lot here but here's what I have been doing and here's what I'm wanting to do... My swimbaits are currently made using the standard two screw eyes in one section and then a hinge pin through them in the next section as seen in the attachment. What I'm wanting to do is to get away from needing to cut out the slots in the sections and use the screw eye to screw eye method instead of hinge pins. The thing that I'm trying to do is to make it so that I can get the sections close together so they will be the same as I have them now. I'm experimenting with ways to be able to be able to have the eye screws pre linked together and then just be able to epoxy or somehow cement them into pre drilled holes in the opposing body section. I can't just screw the eye screws into each section as once they get closer and closer, the body of the lure prevents me from getting the sections close enough. If I try and use open eye screws on one section I can't get into the space well enough to be able to squeeze them shut properly. Basically then I'm curious about getting the strongest way of being able to insert one end of the eye screw into a pre drilled hole without worrying that it will pull out. So far I've tested using marine epoxy putty in the hole but I was able to pull out the eye screw which actually was encased in wood! I'm using cedar again by the way as oak was prone to splitting I discovered the hard way. I also tested a different epoxy called epoxy steel. This worked better but is there something perhaps any of you have tried that would solve my dilemma? Maybe an alternative to a screw eye for the part that I'm wanting to seal into the pre drilled holes? Thanks in advance for any suggestions!
-
Absolutely sick actions on your swimbits!!! Love them both!
-
Thanks for the kudos Mark! I'm sure that there would be a lot of stiff competition from many of the other talented painters here. You guys inspire and motivate me to strive for perfection.
-
Hey guys, I have been corresponding with the guys over at swingpaints for a few years now and have been telling them about the need for an epoxy to suit the needs of lure makers like us. The new formulation is the best one yet and is making it much easier to get a bubble free finish every time. It also has uv protection and while it was supposed to be "drip free" it does still require the use of some type of rotisserie while it sets up unless you flip the lures end over end manually. It works great if you do what I do... I set up my clear coating area with a piece of wax paper under where I hang the baits. After mixing the epoxy which is a 2:1 ratio of resin to hardner I pour the mixture onto the wax paper and let it sit for about 30-60 minutes during which time it will release most of the bubbles itself and will have a shorter working time (less drip time) which I prefer. What I do is then brush the epoxy onto the lures and then use a plastic scraper to get the drips back into one puddle after a while so I can brush it back on. I have to do this until I redesign my drying wheel to accommodate my swimbait sections. What I love the most about this latest formula is how it doesn't seem to get cloudy at all and rarely ever needs the use of a blow torch to pop any bubbles that form. It's extremely durable too and quite tooth resistant. I order directly from swingpaints myself and I'm not sure if they have this new mixture on the shelves yet. I know that Home Depot carries the original Nu-Lustre 55. Love to hear from anyone else that tries the product and I'll forward your comments to the guys at Swingpaints for them to get feedback on it. I'm still working with them to create a truly drip free epoxy that you could brush on then not need to use a rotisserie as it cures. Hopefully it will come into fruition and i for one will be first in line to get my hands on it!
-
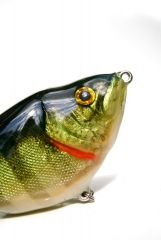
I have also made a pike swimbait that swam really well. Here's how it turned out... By the way, hats off to Lockjaw for his spectacular pike swimbait. It rocks!!!
-
The new formula is great but still drips off when applied as heavily as we need it. It does start to tack up much faster than the original formula however and it also goes on very clear with little or no bubbles or cloudiness. It also has uv protection. I've asked the guys if they can make a formula that will be applied thick and not drip off and it may be coming. I was really hoping that this mixture would be like that but it needs to be applied in several very thin coats in order not to drip off. I have fund that if I mix up the amount I need then pour it onto wax paper to let it have time to thicken, it will work better for coating baits. The last time I tried using it I let it sit for 50 minutes before applying it with a brush and it worked pretty good with minimal dripping off.
-
 One of your nicest ones yet Tigger. Looks awesome!!!
 -
 Gorgeous!
 -
John's baits ROCK! He's my own personal favorite bait maker too.
-
 Absolutely gorgeous!!!
 -
 Very niiiiice!!!
 -
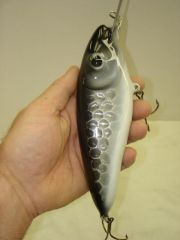
 Here's the Shad model at long last. I'm so busy making baits I rarely get to enjoy fishing with them. Nearly got a nice musky last night on a Trout pattern swimbait though. Hope to hook up next time out.
 -
 Damn! That turned out awesome dude!!!

