

.JPG)
Snax
-
Posts
485 -
Joined
-
Last visited
Content Type
Profiles
Articles
TU Classifieds
Glossary
Website Links
Forums
Gallery
Store
Everything posted by Snax
-
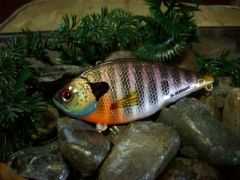
One of the best swimming single jointed swimbaits I ever made was this Crappie pattern. I had a microfiber tail on it but none of the others. I'm certain though that it would still swim if I'd added the rest of the fins. I have come to notice that if I have my dorsal fins sticking straight up vertically, the actions are greatly reduced but when I angle them back like they are half folded down then they swim perfectly.
-
It's a different type of paint, not necessarily a higher quality. Each has it's place. I use Createx on fabrics and when doing my artwork and the Auto Air for lures and helmets etc.
-
That's an interesting observation about weight placement. I might have to do some experimenting with head only weighting. I just want to make sure that my baits are stable at all speeds and won't roll over. I weight each section and then tank test until they sink horizontally like a glider. That's a habit I got into from making only glide baits for the first two years so perhaps it simply isn't necessary in a swimbait? Actually having them head weighted only would mean that they should swim as they fall when counting down. I never even thought of that before.
-
You absolutely need soft, thin fin material when they are that big. Also make sure that there is sufficient space for the joints to move freely. I did a ton of experimenting with swimbait design before settling on the current one. However after seeing how much better the multi sectional swimbaits work I am planning on making a switch soon.
-
There are two things I have used and both work equally as well. The first is the newest Auto Air 4011 reducer which has a very small amount of glycerine to help eliminate tip drying. The other is a home bew which is 75% water, 25% Methyl Hydrate alcohol and about 4-5 drops of glycerine mixed in a large medium bottle. Glycerine can be purchased in any pharmacy. How much reducer to use depends on the application and the amount of air pressure being used. Too much reduction is bad and too little won't help as much. What I do is to reduce my paints right in the airbrush cup (gravity feed) until I have the consistancy I need. The new transparent paints from Auto Air spray fine without reducer but the semi opaques need about a 20% reduction.
-
I have been using Nu-Lustre 55 for years now and you can do multiple coats without sanding as long as you haven't gotten any finger prints or oils onto the surface. I usually clear coat each coat the next day once the first has set but has not yet reached it's full 24 hour hardening duration. Also musky teeth will penetrate no matter how many coats you do unless you are doing a 1/2" thick layer which would be ridiculous. What mostly damages finishes is the hooks as you are fighting the fish. All that thrashing buries the points into the finish and can shred even the most carefully clear coated bait. The best thing you can do is to make sure that the wood is sealed and has a good hard surface underneath the paint which is why I now use the propionate dip method of sealing.
-
What I do for my own swimbaits is to first cut out the shape with the band saw then rout the edges with a round over bit. Since my swimbaits are 1" thick I use a 1/2" bit. Next it's back to the band saw to cut the bait into the body sections it needs ie: two section, three section style. Now for the tricky part! To get my angled cuts I use my router again with a 45 degree angled bit. I have a quick release wood clamp that I use to hold the small swimbait body sections and I'm careful to make sure that the pieces lie perfectly flush to the router table before routing. I've seen a miter clamp used for this purpose also. The clamp keeps my precious fingers away from the router blade and provides stability as I hold it with two hands while routing. Do one side then release the clamp and flip the piece over once again making sure that the lure is flat against the router table before routing the other angle. Now I go back the band saw and cut out the two notches where the pin will run through the two screw eyes. Again I use my clamp (which has plastic grips to hold the wood by the way) to keep my fingers away from danger. The plastic grips are important because you don't want to accidentally contact the router cutter with anything metal!!! The other sections groove where the two screw eyes sit is achieved using the router again but with a 90 degree cutter. I use a router fence to ensure that the groove will be routed perfectly down the center line of the piece. You can adjust the height of the cutter to make a shallow or deeper groove depending on what you want. With this particular router bit you hold the lure section by hand up against the fence and then slide it from left to right over the cutter while maintaining downward pressure. Voila, a perfect groove for your screw eyes! I'll have to take some photos to help explain all this but hopefully you'll understand.
-
Ha ha ha!!! Thanks for the kudos Mark, you just made my day! Honestly there's so much talent here on this website that I'd hardly consider myself special at this point. It's nice to have your work appreciated though so thanks all the same.
-
I use some color shifting paints made by auto Air and they work great. The particular one I've used recently is Chameleon Flair Teal/Purple which I used over a dark green base coat. Depending on the light it looks green or purple/blue. They also have some highlight interference paints which add a hue shift depending on the base color underneath.
-
 Sweet!
 -
Of course what also sells baits is QUALITY!!! That's where many knock offs fall to the way side and the custom bait makers rise to the top.
-
I actually believe that the closer we can get our lures to look like real food to a fish the better but that starts with profile and motion before color. I'm always amazed though at some of the custom requests I get from my customers who are very adamant about having specific colors or details. As a guy pretty well known for putting a lot of detail into my paint jobs I know the power it has to sell my products and if it gives the customer confidence to throw my bait over another one then that's great.
-
Thanks for the question. I'm glad I happened to scan through the newest threads and saw this. No big secret for making spots and dots. I used to do it all freehand but made myself a stencil out of mylar with an electric wood burning/stencil burning tool. Whenever you see REALLY tiny dots on my baits they are done with stippling which is achieved by lowering the air pressure to the point where you have to rock your airbrush trigger back and forth to make it spit the tiny drops of paint. Hope this answers your question.
-
Shhhhhhhhhhh!!!
-
Just wanted to let you guys know that Nu-Lustre 55 will soon be available in a non dripping formulation that should be idea for our lures! You can brush it on or dip and it won't run or drip so no drying wheel (and extra hydro bills) will be needed. As soon as it's available I'll let you all know. I endorse their products and communicate with them often.
-
Thanks! Much appreciated. What I try to do is paint "what you see" which are the words of custom painter Mike Lavalee. Look at the light and dark of an object and really try to break down what makes something look like it's three dimensional rather than just the simple forms. It's amazing what a little highlighting and shading can do.
-
Paint pens work great but I usually use a combination of hole templates and free handing. My particular style of eye painting is closer to taxidermy eyes than just a couple of dots. I really try to nail the reflections and shadows that make a painted eye look like it's three dimensional. Takes some time to master but the results are really lifelike.
-
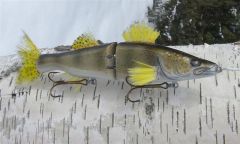 Here's my latest creation. An oak Walleye replica swimbait. Hope you like it.
 -
Regarding the actual method of installing them I'm still perfecting what works best so I'll hold off on giving specifics for now. Once I find the easiest way I'll fill you in. I know John Hopkins uses a piece of tape to arrange his fins into the shape he wants before epoxying them into his baits.
-
I use microfibetts or tapered paint brush bristles depending on the bait. By tapered I mean that the ends of the bristles actually get thinner in diameter. Of course the paint brushes aren't the natural fiber ones but synthetic. The tricky part is getting them from the paint brush and into the bait without gluing them to everything else within a 5 foot radius! LMAO!!!
-
Welcome to our addiction my friend!!!
-
I have to agree with the others. The Bluegill is the better one by far. Very nice craftsmanship.
-
I ended up doing the same thing but I was hoping that it might be possible to drill all the way through cleanly. I might see how small a Forstner bit I can buy as I know that they drill very clean straight holes.
-
Hey folks, I've noticed that even when using my drill press it can be tricky to drill the holes for the hinge pins of my swimbaits perfect. I drill all the way through from top to bottom in one shot and often the hole at the bottom doesn't quite match the hole at the top. I assume that this is due to the bit flexing.The lure is held in place with a vise with a cross vise with rubber jaw covers. Do any of you have any tips or tricks that might help? By the way I use a Brad point bit. That particular bit wasn't the best in quality so perhaps a more expensive bit would flex less? Thanks in advance folks.
-
Mylar

