

.JPG)
Snax
-
Posts
485 -
Joined
-
Last visited
Content Type
Profiles
Articles
TU Classifieds
Glossary
Website Links
Forums
Gallery
Store
Everything posted by Snax
-
That's great news, thanks!!!
-
Thanks for clarifying Dean. Yes, I'm curious as to how waterbased paints will adhere to the Fusion paint. I know it adheres well to most other paints but i wasn't sure if Krylon Fusion would cause any issues.
-
My apologies for the misunderstanding. I was referring to not overheating Auto Air paints which are different from Createx.
-
Thanks for the link that was really helpful!
-
Hi folks, Has anyone sprayed water based paints over top of Krylon Fusion? Specifically I use Auto Air paints which can adhere to some plastics already but I want the best adhesion possible. If so, any tips or tricks I should know about? I did call Krylon but the young fellow I spoke to didn't seem to believe that other paints would stick to it. I think he was new and didn't know what he was talking about though. I use the probionate plastic dip method of sealing my baits so I want to use the White Krylon Fusion as the primer coats. Thanks in advance!
-
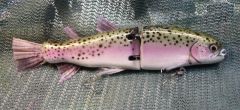
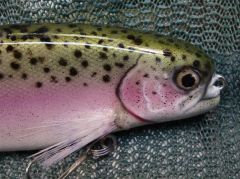 Here's a look at my new Trout Swimbait for 2008. Solid oak and dipped in probionate solution to seal. Airbrushed with Auto Air paints and top coated with three coats of automotive urethane. The tail and fins are microfibers and the idea to use them came from John Hopkins.
 -
 Here's a look at my new Trout Swimbait for 2008. Solid oak and dipped in probionate solution to seal. Airbrushed with Auto Air paints and top coated with three coats of automotive urethane. The tail and fins are microfibers and the idea to use them came from John Hopkins.
 -
If you are trying to spray opaque Createx some thinning is usually required but be sure to use the right reducer and not just water. I switched from regular Createx to their Auto Air paints and they have much better adhesion Also their new 4011 series reducer is awesome. It contains a tiny amount of glycerine which helps eliminate tip dry while spraying. Spray in very thin coats and heat set between. Caution to not over heat the paint as this can reduce adhesion also.
-
One of the best swimbait motions I've ever seen. Outstanding work John!
-
Hi folks, I'm Mike Bromelow, owner/artist of muskysnax.com. I've been making my own line of baits since 2005 but tinkered with bait making since I was 10. I try to answer any question that comes my way and really have no secrets when it comes to what I do. Many people have helped me along the way (Jed Volkman for one) and I enjoy doing the same for others. This website is very humbling and just when you think you're getting good there's always someone pushing the envelope a little further than you! Thanks to those who share their secrets and to those who continue to fuel my own passion for learning. A big shout out to John Hopkins for inspiring me to take my own baits to a whole new level with the use of microfibbets for fins and tails.
-
That is very innovative John! Another outstanding creation from the master.
-
Very nice color matching. Well done.
-
REALLY nice job on the lure! I'm also looking into creating a line of plastic baits to meet a different price point than my high end oak creations. I'm interested to learn more from anyone that has had solid plastic or expanded foam baits made.
-
 Wow! You're now among my favorite bait makers! Incredible job.
 -
Great job! Nice clean blends from photo finish to paint.
-
John was kind enough to tell me that the tail material is a product from the fly tying world called microfibetts. Thin durable tapered synthetic fibers. I'm going to be using them on my own swimbaits and yes, they do look amazing. Johns baits are phenomenal aren't they? I always enjoy every new batch he comes up with.
-
I bought a kit that has tiny brushes that fit up inside the airbrush body much like a pipe cleaning brush. First though I soak the airbrush for a couple of hours in airbrush restorer which breaks down the paint.
-
Another masterpiece! I'm one of your biggest fans John. I KNOW what it takes to make baits at that high a level and yours are some of the best I've seen. Keep it up!
-
Hi guys, I've searched for and ready every post I could regarding this subject and I have a few questions... I tried it out using clear plastic shot glasses from a dollar store and used lacquer thinner to dissolve them. They dissolved well but so far the mixture doesn't appear to cure hard at all once applied. I bought some acetone today but it seems to take much longer for the cups to dissolve. After a number of hours they are still in a goopy mass where the lacquered ones are completely dissolved. Does it take longer for the acetone to break down the platic and will it cure harder? Perhaps these particular plastic cups are not going to cure hard no matter what I dissolve them in? Should I invest in the propionate pellets or is there a plastic that will work just as well? Thanks in advanced.
-
You're a talented guy John! That bait is outstanding.
-
 Another masterpiece from one of the bait makers I most admire. Well done.
 -
 Outstanding!
 -
Without a doubt, action (and shape/size) before paint. I've caught so many fish on my baits while testing them out in the bare wood stage. The size/shape and action is what will do most of the triggering on active fish. Now there are times when a certain pattern can outproduce others. Perch would be a good example of this where I live and fish. I'm pretty well known for painting realistic styled baits but I spend the most time during production on making certain that they swim right before they ever see a drop of paint.
-
I'm really interested in trying out your method of making these swimbaits but I'm curious as to how you clear coat them? I currently hinge my baits with two screw eyes and a stainless steel pin through them. I have to epoxy the sections independently and then assemble the pin through the screw eyes to join them. Problem for me is that sometimes it's hard to drill the hole for the pin straight and it will pop out in the wrong spot. For that matter is that how you other folks assemble this type of bait? I wish I could clear coat them when they are already assembled but the epoxy will foul up the joints.
-
Wow, some GREAT reading in this thread guys! I've also made a number of jointed lipless swimbaits and have noticed that if my tails are warped (I make them from wood) even a little, it causes the bait to come in like a stick. Mine are only jointed once in the middle then have a wooden tail attached with a screw eye and split ring. I'm curious as to how best epoxy wooden swimbaits? I put all my baits on a rotating rack to ensure no runs in the epoxy. Problem is that it gets into the joints and is a pain to remove. How do you folks epoxy this type of bait?