

.JPG)
Snax
-
Posts
485 -
Joined
-
Last visited
Content Type
Profiles
Articles
TU Classifieds
Glossary
Website Links
Forums
Gallery
Store
Everything posted by Snax
-
Simply amazing!
-
Nice work. I also use the CM-C Plus and it is an awe inspiring tool to work with. It's capable of some serious detailing once you get your paint viscosity and air pressure adjusted to perfection.
-
Sorry for the confusion. I use a Forstner drill bit to drill out three holes that overlap so that when I melt in the lead it will be in one larger hole. The Forstner drill bit allows you to overlap the holes without the drill bit wandering. Again, don't drill to deeply or the bait will roll like a top heavy iceberg. Riverman is the guy who taught me about weighting glide baits. I'm sure that he might be able to elaborate on the matter also. I use screw eyes in my baits and I make sure that they aren't too close to the lead filled holes for strength reasons.
-
Fotunately, making a glide bait glide is easy once you know a few basic rules. First use thicker wood for any glider over about 6" long. I use 1" thick cedar. Drill three interconnecting holes at the head end of the bait about one inch in and three interconnecting holes at the tail end of the bait about one inch in. You will now have a drilled out section at each end of the bait. For baits that are less than 7 inches try drilling just two holes at each end.Put the bait in a bench vise or support it somehow so that you can drip in the lead. Melt your lead with a blow torch while holding it with pliers. Always wear safety glasses! Don't drill deeper than the centre line of the bait or it will have more roll and less side to side action. Make sure to balance the bait so that it sinks horizontally.
-
I'm a realist when it comes to the topic of this thread. Some folks are just naturally good at doing this while others will take years to get to the same level. Compare your work now to when you first began and not with your peers. Now you have a realistic source of comparison. I've been lucky enough to progress quickly but I never stop trying to outdo my last paint job. It's about being pleased with your own level of growth at the end of it all. Enjoy the ride my man, enjoy the ride.
-
I like 'em all. Nice work.
-
Just dropped freshly devconned plug on the carpet
Snax replied to barry batchelor's topic in Hard Baits
I had a slight....ummmm....mishap today. I was getting down two musky jerkbaits that I had hanging up ready to package up and somehow one slipped out of my hands as I picked it up off the nail it was hanging from. It dropped and one of the 6/0 mustads went through my t-shirt and into my abdomen! Fortunately, it didn't quite get past the full length of the barb and I took it out. I've already done the same thing before and had it go into my finger barb and all. WHEW!!! -
 Stunning baits as usual buddy! It never ceases to impress me when I see them.
 -
Wow, that's really nice looking wood. Great job!
-
Hi guys, I also read that tip and used it to restore a bent needle tip. I used my Dremel but ran it slower and kept it at a shallow angle. I didn't wrap it up, just slid it against the fine sandpaper. After that I put a few drops of metal polish onto an automobile shammy and using the same method I polished it up very nicely. As you drag it across the shammy,you will be able to see how fine a point it is getting as you raise the angle. It has worked on two needles so far that had ...ahem ..."mishaps"!
-
 Very nice colors and blending! Keep up the superb painting.
 -
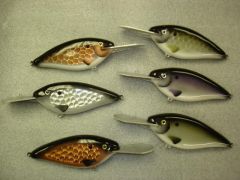
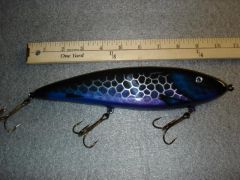 This particular one is my favourite so far Tigger. Love the Blue over the silver scales. You definitely have your own style my man! Awesome workmanship.
 -
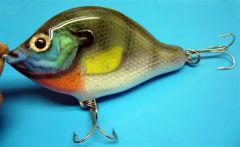
 Not a stupid question at all my friend! This particular bait is designed with the California big Bass market in mind. Of course pike and muskies will kill it also. Bass will hammer it more as a territorial protection reflex although they will eat them on occasion.
 -
This is a 5" cedar glide bait I make which is lead weighted for perfect balance and swimming action. It zig zags side to side when twitched and swims in a wicked "s" during a straight retrieve.
-
 This is a 5" cedar glide bait I make which is lead weighted for perfect balance and swimming action. It zig zags side to side when twitched and swims in a wicked "s" during a straight retrieve.
 -
There are many great airbrushing specific websites with forums that are wonderful for learning specific techniques. Practice specific things over and over until you see an improvement and then add that skill to your lure painting. I went from painting with spray cans two years ago to painting very detailed and lifelike baits with my airbrush after only a year. You can do it if you stick with it and really focus on learning techniques that will be applicable to your style. Most of all don't get frustrated when the learning curve slows down. It will happen but from that point the small improvements will be the ones that really make the biggest impact. Hope that made sense! lol
-
I own an Iwata Sprint Jet and Hammerhead compressor. You can't go wrong with Iwata for quality and customer service.
-
I'm not familiar with your brush but the Iwata Custom Micron airbrushes are unbelievable for detail work.
-
Thanks so much guys. Your comments make all the hours I put in worthwhile. I'm amazed at the talent on this site. I had a good look through the gallery today and I'm among some truly talented bait makers.
-
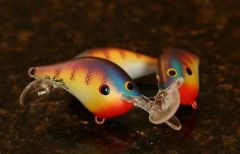
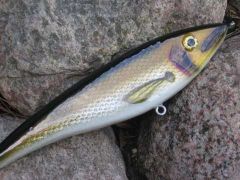
 Really nice! I've always been a fan of those lipless swimbaits and I've just finished testing my own prototype. Yours is awesome!
 -
 Wow Dan, VERY nice work! Great use of color contrasts too.
 -
 Really professional looking job. Keep it up!
 -
Thanks again for the nice comments guys! Regarding the paints I use, I use Createx, Com-Art, and craft store acrylics. The lowest psi I'm not sure of but I can let you know shortly after a few tests. The beauty of the Micron CM-C Plus is the tiny MAC (Micro air control) valve on the underneath of the brush. It allows for super fine tuning of the air pressure with a few turns. That allows me to get exactly the right pressure for different effects without the need to keep changing my compressors regulators. Another feature is the matched head system which is tested and tuned to perfection to give the perfect spray pattern before it is sold. Is it worth spending the extra money to have the best tool for the job? In my opinion there's no better airbrushing tools than the Iwata line up.
-
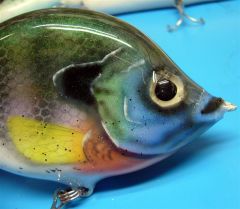
Wow guys, thanks so much for the nice comments. I'm humbled as there are a ton of talented painters on this site. The tiny dots were done by stippling which is achieved by reducing the air pressure to the point where you need to rock your airbrush trigger back and forth to get the tiny drops to come out. I could have sprayed each dot individually with this brush but it would take half a day! Thanks again for the kind words.
-
Excellent workmanship all around. Keep it up and please post more!