

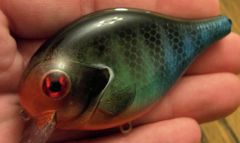
.JPG)
Snax
-
Posts
485 -
Joined
-
Last visited
Content Type
Profiles
Articles
TU Classifieds
Glossary
Website Links
Forums
Gallery
Store
Everything posted by Snax
-
I use Iwata airbrushes exclusively. I use them both for lures and custom airbrushing. Worth every penny and outstanding customer service.
-
Thanks for the kind words Tim, and to answer your question it NEVER ends! lol Even after making a successful bait I'm now thinking about how to make the next one even better! It's a sickness but one I'd never want a cure for. I also enjoy seeing videos of everyones lures and I think with lures it's almost needed to really get the design across. Words can only convey so much but these videos are a great educational tool. I'll never forget seeing my first John Hopkins swimbait video! Wow!
-
Thanks Matt! Your incredible Bluegills were the inspiration behind the level of detail I put into this bait.
-
 Your photo finishes are some of the best I've ever seen! Awesome work!
 -
Here's a video clip for you! Click on the image.
-
Great questions! The bait is 1.25" at it's thickest and it tapers down into the tail. I'd guess the height to be about 2", maybe more. I weighted the first three sections only and mostly the head section. The only difference in ballast going from wood to Featherlite is in the actual amount of weight added. Its location remained the same. I keep the weight between the belly and the center line of the lure for a keel effect. The lure can be worked slow or fact equally well with no rollover at high speeds.
-
I'm going to stay with the molded fins and tails Lockjaw. I love the look of the fibbetts but it's just so time consuming to do them.
-
 Great job dude!
 -
 Thanks so much for the nice comments guys!
 -
Sorry for the oversized photo infraction! I really had no idea it was too big. I just made it smaller and hopefully it is now legal. If not, I'm sorry in advance and I really did try to follow the rules!
-
It does swim well Jed. I pay close attention to where I place every joint. This one swims with almost no head movement and it looks like the tail is actually propelling the lure. Even though I've done a ton of experimenting on my own I have definitely borrowed from many of the other folks here who were kind enough to share.
-
Thanks bud!
-
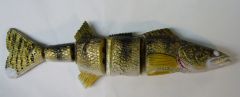
Hey everyone, Here's a look at my newest swimbait. This is a 10" Walleye replica. After MUCH tinkering with joint types the past several months i have settled on the ones seen here. I believe that Mark Poulson also uses this method which is just creating a small slot for the screw eyes to sit inside. The hinge pin passes through the two screw eyes and the flat faces of each section catch the water creating a great swimming motion. The only thing I did as far as shaping the faces was to notch out a section on one end of each body segment where the screw eyes stick out from. This helps give the lure a better side profile with less space and allows for more freedom of motion. If I didn't do the notches, the screw eyes would need to be sticking out further thus making larger gaps between body sections. Whether or not that would effect the action or not I don't know but I like the look of tighter spacing. Obviously the hooks and all hardware are not installed in the photo. I'm about to send this wooden body off to be made into the mold for my Featherlite models. Hope you like it.
-
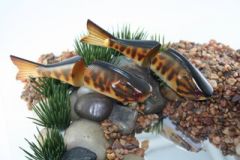
Here's the wooden original body just before I send it off to be turned into a mold for my Plastix line. Thanks to all who have inspired me.
-
For sure!!! That underwater footage was soooo COOL!
-
PERFECTION!!!
-
I have since decided not to use the taxidermy replicas and have been hard at work hand carving my next few swimbaits. I think it adds to the value of the lure for the customer that at least the original was hand made even if they are buying a plastic version of it. Your level of detail is just stunning Matt. Truly inspirational!
-
I honestly think that Matt's are the most realistic swimbaits out there right now and I'm inspired to step things up another notch on my own. Way to go dude, you deserve all the recognition!
-
Congrats! I'm one of your biggest fans Matt!!!
-
 Looks GREAT to me!
 -
Hi Milia, Glad to hear you got the scroll saw issue sorted out. As mentioned by the others, you will find that band saws are very handy if you are planning on doing any larger quantities of baits. They are also handy to have around when renovating or for odd jobs around the house. I suggest buying one that has roller guides for the blades as they can be adjusted to track better, run cooler and increase blade life over model with guide blocks. I bought a RIGID brand band saw and then bought a roller guide kit from Carter to fit it. Also buy a high quality blade as most blades that ship with any machine are budget level. It's funny that once you get into making your own lures you suddenly become an expert in so many other things like hydrodynamics and it's effect on different swimbaits shapes, how to make paint stick to every surface imaginable, pull strengths of different woods and on and on! lol Then there's the whole issue of trying to be original yet still borrow from others and how to market yourself in a vast sea of competition etc. Welcome to your new obsession!
-
I was looking into this very idea recently but also found that most taxidermy fish replicas have a curve or one sided details. Try Wasco though if you want some small 4.5" sized Bluegills, Perch or Crappie. They have some that are unpainted clear plastic that should work well. The fins are thin though so you may need to bulk them up with some epoxy putty or similar product prior to molding. I bought some and did some testing which went well. My larger baits will still be hand carved originals but I may use the ones from Wasco for the small ones.
-
Hi Aaron, Try the search function and type in swimbait. You'll find many threads that answer your questions and then some. The lipless swimbaits have been a hot topic for some time now. "The year of the swimbait" indeed eh Jed? I predicted that last year after seeing a few of the talented guys here starting to market theirs.
-
I've heard them called that too. As you say it's slang for the dive and rise jerkbaits. It can be confusing for marketing these days as different genres of anglers have started interchanging terms with one another.
-
There is a small nut on the rear of the needle called the needle chucking nut. Remove it and then pull the needle out of the back of the airbrush being careful not to bend it. If it seems hard to pull out or is stuck, soak the airbrush in the appropriate cleaner for the paints you use for a while to loosen it up. The needle should slide out easily when the airbrush is properly maintained.
