

.JPG)
Snax
-
Posts
485 -
Joined
-
Last visited
Content Type
Profiles
Articles
TU Classifieds
Glossary
Website Links
Forums
Gallery
Store
Everything posted by Snax
-
Crankbait = A body bait that uses a diving lip to achieve swimming motion Swimbait = A body bait that has no diving lip and achieves it's swimming motion via the shape,placement and number of jointed segments Jerkbait = A one piece body bait that achieves it's action via various twitches from the anglers fishing rod. They have no diving lip. Some are side to side glider style and others are dive and rise types. This would be the standard definition however companies have been calling twitch baits jerkbaits. Twitch bait= A body bait which may or may not be jointed but does have a diving lip and is fished erratically with snaps of the fishing rod as opposed to a straight crankbait retrieve.
-
Do you happen to know if the airbrush have solvent proof o rings inside and was it cleaned with or sprayed through with solvents or solvent paints? For sure though it will be needing Medea airbrush lube on the trigger and possibly on the tiny pin that the trigger moves when you push down on the trigger. That and run a little down the length of the needle with your finger tips before carefully seating it back into the airbrush. If the trigger doesn't seem to go back far enough when you pull back on it make sure that your handle isn't to tight as this limits the trigger throw.I believe you should have a small adjuster for the pre set handle.
-
Hmmmm, I've usually heard that the fins hinder the swimbaits as they limit the motion of the head section. I guess joint placement/type has a bigger effect on some designs than the addition of fins. Aren't swimbaits fun to make though? When you finally get one just right and it swims like a real fish it makes all the trials and tribulations well worth it. This website is a blessing for people who are just starting out as they can learn from all our mistakes and triumphs. I've been around for while now and I still learn something new every time I log in here.
-
Honestly I'd do some market research and see what the big companies are up to. It's what the customers want that ultimately should sway you one way or the other. I'm actually considering this very dilemma for my next molded bait. I can go with microfiber pectoral fins that stick out or just go with the molded in ones that are flat against the body. Both styles sell and both are functional. Do I really want to have to do all that extra work is the question!
-
 Just a quick word on the computer situation. I'm a recent Mac convert and my favorite thing has to be the ability to safely surf the net without getting all these pc viruses and spyware. I find that I'm spending more productive time on my laptop and not constantly running and updating virus scans. Not trying to start a whole Mac vs pc debate but this has made my own time on the computer more productive.
 -
Oh man I feel for ya! I really hope I don't do that myself when I attempt to make my first Oomoo mold soon.
-
 What a Kodak moment!
 -
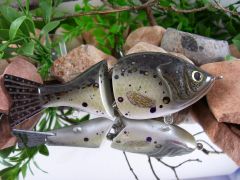
 That thing is gonna get EATEN!!!
 -
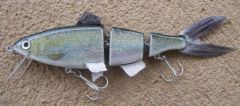
 Boy what a fantastic paint job! The carving is great too. Love it!
 -
Looks great Mark, well done!
-
Who made the firetiger musky bait on the random thumbs?
Snax replied to go4bas's topic in Hard Baits
Apology accepted and congrats on your recent success. Take care. -
Who made the firetiger musky bait on the random thumbs?
Snax replied to go4bas's topic in Hard Baits
Hey Joe, how are ya? It's only because he has a history of posting smart@ss remarks aimed at me that I thought he was at it again. Maybe I was wrong but I doubt it. Like I said there's a ton of talented bait makers here. I suppose with a name like Musky Snax it's hard not to think of me when thinking of musky lure builders. -
The stipple effect can also be done by reducing your air pressure all the way and then rocking your airbrush trigger back and forth while pressed down and slowly increasing the air pressure on your compressor. You can buy separate micro air control valves that attach right to the airbrush that will let you dial the air pressure just right to get the tiny stippling. A more advanced method is to grab your air hose and loop it to cut off all the air. Then slowly start to release the kink to the point where there's just enough air flow to get the paint to spit out causing stippling. Using this method you can also immediately vary the size of the stippling by chocking or opening up the kinked hose with one had while rocking the airbrush trigger as mentioned above.
-
Welcome to your new addiction!!! I also think it's a great idea to try some repaints but also don't be afraid to find some threads on making the style of baits that interest you and jump right in head first! I did four years ago and I'm still learning from everyone here! Have fun and remember that we never make a mistake...We just change our minds!
-
Who made the firetiger musky bait on the random thumbs?
Snax replied to go4bas's topic in Hard Baits
Thanks for the kind words Pikeman. I've been working on prototypes lately and haven't done any new finished baits. They will be coming soon though! -
Who made the firetiger musky bait on the random thumbs?
Snax replied to go4bas's topic in Hard Baits
I don't want or need to be anyones favorite but I have a feeling that he made a point of not mentioning me in his post on purpose. Maybe I'm wrong. It's the way he said what he said. There's so many amazing bait makers here it's ridiculous and I certainly don't think I'm any better than those mentioned, just different. -
Who made the firetiger musky bait on the random thumbs?
Snax replied to go4bas's topic in Hard Baits
Boy that was subtle. -
I've just ordered some Oomoo silicone which I think will be perfect for what I need it for. I'm also going to pick up some smoothcast 300 for prototyping. no need to have the right density during that stage. I just need a quick methos of making identical lure bodies for experimenting with joint spacing,joint faces hinging methods etc. There's been some really good discussions on here as of late regarding all the intricacies of swimbait design and I'm going to put them all to good use!
-
Nate was a big help to me when I started making swimbaits and as I began getting more adventurous with the designs John Hopkins input was invaluable. Thanks guys!
-
I'm going to be going through all these learning curves myself soon and your thread has been very helpful. I want to be able to make my own baits as well as having Danny make them. God forbid if anything happened where he was unable to make me baits I'd be screwed without being able to do them myself too!
-
I need help painting a lure for a friend and paint mixing.
Snax replied to red sox 58's topic in Hard Baits
I suggest picking up video that teaches the basics of airbrushing. There's many good ones on the market to choose from and it will help you more than you'll ever know. Airbrushing looks so easy when you see an experienced person doing it but controlling where your paint goes (and doesn't) takes a lot of practice. Best of luck to you! -
I sometimes use epoxy wood to fill imperfections. They are pretty rare in the bodies that muskydan666 pours for me. He has been using the Featherlite for a couple of years now.
-
Dave exemplifies the spirit of this website unlike certain others who only post jealous wise cracks. I look forward to the photos showing the differences in the designs. As they say, a picture's worth a thousand words.
-
This morning in Muskoka Canada it was -35 degrees celcius!!! That's without any wind chill too. This cold weather sucks @ss!!!
-
It should only effect the durability of the paint if it's not been heat set. The fish eyes would be from solvent pop or surface contamination in my experience and from what I've read on airbrushing forums.