


pikeman
-
Posts
310 -
Joined
-
Last visited
Content Type
Profiles
Articles
TU Classifieds
Glossary
Website Links
Forums
Gallery
Store
Everything posted by pikeman
-
why don't you use a rounded stencil ? and at the edges use less paint to do the fading effect, it will require some precision because you don't want to see the edges of the stencil on the lure. Another way is to do a 4, 5, 6 small triangles on the stencil to cover the lenght of the lure than paint them gently (just as a fine shade), after that use the hand tehnique to round the corner and cover the sides
-
Husky, How did you manage to place the wire for the eyes in the mold? My guess is that you use an 1 part mold for foam. I did some molds with the prototype having the eyes on it but somehow never got good results in placing the wire correctly inside the mold, 3 out of 10 got bad results with the eyes placed wrong, I think I might have moved the wire inside the mold while I was pouring the foam. Now I managed to do a top class mold with a thru wire chanel and a hole on the belly, also carved details and a hole in the mouth for the lip to place in, it looks great, I can't wait to see how the pouring will turn out since the mold is filled with all these tricks
-
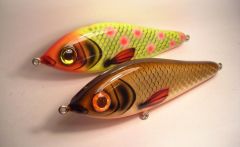 great lures looking at those scales and wandering, did you do the black ones by hand? they seem to be done with the airbrush but I can't figure it out how you managed , shoot the black paint from one side and the brown from the opposite side ?
 -
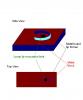
Tried to make an example in paint the metal board has a 5 mm height for NOT bending under pressure, carefull at those sharp edges also bonding the ends of the board is optional, as you can see in the pic if you don't weld the ends of the metal board then you don't need the evacuation hole
-
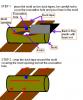
I have a solution Yes , a friend of mine tryied it and if you go for a great number of lures you might have a chance this way, I'll try to explain but I don't have pictures unfortunatelly. Prepare to consume one of your lurebuilding days for cutting lips You need the folowing materials (a little bit dangerous): - a prototype lip - metal board cuting scissors - metal board 1mm thick - long enough to cover the lip overall lenght and 5-7 mm height - a dremel - welding gun - a piece of metal with a hole in for welding the metal board Now you wrap the metal board around the lip (carefull not to cut your fingers) Next you bond the ends together using the welding gun Next you weld the board form on the metal piece, center the hole because you will use it to get the lexan lip out Next sharp the edges of the metal board with the dremel or other methods you can think about for the board to easy cut the lexan Now you can either use a hammer or a vice to press the metal "mold" into lexan This should do it
-
Have the same problem, anyway my compressor is very hot after 30-45 min sometimes less depending on how long I use the brush in that period. Also is losing air somewere and I can't find the spot, but I can tell because from 30 s to 30 s of non-usage it starts for 2-3 seconds to pump air to keep the pressure constant. Tried the soap mixed with water method (used for gas pipes joints) and yet I didn't figured it out It will die pretty soon if I won't solve this but this is the price for buying low costs compressors I guess. I think that mounting an water trap ain't such a good advice since you may overheat the compressor and not notice.
-
http://www.tackleunderground.com/community/topic/14236-photofinishing-or-foil-on-a-jerkbait/
-
is it absolutely necessarily to heat set the paint? in fact my question is "does it make the paint stick better to the underlayer?" or it is ok to wait for the water in the paint to dry? I ask because I paint more lures in one step so before I get back to the first one the paint is dried
-
and it is UV protected ?
-
A-Mac, I wouldn't encourage this method for a 3-piece swimbait unless you split it in three different molds, remember that you can't place the hardware in the mold so you'll have to do it after you demold the pieces. Working with foam it's different than urethane and microballoons, you don't have time to place enough foam for a 3-piece lure before it starts to expand. If you figure a way for this or if you have any thoughts share them and will discuss pro and cons maybe there is a way to do it P.S. here is the tutorial for the mold http://www.tackleunderground.com/community/topic/11512-slip-molds-for-hard-baits/
-
Maybe I'll do a tutorial for this the pics are more concludent than the words
-
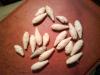
P.S. don't worry, you have plenty of time to do all of that before the foam expands. Also use the napkin to wipe the foam of the X-Ray plastic cause you can use it several times. The down side of this method is that you'll have to drill holes and use twisted eyes and also drill a hole or two for the weight I'm working on a mold with pre-cut channel for thru wire and holes for the weight, I have a blue RTV and a pink one. The blue is 1:1 mix ratio and it's better then the pink one that has a 10:1 mix ration. This stuff is great, on 1" lures I have an 0.03" lip slot and it gets perfectly on each foam lure so I think it won't be a problem on the thru wire channel Sorry for the pic quality, it's made with my mobile phone
-
Can you specify the lenght of the lures? For small , under 3" lures I also use RTV and foam from smooth-on(15lb 4X - expand) and never had a problem. I make the mold in a plastic pipe(there is a tutorial about this on TU) after that I do an evacuation hole on one side, then I place the mold on two large duck tapes but leaving the hole free for the foam to evacuate Also as a tip, I use an X-Ray plastic for pouring the foam in the mold. I bend it and press it with my fingers, like that you will obtain a channel on the plastic. Mix the foam on it, plie the plastic, separe the mold opening, put the plied X-ray in it and let the foam go down. This way the foam won't get on the RTV opening, if it gets there gently wipe it with soft paper(napking)because it will expand and will open the mold, your lure will become fat. Note: this is 1 piece molding
-
Is is absolutly necessarily to place the lip? I cut the lip slot on the prototype, make the mold and place the lip after demolding the lure Now I'm trying to make a mold with a channel for the thru wire and two holes on the belly for the weight already cut on the prototype, if it works this may solve the problem with the wire running through the lip also cause you can place it after I'm tired trying to fit the wire in the mold Oh , forgot to mention that this is a one piece mold and I use foam for the lures
-
Diemai, were did you find you're gallery ? cause I can't find mine
-
I've tried with devcon2ton man it was a mistake the resin became hard in 10 minutes instead of 30 than I've changed to your idea and heated the lure, yet another mistake, it didn't cured evenly, and the resin didn't covered all the lure, don't ask me why but there were huge spots uncovered and I couldn't blame the oil from my fingers for that so, yes, it is more fluid but that didn't helped me too much and then I decided to remain on the classic method Maybe you'll have better luck with etex
-
try devcon2ton 30 minutes epoxy
-
Jerry, no need to apologize, it is indeed a big effort to pull this out and I think we shall have patience because it is in the favour of all TU members, if it wasn't I don't think you would have mess up your brain fot this Best regards, and thank you for TU
-
outstanding job can you share some info about the foil? from were did you bought it ?
-
thanks Jerry , checked I wish you good luck with the pictures ... 6000 manually, damn , lot of work


