


Vodkaman
-
Posts
7,423 -
Joined
-
Last visited
-
Days Won
237
Content Type
Profiles
Articles
TU Classifieds
Glossary
Website Links
Forums
Gallery
Store
Everything posted by Vodkaman
-
Band saw for me, followed by a go on the belt sander. I design my lure profiles (concave shapes) to match the belt sander radius, consequently I never need the tight curves of a scroll saw. Dave
-
Definitely on the right track. Try to limit to one change at a time. This way you find and learn the actual solution. Dave
-
Nice shape and proportions. What you describe is the perfect action for this kind of bait, you have managed to get the maximum action out of the bait. This is confirmed by the 180 turn on the pause. This is caused by the last vortex acting on the bait. In my opinion, the roll is caused by the joint being too tight. It is a very tidy joint, but if the joint touches during the swim, the joint will freeze and the force from the vortex will push the bait over (roll). Correct, deep swimmers create such large vortex turbulence, that prevents the glide. Gliders, which are beyond my personal experience, are generally one piece and torpedo shaped. They use the same water forces, but the shape greatly reduces the force. Apply a twitch and the vortex sets the direction of the bait. The bait then glides beyond the effects of the vortex. The next twitch always reverses the direction. If you want to stay with the two piece, you will have to reduce the efficiency of the swim. Increasing the front length ratio to 2:1. A lot of trial and error work ahead. Another thing to play with is the nose position. Yours is currently central, try a high or a low nose. A more rounded forehead section will help too. Dave
-
The 30 minute will work, it will just take longer and more care to keep the alignment. Personally, i use a couple of drops of instant (CA) glue, as the lip is not a part of the line tie structure. Dave
-
De ja voux Dave
-
So funny Dave
-
Reducing the width of the lip will increase the speed of the wobble. This will in turn, reduce the width of the wobble, giving the lure a tighter action, exactly as Hawgfan stated. It is actually an easy calculation to predict the speed increase for a specific lip width reduction, using the Strouhal formula. If you want to know more, let me know and I will write an article on the subject. Looking at the image on the bagleybait website, I don't see the bait swimming any deeper. If anything, I would say shallower. The fact that the swim angle reduces will reduce the power or forces at the lip. This will also reduce the width of the action and make it even tighter. For this reason, Hawgfan's advice is very important; Go Slow. Dave
-
Here is a video tour of my old workshop. Due to fiscal restraints, I had to give it up, but this vid will always give me fond memories. One day I will re-build. I had to upload to Photobucket, let me know if the link worked. Dave
-
I think workshop images belong here, not in the gallery. The gallery should be reserved for lures etc. Dave
-
Sounds like a good result. Post another picture, this will help others in the future. Dave Edit - oops! you already did - good job There is more depth available to you if you want it, just make the lip longer. You could make several lips at 1/4" increments and wedge them in for swim tests. Dave
-
I seal with runny CA glue, having already drilled the hardware holes and slots (holes and slots are the very first operation, even before shaping). The purpose being to fix the grain and allow a final sanding of the body. I then fit the hardware and a second seal coat of CA glue, to catch any bare spots from the sanding. I fit the hardware with the CA glue also. I don't paint my baits, but if I did, I would probably fit the lip after painting, but still fit the ballast and eyes before. Dave
-
Very instructive vid and congrats on the first catch Dave
-
That looks as though it would swim nicely without a lip, but of course, you will not get your required depth, so a lip it is then. Having never fitted a lip to a swimbait, I am reluctant to get involved beyond my suggestions above. If no one with the relevent experience jumps in with some advice, then you have to treat this as a first prototype and be prepared to try different things. I can see that you have plans for the carving, but I strongly suggest that you should shelve these ideas for the first proto and save them until you have a working bait. Hopefully you can get all the testing done on this first bait and go all out on the next. The suggestion to make the lip too long and trim back until the bait works, is the way I build. This is very easy with my test tank just outside my workshop, but may not work for you. There is always some water nearby though, be inventive. The attached image would be my starting point. I hope some more experienced advice is forthcoming for you. Dave

-
You call it a swimbait, is it a jointed swimbait? I ask as these do not normally do not have lips. But yes, a lip can be added to get that extra depth. There is more to lips than just the angle of the lip; The length of the lip is important along with the position of the tow eye. A good starting angle would be 30 degrees to the horizontal with the eye in the nose. Make the lip too long and trim it back until you get the depth and swim that you want. It would help others to advise you if you included a photo and told us the length of the lure. Dave
-
Great video and loved the lure and the thinking behind it. Not much you can do about the casting limitations with that cupped rear, but the bubble trail should make up for that. With that wide body, there is a lot more depth available if you wanted it, by moving the tow eye back a tad, but I suspect in that water that the extra depth would not be required. Very informative thread. Dave
-
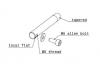
This was my Mk1 lure holder. Very simple, 10mm diameter aluminium rod. The taper is to push into holes on my lure turner. The bolt traps the lure eye between the washer and the flat. It works well enough. I have a more involved Mk2 which uses a saw cut down the middle of the rod, to clamp the eye. I will draw something up if you want to see. Dave
-
The way that hunting works, you cannot have a deep diving hunter. Hunting occurs when the swimming lip passes the vertical. As far as diving is concerned, there is an optimum swim angle for maximum depth. If the lip swims at a shallower or steeper angle than this optimum then the depth of the swim is reduced. DAve
-
Good advice from Ben, but I would stop short of cutting up a Bagley original as these are obviously copies. Check out pictures of originals for the shape and angle of the lips. Make the first couple of lips too long. Trim them back gradually until the bait swims, then make a template. As Ben said, cutting the lip slot is going to be the hardest part. There have been a number of solutions posted about jigs for such operations, here is one method that I posted. The problem for you is that it is pointless searching for 'lip jig' as the search function will not operate of 3 letter words. I did a search for 'lip slot' and that helped me find relevant threads. Dave
-
Wise words, Slowfish and Bob. Dave
-
As above, the attitude does not matter, I have tested both. DAve
-
Running water would also be a bonus - lots of planning to be done here. Dave
-
I've got models of 32786 sizes 40, 50, 60, 70 and 80. Email me and I will send CAD models of what you want. folicallychalled@aol.co.uk DAve
-
I just had a close look at images. What a simple idea, as all the best ideas are. I think the spinning blade is just an extra and has nothing to do with the change of direction. The angle of movement of the head is the critical part. You have to stop the bait and tug to re-start in a new direction, as I see it. Dave
-
I agree with Sonoman - this is a great opportunity to get your ventilation system right, by planning from the start. Dave
-
I have used sawdust with runny quick glue. Works well, but is more difficult to sand, as it is harder than wood. DAve


