


Vodkaman
-
Posts
7,423 -
Joined
-
Last visited
-
Days Won
237
Content Type
Profiles
Articles
TU Classifieds
Glossary
Website Links
Forums
Gallery
Store
Everything posted by Vodkaman
-
I have just managed to have a look at half the video (bad internet service), certainly an exciting lure. Quite an erratic hunt action. I agree, it is all about the plate and nothing to do with traditional hunt theory. Plate size is probably a critical balance thing. I take back my first comment Dave
-
I will explore this concept next time I get my tank up and running. Ants have eaten away some of the structural beams and so I have some rebuilding to do. Dave
-
Just my opinion, but I don't think the blade has anything to do with the hunt. I think it is there for added bling. If the blade was removed, it would disturb the balance, but it might well still hunt. Interesting design though. Dave
-
Tony - thanks for the kind words. I know my stuff is not for everyone Dave
-

Bending Jig Or Table For Through Wire Crankbait, Ideas?
Vodkaman replied to Diesel Fitter's topic in Hard Baits
I use 18mm plywood base and 1/8" brass rods, because I already have these materials in my shop. Dave -
I wrote an article on the comparison of various lip material's bending properties (July 2011) it involved a lot of research and some very heavy sums. I tried a search but I probably decided not to post it, as I know most of you don't like the techy stuff. The results: 1/16" G10 was 3.5x better than 2mm polycarbonate. I also came across another material that was twice as good as G10, called basalt carbon fibre. I don't know what its availability is, but it could be worth looking into. I use 2mm polycarbonate, purely because it was readily available at the right price. I doubt I will be changing any time soon, judging at the amount that I still have left in my man cave. For small lures it is overkill, BobP's selection of 1/32" G10 would be a good choice for lures smaller than 3". Dave
-
I have had this happen to me once, when I was in too much of a hurry and placed the lure in my PoP drying box. Not necessarily a bubble that you created, lots of expanding air in the wood, fighting to get out. I bet it is a mistake you won't make again Dave
-
I had already caught the lure design bug when I was introduced to TU. I was struggling and getting nowhere and was grateful for this wealth of knowledge which I pigged out on for so many hours. Being an engineer, I wanted to know why it worked, not just how to make it work. The information that I found here on TU was thorough, detailed and easy to follow, solving most of my problems. Still one question remained unanswered – how does it work – so I asked the question. I wasn’t expecting a flood of answers, but figured that there would be one or two engineers out there that might be able to point me in the right direction. No one could help me. Instead I was subjected to such a barrage of hostility and rudeness that I almost left. I stayed because I felt that I had something to prove. I decided to bring lure theory and an alternative method of design and understanding to the table. It certainly was not going to be for everybody, but there are always going to be one or two inquisitive minds out there who would appreciate the insight, even if they did not use the knowledge. The barrage of hostility continued for some time, but eventually faded away, but the TU experience was marred for me and that was the only question that I ever asked in over 4000 posts. It kind of became my mission to help people with alternative ideas and solutions wherever possible and with extra special help to newcomers, determined that their experience should be better than mine. Not essential, but I do wish people would say thankyou more. There have been times when I have put many hours into an answer and not even received acknowledgement that the information was even received, let alone appreciated. For anyone new to lure building, TU is a daunting site and finding the information that you need is extremely difficult, because you don’t even know what you are looking for. You try random reading, but that doesn’t get you anywhere. You are left with no choice but to ask a dumb question. It is upto us to just set them on the right track, maybe with a few helpful links to get them started. It doesn’t have to be a big effort. This idea of having to serve a lure apprenticeship before being qualified to even speak is BS and I cringe every time I read it. Other cringe worthy comments are: ‘reinventing the wheel’ or ‘it’s all been done before’ or ‘there is nothing new to be discovered’, another favorite is ‘there are no short cuts’ pfft! Lure design is still in its infancy. The first hundred years were driven by trial and error, a slow but determined process involving a lot of firewood. Now we have a new tool – knowledge of theory. Designers who embrace this knowledge are far more likely to come up with solutions and new ideas, but there will always be wood for the fire Dave
-
Jigginpig - Thanks for all the ideas. Bobbers or anything that floats on the line are not allowed. Not to worry, my next bait is already designed in my head. The material will be agar-agar, a water based jelly that can be molded and re-heated. I have tried making a lure with this in the past, on another TU project. There are drawbacks, but I can design around those. Glad you enjoyed the vid. Dave
-
Hints For Drilling Eye Sockets In Wood Blanks?
Vodkaman replied to anamealreadyinuse's topic in Hard Baits
I drill a pilot hole while the bait is flat. After shaping, I run a drill the size I want, in reverse. This eliminates any tendancy to grab or chip. Dave -
I haven't built a curved lip bait, but it should give more action and depth. You can test this with a spoon and a bowl of water. Hold the spoon lightly to allow it to move and drag it through the water, one way then the other. Dave
-
There used to be a fifteen minute window, but a lot of site upgrades since I made that observation. Dave
-
Java - yes, a similar type pond but located in Bandung. Quite a few of them around and targeting different species like carp or catfish. I like bawal, it is agressive and extremely strong. I have lost so many fish because of the teeth. I need to find a source for wire for making traces. I tried lots of natural bait flavors, including garlic. I spoke to the owner and learned that the fry were fed on banana. Sure enough, it was a winner, banana flavored tapioka! Thanks for the contacts offer. I may take you up on that if I start fishing again. Dave
-
Great comments, thank you all. Yes, an edible crank. As long as I can eat it in front of them, I win Dave
-
Thanks for your kind comments. They are basically all fishing the same methods, legering, and using the same baits. For me, it is not a competition against other anglers, but a challenge to catch the fish. I noticed the fish taking bait as it hit the water, so I used this and float fished - winner - banned. Next, I used a weightless line, not far to throw anyway - winner - banned. Bawal are basically a predator like bass, so I caught some fry and live baited - winner - banned. Then the bawal12 lure - winner - banned. There are no written rules. I am thinking that they just don't like the big, bald, white guy coming along and taking the money. Several of these guys are fishing professionally and rely on the money. Not my problem, they should step up their game. I sat down with the owner and expressed my grievances and fishing principles. He said that I can use any bait as long as it sinks, is edible and the line has a 1/8oz lead weight. I have stopped fishing there now, until I develope an edible crank! Regarding the attitude and action - it has a wide wiggle like any other decent crank, nothing unusual. Early on in the video, I show a still of the design page. Pause it and there is a view of the float attitude and the swim attitude, both on the same page. Dave
-
Thanks guys, glad you liked it. Hazmail - yes, these things take an embarrassing amount of time. 29 clips and 9 stills. RayburnGuy - the title 'Bawal 12' gives you a clue, Yes, a lot of development. Dave
-
The direction of the loading of the ballast is not important. The last lure I worked on, the ballast was loaded from the rear, lengthways and it worked very well. This thread inspired me to finally post the video of the construction. I have started a thread for it. Dave
-
I designed this lure for a specific species of fish in a specific pond. The fish – Bawal – is a chunky piranha type fish, with incredibly powerful, bone crushing jaws. They have relatively small mouths, so the lure had to be small. I had seen fish of 2Kg regularly caught and the odd specimen of 3Kg. I was told that there were 5Kg fish in the pond. The pond – a manmade concrete pond, about 20m x 30m and 1.3m deep. Down the center is an aeration pipe, pouring streams of circulated water to provide oxygenation for the over stocked pond. Designed for intensive daily competition fishing for upto 30 anglers, though usually no more than 12. No top coat was going to survive more than a couple of fish, so I decided to design the lure as a fast, easy, throw away solution. I wanted to be able to make 24 in a day, so time spent on each lure had to be limited to 15 minutes. So, at least for the prototypes, I sealed with CA glue and finished with a few dips in propionate. Lure length 40mm with a single hook. The body curves were designed to match the curves of the belt sander and the lip design was straight lines, for easy shaping. Because of the size of fish, small size of lure and light, balsa type wood, through wiring was essential. But, because of the time constraints, through wiring was not an option, so I had to come up with another idea. I first swam the lure in the last five minutes of a competition, as I knew they would not like it. I swung it out to the center and let it settle for half a minute. I then jerked it about a meter to give it a good wiggle and bam! – it got slammed by a 3Kg bawal. They paid up the big fish prize, but the lure was immediately banned from future competitions. The video shows the construction, including the through wire solution and a different approach to ballasting. The lure hunts, as do all my lures, but that was not important, as I only had 3 effective meters to work the lure. I never got around to making part 2 and now my tank is out of commission, so I don’t know when that is going to happen, as I am not doing so much building these days. I shot this video last April. Hope you enjoy the video. Dave
-
I find that the only way to cut the lip slot square, is to cut the lip before carving. The lip slot is the very first cut I make after gluing the profile template onto the block of wood. Dave
-
Me too. I had a look on Facebook, but no mention of a problem, so assumed it was a problem my end. A FB notification would have been nice. Dave
-
Tow eye position relative to the lip is critical. The position may well not be on the end of the nose, like you might expect it to be. Lures are like a balancing act. You change one thing and you may have to adjust something else to regain the balance. No majic formulas, just lots of testing. Change one thing at a time, or you will never know what works. DAve
-
UV LED's (light emitting diodes) is another option, but that involves a little bit of electronics. If this is within your scope, could be a good solution. Dave
-
Good idea. It may be better to leave the bulbs switched on rather than switching on and off, as the biggest load on the bulb is at power-up and the bulbs are not cheap. Ever notice that incandescent bulbs always popped when you switched them on! Dave
-
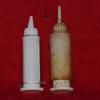
Cake syringe for resin/microsphere injecting The first time you try injecting, you spend about half an hour trying to clean everything up and soon realize that this is not the way to go. Also, the pour is not efficient, with a lot of waste filling the gaps and crevices. The three images show two identical syringes, one unused. The secret is to fill all these gaps and crevices. This serves two purposes: 1 – greatly reduces wastage, improving efficiency. 2 – clean-up is reduced to a minute or two after very little practice. First job is to fill the end of the plunger. Image No2 shows the recess in the end. Fill this flush. You can use the resin or some other filler. Second job is to fill the unused space inside the barrel and nozzle, as seen in image No3. The best way to achieve this is to have a dummy run. This also covers the clean-up procedure. You need half a jar of solvent, I use cheap paint thinners. An old rag and a scraper, I use an old knife. 1 - Spoon in some mixed resin, insert the plunger and squirt out of the nozzle. 2 - Pull out plunger, scrape off excess and wipe with the rag. 3 - Re-inset plunger, draw up some solvent and squirt back into the same jar, repeat about 20 times. 4 - Remove the plunger and allow to set. The syringe is now ready for injection. The clean-up solution can be used many times. The sediment settles and can be decanted. You can see in image No1 that there is a build up over time. The syringe in the image has been used more than a hundred times, so you can see that the syringe is good for at least 500 operations. You could extend this life by figuring out a way to efficiently wipe the inside to prevent the build up, but I didn’t bother as the syringes are so cheap anyway. You never need to remove the nozzle. Hope this helps, I am not famous for explaining things clearly. Dave
-
The problem with the pouring of resins is that the density of the final result is quite a bit heavier than your original wood bait. This will inevitably affect the action and the amount of ballast. You may get lucky and preserve the swimming action. Some of the commercial pouring resins already have micro-balloons or microspheres already mixed in or you can mix the plain resin with micro-balloons to control the density to your own specification. But, the more MB’s you add, the thicker the mix becomes. I had some success pouring the thicker mixes using a cake icing syringe. It takes a little practice to clean up after each pour, but the syringe can be used over and over hundreds of times. I bought two syringes and never opened the second. If you choose to try the syringe, let me know and I will write a detailed procedure of what I learned and save you some grief. Dave


