


Vodkaman
-
Posts
7,423 -
Joined
-
Last visited
-
Days Won
236
Content Type
Profiles
Articles
TU Classifieds
Glossary
Website Links
Forums
Gallery
Store
Everything posted by Vodkaman
-
Bigblue2 - only the occasional development work, but I will keep the offer in mind Dave
-
Indeed. I would never go to China with my product. I would always keep it local so that I could keep an eye on things. I would be more likely to use low tech methods using mold masters and employ my own people for the production. I would not be looking to sell millions, thousands would be enough to support me and my team. Dave
-
SlowFISH - I understand the complexities of injection tooling having been involved in automotive fender design. Tooling is a massive investment, but it also makes the lure more difficult to replicate. Of course, if the lure is successful on the market, there is no complexity that will stop the Chinese reverse engineers from stealing your work. I have lures that I could have taken to production, but the thought of having my work stolen, and feeding these thieves with money that should have gone into my pocket, No thanks. My best opportunity is if I crack the triple point hunter. Because it will be a fine balance, this would be very difficult to replicate for the reverse engineers. It is always tempting to go to the Chinese manufacturers to produce your lures, but there is little to stop them from selling your work on the side using your tooling. This happens a lot. Dave
-
BSF are the future, not just for fishing, but also for the human food chain. I designed a BSF farming unit, but broke my hip just as I was getting started. Now that I am fully recovered, I should really get back to this project. There are business opportunities in BSF larvae. Dave
-
Ha! very cool lure. 3D printed too which means very good CAD skills. I have been an electronics hobbyist since college, specializing in logic since I failed the subject. I only pick up the soldering iron very occasionally when a need arises. I have been meaning to explore arduino but the need hasn't arisen yet. I have a few stepper motor projects that would suit programming as the standard electronics is a nightmare for such control. Dave
-
You maybe able to find a local electronics store for LEDs and the other components. Red, yellow and green should be around $0,15 each. I am very fortunate here in Indonesia; in the city there is a huge mall full of electronics and other self build shops. Because it is a fiscally poor nation, do not make the mistake of thinking that they are dumb. So much electronics and computer genius here, enough to keep the mall in profit. There are online stores such as Maplin that are reasonably competitive. There is RS components but I find them expensive, but that was years ago, maybe different now with so much competition. The market for electronic components is bigger than you might think! Dave
-
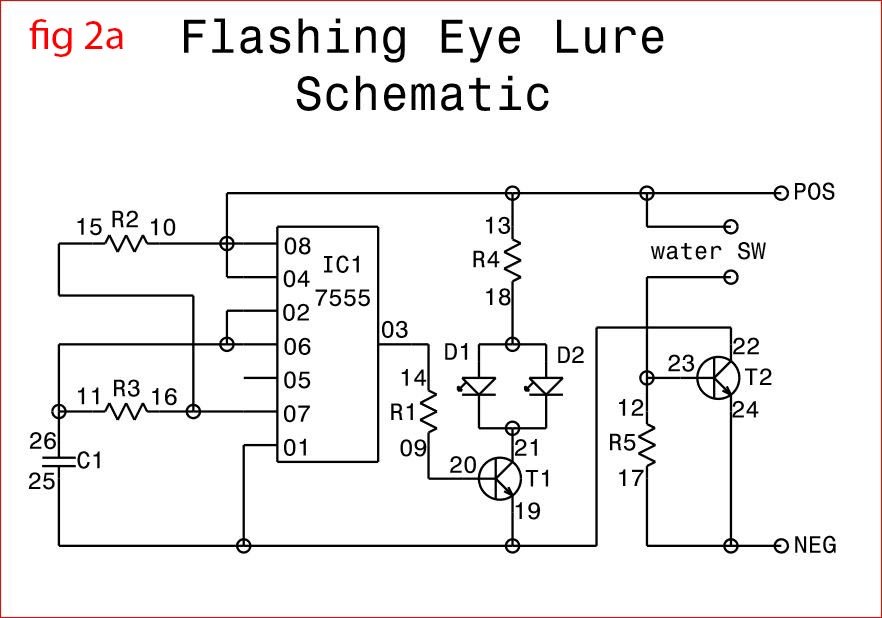
Bigblue - Here is the circuit schematic. I also have a spreadsheet for calculating the resistor and capacitor values to achieve the required on/off times. I would welcome any electronics boffins to check my work, as I stated, untested. Dave
-
My thinking with the flashing light; is that you can have the off time 5x or even 10x the on time. This will be a power saving of the same magnitude, AND, you can still choose a frequency (flashes per second). This is all controlled by choice of resistor values or in the case of Datguy's solution, in the programming. You can also control the brightness for more power savings, again, by choice of resistor value. Dave
-
Datguy - definitely a good solution. If I were to built hundreds of these lures, this would be the way that I go. Except for the programming equipment, the price is about the same, but the space saving is significant, especially if you use SMD (miniature) chips. There is an 'instructable' for a flashing light using this technology, but it only gives a broad outline. But, I am sure the detailed information is available on the web. Very techy Dave
-
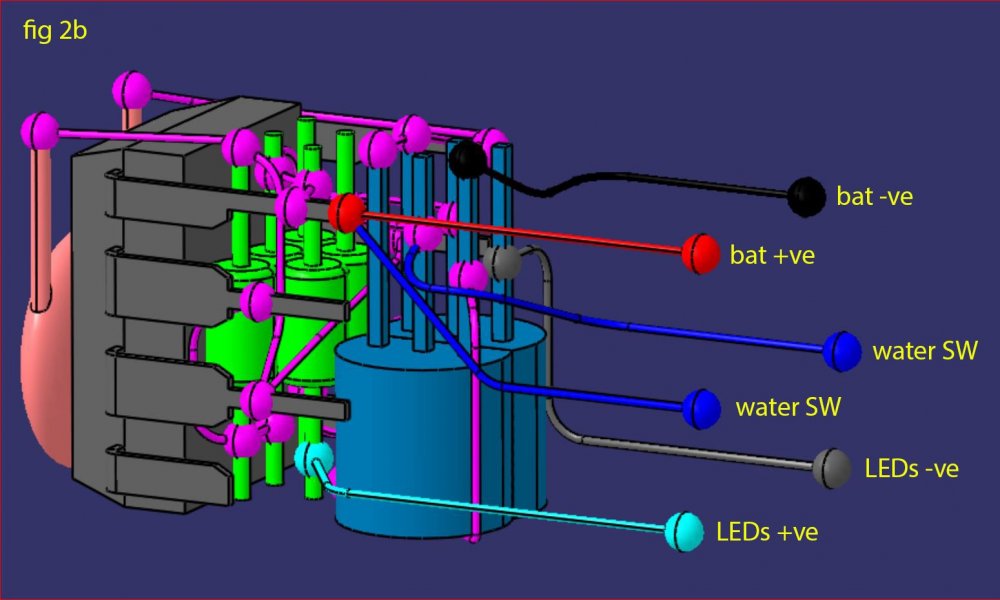
Do you want constant or flashing. The LED color makes a difference too. How are you with a soldering iron and very fiddly work? You will have to figure out a battery mounting, water proof but easily accessible for changes. The components can be sealed in resin or epoxy, so they are no problem. I designed a circuit a couple of years ago, for flashing LEDs and water contact switch. I never got around to building it, so sorry, untested. The dimensions of the electronics are 14mm x 10mm x 8mm plus a little extra for epoxy sealing. I have written instructions on how to build, blow by blow. If you are interested, pm me your email addy and I will send you all I have. Dave
-
Doc - looks like you have found the solution - wavelength. Dave
-
SlowFISH is spot on, it is all about air movement. If I run my box without the lamps the drying time doubles, but to achieve this level of drying just by placing in a room would take a week or more. Another good place is on top of the refrigerator were there is air movement which reduces drying time to 3 - 4 days. After all the testing I built a simple moisture sensor which beeps (very low volume) at different speeds depending on moisture, continuously once dry. So, no more weighing Dave
-
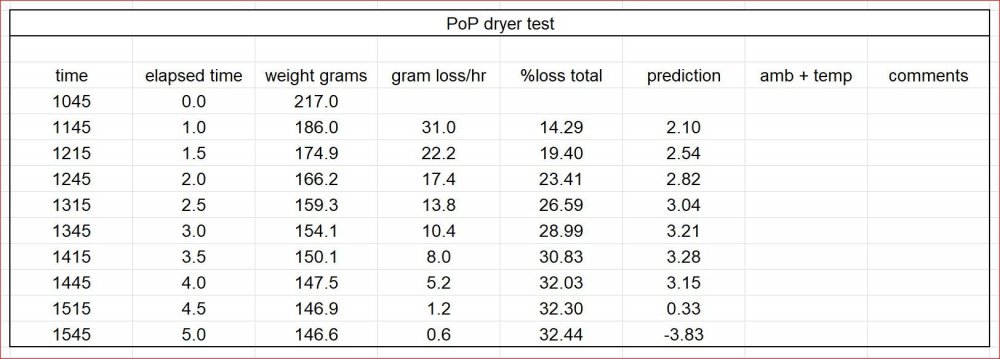
Here is a spreadsheet of the drying times. This was never intended for publication and so is a bit rough. But, it does give an indication of the drying process. Contrary to what I remember; the rate of drying is not constant, but it tails off significantly at the end. You do not need 100% dry. Once the loss rate drops the mold is dry enough to use. The molds sit on dowels so airflow reaches all surfaces. Dave
-
Here is an isometric and a section through my simple pop dryer. the light blue shelf lifts out. PoP molds can be placed at the bottom of the box and on the shelf. If you do a lot of molds, you could build a cabinet with lots of shelves. The holes above the fan is low pressure (fan blowing down) and so draws fresh air into the box. The holes below the fan are high pressure, so blow out wet air. Thus, moisture never builds up, maximizing the drying effect.


-
I usually throw such lures in a box for a few months and fix them up next time. If you are in more of a hurry, this is the way I would tackle the problem: Your biggest problem, without removing the topcoat, will be drying the lure. The most likely point of water ingress, apart from deep scratches, will be the hook and tow eyes. If the eyes are screw-in, I suggest that you remove them. This will speed up the drying process and allow you to re-seal the eyes into place. Before epoxying the eyes back, clean them up with emery or a wire brush, a brief soak in a degreaser such as alcohol, acetone etc, will improve adhesion and help prevent future leaks. To dry the lure, place in a sealed container (screw eyes removed) buried in uncooked rice grains to dry the air and draw the moisture out. It is impossible to tell when the lure is completely dry. I suggest weighing with a gram scale daily, making notes of the weights. When the lure stops losing weight then you are done. Drying through a minute fault could take weeks, so be patient. With the eyes removed, grind off any meniscus forms from the old epoxy before installation of the eyes. If the eyes are through wires, the best that you can do would be to apply a small drop of runny CA (super) glue to the wire after drying. This will be drawn by capillary action into any faults that allow water ingress. Also apply to any deep scratches. You could apply new epoxy locally, but a complete new coat is always the tidiest solution. But for lures that are close to neutral buoyancy, a complete new coat will disturb the buoyancy. Clean all the areas to be epoxied with emery, and wipe with degreaser. Don't worry about the emery scratches, they will disappear under the new epoxy. Dave
-
I have no experience with UV cured resin, but have built an Eprom burner in the past. From what I have read, cure should be complete in minutes. Keep in mind that if you double the distance from the lamp then the lamp power is reduced x8. I cannot tell the distance of the lamp from the lure, but you should try and reduce the distance to the absolute minimum to get maximum power. I suggest do some tests with scrap wood or even cocktail sticks dipped in the resin, and find the ideal curing distance. Report back whether success or failure. Tell us the distance that works. Dave
-
Mark - I like that 'cross pin' idea. This method can also be used with twisted wire eyes. This is especially useful on very small cranks as often the depth of the twisted eye is compromised by available body space. I will definitely be giving this a go. The pin need not be metallic, a length of bamboo 'sate stick' will amply do the job. The 3mm diameter stick will have a large bearing area. The lure will be ripped in half before the hook hanger comes out. Who's a clever boy then Dave
-
Good video. Dave
-
I bought a new circular saw. Its layout was slightly different to my old one. First time of using I touched the side of the blade. Fortunately it only ripped my nail off! Correct, no alcohol, except as a disinfectant Dave
-
Oh yes, that'll do the trick. Still plenty of room to move around. You shouldn't be working the far side anyway, extremely dangerous. Keep your sleeves rolled up when working the router. Dave
-
The wood needs to be light enough to support some ballast to keep the lure upright and stable, and strong enough to hold screw eyes. I suggest anything with a density of 0.35 - 0.45g/cm3. There are plenty of wood lists with this information obtained with a simple Google search. Regardless of top or sink, all my lures are built with 0.35g/cm3. Albesia is a very cheap and light construction wood that works well for me. I doubt you will find it over there. Dave
-
I never did add dust collection to my table router. There are two methods; top fence or underside box. There are plenty of videos on YouTube. here is a good video explaining the underside box method. Dave
-
I weigh my plaster molds on a gram scale. When the mold stops losing weight in the drying process then the mold is 'dry'. From personal experimentation; PoP loses weight at a constant rate, there is no gradual slowing down of the weight loss, so it is very easy to determine the dry point. I mention this because over drying in the oven can make the mold powdery. A cracked open oven works well, but the ideal rapid method is a warm box with fan circulation. I used 3x 100W incandescent (filament) bulbs as the heat source. If you make a lot of molds, this simple wood construction oven is worth building. Dave
-
I did build a painting stand based on my tapered insert rods. It sat in a BIG bearing on the base for easy rotation. It actually rotated in 2 axes for total flexibility. But, I abandoned painting before ever trying it out. I am looking forward to seeing what you come up with Dave
-
I too am liking the PVC cap idea. Very innovative, good thinking. I used the same principle with tapered clamp rods that pushed into holes on the wheel. But, I had to manufacture the rods. The 'cap' method will give a mounting sturdy enough for jointed swim-baits. I know this because I have used push-on joints on another project with sturdy success. Dave


