


Vodkaman
-
Posts
7,423 -
Joined
-
Last visited
-
Days Won
237
Content Type
Profiles
Articles
TU Classifieds
Glossary
Website Links
Forums
Gallery
Store
Everything posted by Vodkaman
-
Mark - It might be a more robust option than the PVA glue. If the Pam spray oil fails, then that may be tried. I should have the Mother proto-3 towards the end of next week. Dave
-
Further to BobP's post, you could not do better than to view all of Paul Adam's videos. Paul is also a member of TU. Dave
-
Hi Ryan and welcome to TU. What school subject(s) are you planning on satisfying with this project? Either the school going to pay for the equipment, you have a rich Father who likes fishing or maybe it is better to build your project without spending a small fortune. There is a little bit of everything in here; art, woodwork, design, mathematics, science, sociology, mental illness... Tell us more about your plan and we can start to help you. Dave
-
Point taken. I did clean it up with a scrubbing brush and can say that the clean-up was reasonable. What did not clean off would be too thin to mark the castings. Still, the release was not brilliant. Dave
-
X3 I would never have expected that though. DAve
-
Good post Frank. You know I always like to over think things. Yes, it is the paste that I am using. If anything, I will be mixing on the low side, to make sure that the tube lasts the whole tin. Yes, it is warm here, I reckon around 80F in the workshop. Bubbles at the mating face are a problem, but not of real concern at this stage. When I find a supply, I plan to mix 25% of liquid resin, to thin the mix out and give the bubbles a chance to rise under a light vacuum. The mix did heat up after hardening, but not as bad as I have experienced in the past, when I likely used too much hardener. Mixing a kilogram at a time is going to be a challenge. I will use an old 2 liter jug for the job. I have a chromed steel rod that I have sealed the ends rounded, I also have a long teaspoon for getting into the corners. Once the two halves are formed, I plan to heat the mold halves to soften slightly and then clamp together with load spreading blocks and let cool. The parts should mate perfectly after that or I will have to totally re-evaluate my plan. The first softening heat will be in boiling water. If that doesn't work, I will have another go with hot oil. I think I have all the bases covered, but it will be more than a week until I get my hands on the new mold. Thanks for the input Frank. Dave
-
Good, 'cos the glue didn't work, it peeled off, even with the cooking oil. Dave
-
The shelf life is 1 to 1.5 years. The thick layer of dust that was blown off the top of my can was not promising. This is a most informative website for answering filler questions. Dave
-
Not sure where to post this, but it probably has most relevance here for mold making. The question is always on your mind, ‘How much hardener should I add’. I did a little research, and the recommended ratio 50:1 Bondo to hardener by weight. So, if you mix 100gm of filler, you will need to add 2gm of hardener. I just bought the Indonesian equivalent called San Polac in a 4Kg tin, but the tube of hardener just looked mostly empty to me. I squeezed the hardener into a small, lidded jar, making sure I get every drop of hardener out. The weight of hardener was 37.4gm which gives a mixing ratio close to 100:1, half that of the Bondo recommendation. If I don’t stick to this number accurately, I will likely run out of hardener and waste a good part of the can, so I have no choice but to weigh the hardener. However, now that I have transferred the hardener to a jar, this weighing process is made a lot simpler. I place the jar on a gram scale and remove hardener until the weight loss matches what I need for the mix. The other problem people have with Bondo, is the rapid speed of curing. This is almost certainly because too much hardener has been used. In my testing of the 100:1 ratio, I found that the product still hardened successfully, but a lot slower, allowing more working time. As I will be mixing 1Kg batches and wanting to paint on a layer for a bubble free surface before pouring in the remainder, then any extra working time is most welcome. I can recommend this jar storage method, especially with large tins, as all the guess work is removed from the process and you can proceed with confidence. I calculated the density of San Polac to be 1.9gm/cm³ which is a lot heavier than I thought. The significance of knowing the density, is that you can calculate the weight of product to fill a particular volume. As a rough guide, it is almost twice the weight of water. Dave
-
Bob - do you mean; paint on the PVA glue and let dry? I can try that. I still have plenty of room for tests on a failed ABS mold. Dave
-
JR - I doubt it can be called a market, as fishermen just do not use artificial baits here. Even if they did, and possibly the reason why they never caught on, is that the prices are way too high for a guy who probably manages a family on $200 - $300 per month, in many cases a lot less. My aim is to generate local interest and take it from there. By having my test tank on the main road, I developed a lot of interest with the hard baits. People still stop me in the street and ask when I am going to start up again. Many of them I do not ever recall meeting before, so the word of mouth thing works particularly well when you are a giant, white, bald guy in this community. If I can take a new type of bait around the competition ponds and beat the locals, word would spread like wild fire. These ponds are fished by professionals, relying on their success as an income. Currently, $1 buys them enough bait for a 4 hour competition. They will be very reluctant to pay much more without a proven high success rate. Plus, if the bait was that good, it would more than likely be banned, as I have had baits and techniques banned before because of my success. Dave
-
Yo Al - I agree, a wax will be the most effective solution, as I have used floor tile wax on both resin and filled resin in the past with great success. I am hoping to find a thinner solution to the problem, so that I can maintain the detail and particularly the mating surface. I will be using vacuum pouring method and any mating surface irregularities cannot be tolerated. Even the slightest air leak is disastrous to the pour. Ideally RTV would be the best solution by far, but it is expensive and I cannot find it locally. I have high hopes for Pam spray combined with my new prototype design. If this fails, it will be the wax for sure. As for the surface texture; I have done water visibility tests and the texture is almost invisible. As these lures are for home use, at the most, local distribution with zero competition, the texture is of no concern. Dave
-
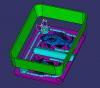
Bob - The RP plastic (ABS) is the Mother mold. From this I will be casting molds with a polyester Bondo filler type product. It is the Bondo that I need to release from the ABS. My original intention with this project was to print both mold halves with a built in injector. However, the mating surfaces were poor and not as flat as I was expecting. The RP process was also unable to print the cylindrical void with any circular accuracy. This step of the development was abandoned. I too have doubts whether the ABS could take the continuous heat cycles. The idea of using Bondo, is that when heated up, it softens. The mold halves then can be clamped together to fix the mating surfaces. I will not be using regular plastisol, but a jello and glycerol mix which will pour at around 175F (80C). Because of the very slow cooling process (15 minutes), I will need lots of molds to put in the fridge. I considered plaster, but the mating surface would always be an issue, plus the cooling process would take longer. Demolding the plaster was problematic due to the complexity causing chipping. Dave
-
Gekhang - the cooking oil test kind of worked, but the test piece still stuck a little bit and had to be popped off with a screw driver. Not good enough. What are you using for a release agent? I have changed my Mother mold design, so that the box sidewall is a separate part and can be released easily. This will make the base plate more accessible. I am thinking a few taps through a wood block should release the plate. Dave
-
M_vandorn - It would be OK to start a thread in the hardbaits forum, call it Buzzin' Baits. Here you can explain the parts used, how you mounted them, what battery you used etc. You can also post photos that are relevant to the thread and not just showing off the lures. I think a lot of members would be interested, I certainly would. Dave
-
m_vandorn - congrats on the win and welcome to TU. Hope you stick around. What electronics did you use, I am guessing a phone vibrator motor. Dave
-
Sounds like the docs are stabbing in the dark. These are BIG words to be throwing about without any certainty. Let's just hope that they are wrong! Dave
-
Gekhang - Oh yes, most definitely needs a release agent. I did a 50g dry test and it is welded solid. I will try a 50g cooking oil test tomorrow. I guess the rough surface texture of the RP print is the big problem. Dave
-
Gekhang - Ha! I just bought 4Kg of a Bondo equivalent, an hour ago. I have just been researching the hardener ratio by weight (50:1) and whether the bondo sticks to ABS (no). I will still probably use a release agent, like Pam. Also I am going to thin the filler with fiberglass resin, to achieve a pourable liquid. I read that the best ratio is 4:1 filler to resin. If you have any comments on the above from your experience, let me know. Good job on the mold. Dave
-
A better solution would be to print a symmetrical Mother mold. With this, I will be able to pour RTV and both halves of the mold will be interchangeable. I can either produce enough RTV molds for mass production or sell the RTV molds or sell the Mother for a very high price or sell the computer model for an even higher price. Dave

-
The problems with this technology for making molds; are the time to print and the surface finish. The mold that I am working on, which is a 2 cavity bluegill, I am told takes close to 24 hours to print. This fact alone means that you are not going to be hitting the mass production market. The surface finish is never going to be smooth, due to the layering method used to build the RP print. Dave
-
JR - I hate shopping and a couple of bucks is a couple of days food. But seriously, 10c - 15c is a throw away price, about the same as I pay. I just feel that the brushes actually improve with use. TheHammer - a professional painter will break in his new brush by wetting and painting a brick wall. This removes all the loose bristles. I do the same with the rough cut wood block. After the first application of epoxy, there are never any more problems with loose bristles. Dave
-
ING - it is all about timing. As long as the lead is still hot, the pin will pull. Dave
-
The question of brush cleaning after using epoxy or any other difficult compound comes up often and there are plenty of good answers scattered around the TU site. So I decided to post my method and invite others to post theirs. This will bring all the possible cleaning options under one thread. My method First, the problems that need to be overcome for long brush life; 1 – Inadequate cleaning will leave the bristles rigid next time you pick up the brush. You may or may not be able to rescue this with a good pounding. 2 – Build-up at the roots. Inadequate cleaning will cause build-up of resin, effectively shortening the bristles after each application, thus shortening the life of the brush. Epoxy brushes are one of the few examples were paying less gets you a better product. Most experienced lure builders have come to realize that cheap brushes usually work better. But that doesn’t mean that you should treat the brush with contempt. With a good cleaning strategy, the brush can live long enough to wear out before being discarded and save money. I use acetone for cleaning my brushes, but other cleaning solutions work just as well; alcohol, thinners etc. I keep an ounce or two of the cleaning fluid in each of three class jars with screw lids. I have an old breakfast bowl kept for the purpose and a length of rough cut wood, the rougher the better. An old half brick or breeze block will do just as well. After squeezing excess of epoxy with an old rag, kept for the job, I pour jar No1 into the bowl. Dab the brush and paint the rough cut wood. Repeat a few times. This is to tackle the roots and scrape the residue epoxy off the bristles. Pour the liquid back into the jar. Repeat with jar No2 and then with Jar No3. Sponge dry, inspect for errant bristles and trim. Store the brush either flat or bristles up, to avoid a set. After use, any solids will settle out in the jars and the fluids can be used many times, thus saving more money. When jar No1 gets too bad, the fluid can be safely discarded and replaced with clean fluid. This then becomes jar No3. This rotation of jars maximizes the use of your acetone and still guarantees the best brush clean and long brush life. Yes, sounds overly complicated. But everything I do is complicated. Brush cleaning is a good habit. Find a method that works for you and stick to the habit of cleaning brushes straight away. So, how do you do it? Dave
-
Wootonc - certainly Devcon 2 ton is a proven product in the TU arena. If you cannot find it, then any epoxy that mentions 30 min should work. I really do not know what the 30 minute refers to; you certainly do not have 30 minutes to apply, maybe 5 or 6 minutes tops. The epoxy may be solid in 30 minutes, but a long way off being cured, which takes at least 24 hours. Dave


