Vodkaman
-
Posts
7,423 -
Joined
-
Last visited
-
Days Won
237
Content Type
Profiles
Articles
TU Classifieds
Glossary
Website Links
Forums
Gallery
Store
Everything posted by Vodkaman
-
Keep thinking and keep the ideas coming. DAve
-
It would not make any difference. The idea of a pressure cooker, is that you raise the boiling point of water so that the water boils at say 230 degrees. This means that the higher temperature cooks the food faster. There is nothing in the plastic to increase the pressure (steam). Dave
-
Propionate refers to raw plastic pellets, as far as I can determine with a few minutes research (not TU). On TU, it also refers to the dissolved solution or propionate solution, and also refers to the process of dipping in propionate solution, even if the dip was not made of raw propionate pellets. Prop (propionate) solution can be made from any plastic that will dissolve in a solvent. Plastic cups are popular and the best solvent for the job is acetone, but not the only solvent that will get the job done. Method - the lure is dipped in the thin solution and hung to dry. The solvent evaporates, leaving a plastic coating. At least 6 or more dips are necessary for a reasonable coat. Dave
-
Thanks TF. RP is very good for making positive masters. The surface finish is the main problem, but this is easily fixed with a coat of epoxy, rotated to achieve an even surface. Dave
-
QR - the second question about the MCU applied in an air conditioned room is interesting. Not so much a temperature thing as a moisture problem. I could speculate about low air humidity and high moisture content of the lure paint brought into the room from a more humid atmosphere. The MCU needs moisture to cure, if it cannot get the moisture from the air, maybe it is getting it from the paint. It is always a good idea to use a hair dryer to drive off any moisture prior to top coating, but the obvious solution is stay out of A/C when coating. Dave
-

Crankbait Hook Hangers Wire And Belly Weight
Vodkaman replied to Blacklabelsociety's topic in Hard Baits
JR - I used to use time, and there was something calming about picking the glue skin off. But, if you have got things to do, this is time wasted. Dave -
Crankbait Hook Hangers Wire And Belly Weight
Vodkaman replied to Blacklabelsociety's topic in Hard Baits
Further to Travis' post No18, I use Super glue (CA) with my finger. The solvent for cleaning your finger is acetone. Dave -
Crankbait Hook Hangers Wire And Belly Weight
Vodkaman replied to Blacklabelsociety's topic in Hard Baits
I cast all my ballast weights in a simple wood mold. I drill the cavity between two clamped, pinned slabs of wood. If I want to place the eye through the ballast weight, I add a brass pin to the mold. The secret is to pull the lead weight off the pin with pliers before it cools. The wires of the eye loop are passed through the hole and folded back over the sides. Once the weight is glued into the body, the eye cannot be pulled out. Dave -
Thanks Andy, reply sent. Pete - yes, same old problem. Aus, USA, UK, all we are good for now is service providers to our home markets. Eventually the global manufacturing field will level, but it will probably take a couple of generations. Even then, fiscally it will not be good. Dave
-
I would like to see an image of your master. If you don't want to show then I totally understand and respect. DAve
-
I don't see having peanut oil and plastisol in close proximity as a problem, as the oil boiling point temperature is much higher than the working temperatures of the plastic. The problem that I see, is lowering the Pyrex at room temperature into hot oil. The thermal expansion and any faults in the Pyrex could cause a break. The Pyrex of plastisol should be heated to working temperature in a microwave first, to minimize the temperature difference. This is not based on experience, but engineering sense. Dave
-
You need to do a pull test for your own confidence: Set up a simple test piece, hang from a roof beam or door frame. A bucket of water hanging from the bait eye. An average bucket will hold 10 Liters = 10Kg = 22Lb. My pull tests have supported this weight and more for 48 hours. I would say that if it holds 10 liters for 24 hours then you are good. Dave
-
Bob - indeed yes. If you are very good at your job, there is more chance of promotion and less chance of eviction. It is not that difficult to learn about the products that you are selling. Stores should take a leaf from Facebook and introduce the like system; take a 'like' card, write the staff name, write name and phone number, insert in 'Like' box. If someone helps you beyond 'third isle, top shelf', you would have no problem making that little effort. Dave
-
I know we have gotten off subject, but I really enjoyed Bob’s post. I am sure we have all come across this attitude thing, it is based on knowledge pride and is a very western fault. Staff who have worked in the store for a few years and think they know it all, but don’t and feel belittled if they are forced to learn a little more. The biggest problem is inexperienced staff, but this is not rocket science and will not take long to learn the basics of their products with a little effort. But who is going to make that effort when you are on minimum wages. Well this is a bad attitude. Do the job properly and if you don’t like the wages then find another job. I went shopping in a tool store only a few days ago. It wasn’t a supermarket, but a counter store. The girl serving me had worked in accounts for seven years, but today she had to fill in at the counter. The first thing she said was that she knew very little about tools but would do her best. On top of these problems, we also had the language problems, but she did speak a little English. I was buying a powered hand drill. It had to have hammer capability and a screw adjuster for speed control for screw driver use and not be too heavy. It took some explaining, but with the help of the customer next to me, we taught her all the features of the hand drills and she produced what I wanted. Next I wanted an angle grinder machine with a flapwheel attachment. I chose the 750W version and we had a teaching session on Wattages and power. She plugged the machine in for me, but it was way too fast for the lighter jobs and had no speed control. She now knew exactly what I wanted and came back with the perfect machine. I now wanted a Dremel, but they did not stock Dremel. The machines that they had were way too big and clumsy for my application. I acted out an engraving action, holding the huge machine like a pen. Her eyes lit up and she disappeared into the stockroom and came back with a dusty old box. She removed a motor with a flexi-drive and a foot switch. Her experience in stock control solved the problem this time and I got a superb piece of kit. The staff, other customers and myself all helped this girl to solve my problems and taught her some engineering. She taught them a little about stock control and everyone connected with a good attitude and lots of smiles. Opening all the boxes for the stuff that did not work for me was no inconvenience to them. All that mattered to the staff was that I got exactly what I wanted. I shook hands with the staff and congratulated the girl on a good job. This is how tool shopping should be, regardless of how much you get paid. As pay rates go, this staff would have been equally low paid as staff in western stores, but they took pride in their job, not the knowledge which is just a tool to help them do the job better. Dave
-
Mark - Pewter is a tin alloy that used to contain lead, so I would say yes, the toxicity changes depending on the metals involved. Dave
-
I am a professional CAD designer, so I can make CAD do ALMOST anything I want it to. BUT, I still have to carve my lure masters by hand and to me, this is a crime. I want one. When I am done experimenting to find the limitations and how I can make it work for me, and when I can spend the money without putting myself at risk, I will take on the risk and get one. The risk is will the level of machine that you are prepared to pay for, do the job well enough for your requirements. How stable will the machine be and will it need constant servicing. Anyone out there thinking of investing in such a tool: Firstly, without the CAD expertise you may be wasting your money. First you must get a decent CAD system that is capable of the models that you wish to produce. You must spend a lot of time (months) learning how to make the CAD system do exactly what you want it to do. In the early stages you will be tempted to think,'well, that is not exactly what I wanted, but it looks good'. Do your research. Read independent user reviews, NOT company BS. Sign up to one or two RP forums and ask questions. Ask nice and you may be able to get a model printed off on the machine model that you are thinking of buying. Evaluate the risks and accept them. Don't cry if it all goes wrong. The money has to be written off. You are most unlikely to produce enough work to justify this machine, but that does not mean that you shouldn't have one. You may be able to offset some of the costs by doing work for others. Dave
-
Do a TU search for banana. A few members have worked on this kind of project. Lots of good information available for this difficult lure. DAve
-
You are going to be trippin' over a lot of new shoes! Be sure that you can make the machine do what you want it to do - BEFORE you sign. Dave
-
Bob - I was hoping that it would help us in our collaboration. To test swim the customer's baits prior to machining. Of course, the customer would have to add $150 to the design and wait another week. But for the more outrageous baits and those trying out new ideas, this could be a worthwhile exercise. For this extra cost, the customer would receive a video of the swimming action, from above and under water. Dave
-
It is best to get your stuff printed out by someone else first, to evaluate what you will be getting. Look for someone doing it as a hobby or side-line as they will have a machine similar to what you are looking for. If you are not intending to buy, then go to a company with a $500,000 machine and get the best possible quality. These guys print multiple projects at a time. DAve
-
I will add an Amen to that too. Here in Indonesia, the Hourly number is $0.84 which is a monthly of $145 and yes, people do manage to live on that amount. My wife's brother travels to Jakarta starting 4am on Sunday, four hours away. He drives a delivery truck there for six days and gets back to the village late Saturday to see his family. Alan's family is a wife and two young children. They all survive quite nicely on the $145 (Rp2,000,000). It has taken him ten years, but he now owns his own house which he built on the plot of land that he bought. Just needs a proper roof building to finish it off. His kids eat well enough and go to school, eat candy and other kid things and they are happy. I live here in Indonesia because I could not possibly afford a decent life in England. I am happy too. Indonesian people do not have the expenses that you have in the US or UK; no heating or water bills, gasoline is $0.70 a liter, electricity is $10 a month with a few energy light bulbs and a digital tv. Clothes are hand washed, floors are mopped, vegetables are cut with a knife, cooked on bottled gas at $5 per month. I live the same way and no problem here. I would love to start a lure business and employ Alan, his wife, and a few friends from the village and pay them Rp3,000,000 so they will live like kings and not have to commute. Maybe one day it will happen. Dave
-
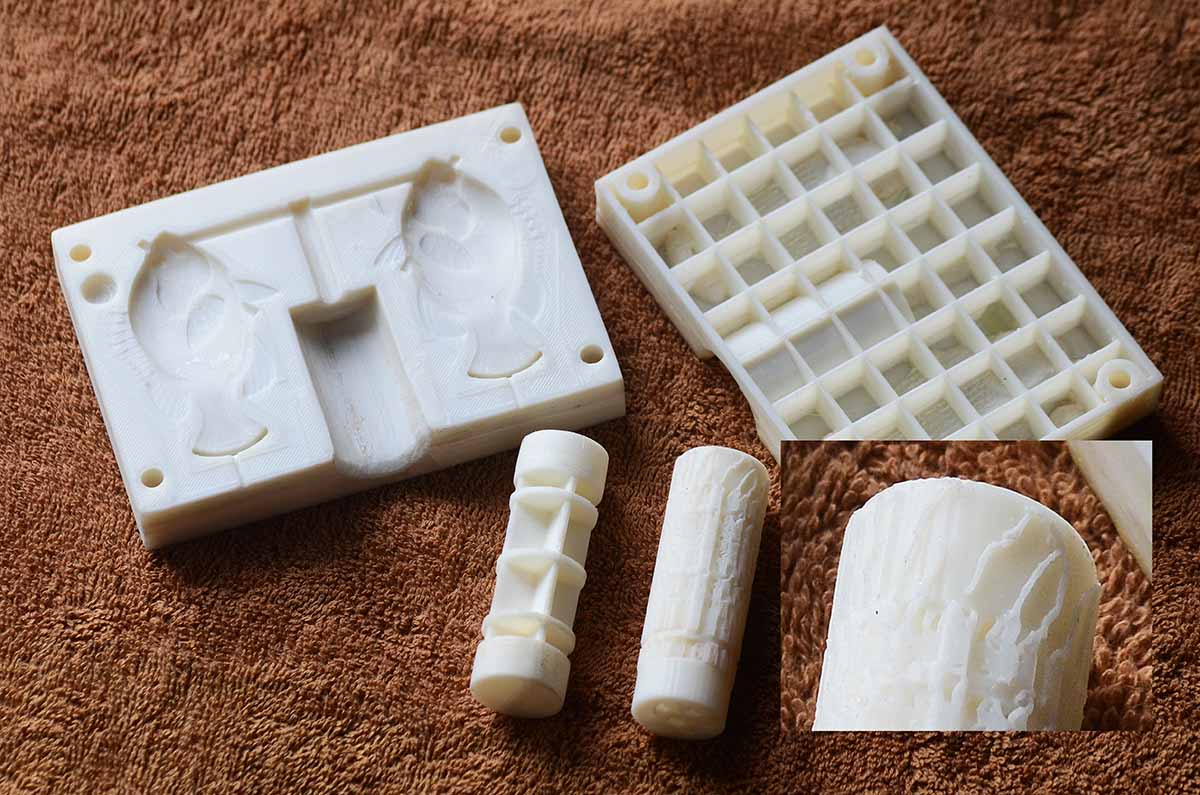
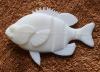
Also known as Rapid Prototype (RP). Obviously a lengthy read, only really of interest to those thinking about using RP or wanting an alternative to sleeping pills. I had no personal experience in this field when I decided to use RP for a project, other than what I had read from a few simple Google searches. I found a couple of local service providers, not wanting to go international postal, I decided that these would have to do. Their print area was not spectacular, so I chose the largest of the two which was 14cm x 14cm x 20cm. I had questions that were bothering me; Firstly I had seen 3D prints on the web of assembled parts printed out as an assembly, also the traditional ball in a ball thing. This made no sense to me, as the parts would have to start printing in mid air. Also, if I gave a positive fish model, how could it possibly print, as the contact with the ground plate is minimal. I submitted a positive fish model as a test, to see what came back. Unfortunately they took so long that I jumped the gun and submitted my mold model, which was a mistake on my part. Still, plenty was learned from the two models. The bluegill came back looking a right mess. The model that I provided was split into two halves and glued together after printing. The join line was along the lateral line. There was a quite heavy seam and a mess of glue. Had I known that this was the method of printing, then I would have printed two halves and carefully glued them together with more precision myself and made a far better job. The only scruffy parts of the print were the rear of the dorsal fin, which is an overhang and the rear of the ventral fin for the same reason. To understand these issues, deeper research was required. I was right, the process cannot print on fresh air, so what the print software does, is print from the base, a rough support structure, to support the model for printing. This structure is then manually trimmed away and you are at the mercy of the guy doing the trimming. It was not too bad, but I could have done a better job myself. When the mold parts came back, it was plainly obvious that holes in anything but the vertical were not possible with any accuracy. The 20mm diameter piston hole came back as an elipse with a 1mm error. I had to significantly trim the piston down to get a free fit, but the 1mm gap on the long axis of the elipse meant that it leaked like a sieve and there was not enough pressure to fill the mold. I designed the mold with spherical locators and depressions, I also included undersize holes for bolting. This was a good decision as the locators did not fit, being too tight. I drilled out the holes and then removed the locators completely. The next problem was that the mating faces were far from flat, with a significant warp, despite the fact that I included a lattice work behind the face, to add stiffness and reduce the likelyhood of warping. The plastic was however soft enough to pull together, but a close seal around the cavities was not possible with the edge bolting and leaky gaps occurred and combined with the inneficient piston, prevented the mold from filling. The surface finish was far from smooth, but this was no surprise given the layering method for depositing the plastic. This I was prepared for and willing to accept. I have just coated all the mating surfaces of one side with a contact adhehive, in an attempt to lay down a rubber gasket. I am hoping that this might allow me to get a few complete pours for water testing. When printing the mold halves, the guy again split the model to enable printing. Unfortunately right through the mold cavity, making the mold useless for anything other than a rough prototype. Other problems occurred, but these were with my model, with the fins being too thin. Rapid prototype is not cheap, the bluegill positive and two mold halves cost me just short of $100. This is not too bad considering that carving a master to this standard would take me days and ultimately not achievable for someone with my carving skills. Printing a positive master is a good plan, as the rough surface finish can be fixed with a thin coat of epoxy and a turning wheel. Conclusions - first impressions would be that this was a total waste of time and effort. But time is never wasted when exploring new techniques. In fact, once you understand the limitations of the RP process, it is possible to design something that will work. My plan now is to fix the computer model and make an RP mold master for pouring plaster mold halves. The mold halves will be symmetrical, so only one master needs to be printed. Once the plaster molds are poured, dried and drilled, they will be skimmed flat on a large sheet of emery paper. This technique will allow me to produce as many molds as I require for production, plus replacements in the future. The built in piston idea cannot work with RP, so I am going back to vacu-venting as I believe that I can make this work. I also think the vacuum method will allow me to achieve the fine detail and a four cavity mold. So, more work time and money to be put at risk, but who's counting. This is what I do - experiment. The image shows the mold halves and the piston. The right hand piston was printed in the vertical and shows how the software built up structure to support the model. The piston was eventually split and printed horizontal. Also included a pic of the bluegill positive, showing the split and messy glue. Dave
-
I just did a little research on minimum wages. I converted all the number to US$ and hourly rates: US $7.25 : UK $10.45 : Costa Rica $2.24 : China $2.66 : India $0.73 It is not the fault of the manufacturers that they have to go abroad for cheaper labor, it is the fault of the consumers. The average consumer is just not prepared to pay 3x the $$ for a made in USA sticker. Any manufacturer who doesn't go abroad, is 100% automated, has a unique product that no one can copy or has a day job to support his family. Dave
-
JR - one may well be safer than the other, but they are all proven to be unhealthy. The membership of this site has always been a strong advocate of health and safety; protect your eyes, lungs and any other parts in harms way. The damage done by the materials used in this industry of ours is mostly cumulative. Do not be fooled into complacency by low production numbers. When you pick up a lump of lead or fit the sander attachment to your Dremel, you should be thinking 'Poison' and then do something to minimize that poison. Under the right working conditions, this hobby is as safe as any other. Dave
-
Get yourself a two headed coin and flip for it. Dave