


Vodkaman
-
Posts
7,423 -
Joined
-
Last visited
-
Days Won
237
Content Type
Profiles
Articles
TU Classifieds
Glossary
Website Links
Forums
Gallery
Store
Everything posted by Vodkaman
-
All the pics for this project got deleted, so I am adding them all here. Remember, these are from many years ago and early experiments. Dave
-
I am not a painter, but there have been a few threads on painting problems lately that I think you should read. There was an excellent post by BobP that explained the names and purposes of each of the coatings and how they all work together as a system. If all the coatings do not play nicely together, then you are in for a rough time. See post No2. Also read this thread on what can go wrong. If you do the right TU search, there are numerous threads on this very subject. Try a TU search for your sealer, it might already have been discussed. The reason that I mention this, is that your thoughts on the sealer might be a problem. DAve
-

Live Target Shrimp - Can You Or I Make This Lure? (Not Exactly Of Course)
Vodkaman replied to Cannon's topic in Soft Plastics
Plaster will need reinforcing to stand injection. I quite liked JRammit's suggestion of a copper pipe insert. Other than that I have nothing. This is what I liked about the use of vacuum; the suction is applied at each individual appendage and there are no bursting risks. Dave -
I did a lot of up-ending epoxied lures, but eventually bit the bullet and built the turner - best thing I ever did. It is an easy build and I promise you won't regret it. Dave
-
Live Target Shrimp - Can You Or I Make This Lure? (Not Exactly Of Course)
Vodkaman replied to Cannon's topic in Soft Plastics
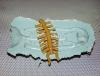
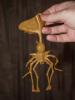
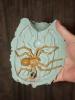
Cannon - yes, you got it exactly right, a cut for each row of appendages. I haven't figured out the prep, but yes, this would be a life casting of a real prawn. One idea is to boil it, then split it carefully down the belly and remove the meat. After fixing the legs into two lines, the thing could be epoxied with something light. Thinned D2T would probably work. You could try with a raw prawn first, but it is soon going to get smelly. Pouring those fine appendages is still going to be a problem with this kind of mold. Me personally, would try and build a 3-piece plaster mold and use vacuum venting to draw the plastic into the appendages. But I haven't figured out how to make the mold yet. Dave -
I don't have weekends. Most of the time I have no idea what day it is. I have to keep an eye on the date, because I have to either visit immigration or leave the country on a VISA run on alternating months. Just got back from Singapore an hour ago. Most of my time I am working on an electric car design. I am just finishing up a very cool lure for a customer that I cannot wait for you all to see. The job I did with Bob is done my end and I have a couple more lures that need starting. I need to start work on the new duplicator machine design and the 12' x 4' x 2' test tank needs designing. I just flip between projects depending on what I fancy - the days don't matter. Dave
-
What Is The Best Temp To Bake A Plaster Of Paris Mold?
Vodkaman replied to Big Ray's topic in Soft Plastics
I have made quite a few different things, not all to do with fishing lures. I made a lot of resin bodies for testing hunting lures. I did a lot of molds when I was developing the vacuum molding method. When I did the plaster experiments, I was not making anything, just curing blocks of plaster. Dave -
Live Target Shrimp - Can You Or I Make This Lure? (Not Exactly Of Course)
Vodkaman replied to Cannon's topic in Soft Plastics
I haven't attempted a life casting, but this tutorial would be the way I would go. I don't think it was written with life casting in mind, but I think it could be adapted for a 3-piece mold. It was one of the first things I read on TU and convinced me that this was the place to be. As I see it, the trick will be to get all the legs and appendages lined up on two planes. I would make a former and freeze the legs with CA glue or something similar. I hope you get the idea, 'cos I don't want to write a tutorial on something that I have not done. Dave -
What Is The Best Temp To Bake A Plaster Of Paris Mold?
Vodkaman replied to Big Ray's topic in Soft Plastics
It was a successful series of experiments and a lot more to it than I have written here. I even built an electronic moisture sensor that started beeping faster and faster as the lure dried. That was fun, but not recommended if you're married Actually, ordinary kitchen scales will do for this job. Dave -
Jaw - very good point, balsa being soft and springy. A coating of CA glue would work well. It is an expensive glue out west, but over here in Indonesia, it is very cheap, except for the big name brands of course. DAve
-
What Is The Best Temp To Bake A Plaster Of Paris Mold?
Vodkaman replied to Big Ray's topic in Soft Plastics
The problem with plaster is that there is a temperature beyond which a chemical reaction takes place and the mold turns back to the original stuff before you added water in the first place. When oven drying, as long as there is water still in the mold, it cannot hit that magic temperature, held back to boiling point until all the water has been driven off. Once the water is gone, the mold temp rises with the oven and unless you rescue the mold very soon, it will be ruined. I did some experimenting, the results might be of use to you: I weighed the freshly made mold and weighed the fully cured mold. The weight loss was 30% every time. I also discovered that the rate of weight loss was constant. This means that you can weigh the mold after a few hours (air drying or I use a light bulb box heater), you can actually predict when the mold will be dry. You could apply this method to oven drying to get an idea how much water is left. The water loss is not likely to be constant, so I would aim for 27% and call it a day. In a normal living room, you are looking at a week. Other ideas are, radiators, airing cupboards, the back of a refrigerator is a good one. With my box, with 2 x 100w bulbs and a computer fan to keep the air moving, I could dry a mold in 6 - 8 hours. I would leave it on over night because you cannot over dry a mold provided you stay below the magic temperature. Dave -
I bought the circular saw Dremel attachment - The most useless and DANGEROUS tool in the world. Be vary wary of Dremel attachments. They are superb mini drills, but that is all. Dave
-
First you need a guide to help you line the bait in the vice at 75 degrees so that you are cutting vertical. It is easier to cut square across the bait if you are cutting vertical. If you don't have an adjustable angle or protractor, you can construct the 75 deg with a piece of paper. Fold a square piece of paper across diagonal, this gives you 45 degrees. Fold this into 3, this gives 15 degrees. Unfold and cut off one segment, this leaves you with 75 degrees. Don't cut all the way in one go, cut about 1/4". Remove from vice and put a straight edge in the saw slot. A standard 6" steel rule is perfect, but anything straight that will fit is fine. Hold it up and eyeball over a tiled floor or anything with a square pattern works for me. Any error that you are making will be magnified by the wide straight edge and help you see the problem. Back in the vice and make any correction with the saw and continue. Again another 1/4" and repeat, until you get the depth that you want. This is how I do it. Others may have other techniques. I hope you get a few to choose from. Dave
-
Live Target Shrimp - Can You Or I Make This Lure? (Not Exactly Of Course)
Vodkaman replied to Cannon's topic in Soft Plastics
Spectacular lure for sure. I only see one way to achieve the offset legs and antennae and that is with a mold insert, basically a 3-piece mold. To force feed those fine appendages, I would use a combination of injection and vacuum, possibly driven by a foot pump. Injection might work on its own, but it is a big ask. A CNC aluminium mold would be possible, but it wouldn't come cheap. Not sure how you could make a plaster mold, but possible. Again, it would be at least a 3-piece. This looks like a life casting to me, so not a machined mold. A rubber tube mold, sliced into 3 parts. Dave -
JR - that made me chuckle a bit Dave
-
Alsworms - from what I have read here on TU, plastics do out fish hard baits. So why do we go to so much time and trouble to make a lure that gets out fished by a plastic. In the time it takes to make one crank, you could probably turn out a hundred or more plastics. I can't explain it, but I am going to carry on doing it Dave
-
Ha! This thread is all over the place, but that is OK, we are in the docks after all. Yes, power tools can rip a couple of fingers off in the blink of an eye and blind you in the snap of your fingers if you have two left. Just like with plastics, it is all about planning, clear thinking and safety attire. AND, just like with plastics, it is the hidden dangers that can cause the most damage; plastic fumes and wood dust, both at the very least will make your latter years a misery. Take care my friends. Dave
-
X2 Pete, I think the topic has advanced this time. JimP's suggestion will be my starting design. 5 gal bucket, rollers, driven by a wiper motor, bicycle chain and sprockets. Dave
-
In the UK, I fished for tench mostly, but other fish like perch, roach, rudd, crucian carp came my way. Occasionally I would travel further afield and do some trout fishing. Most of the time I would be using 1.5Lb breaking strain mono. Sweden was a tidal river, mostly perch with a few trout. Indonesia is all stocked concrete ponds. The two I fish are bawal, a piranha type fish and another pond does catfish. They allowed me to use my lures at first, but when I took the prize fish on the first day, they banned artificials after that. My next plan is to make an artificial from a foodstuff, so that I can demonstrate validity by eating my own baits. Dave
-
Bob La Londe - I like your suggestion. The down side is the doubling of machine time. Possibly a second motor on the opposite side, following the cutter fairly closely. The link to the same master will need thinking about. Dave
-
My first couple of duplicator machines left a lot of ridges, an issue I intend to tackle on my next build. The object of the tumble thing is not to give me a super sanded finish, this is just not necessary or even desirable. The aim is to knock down the ridges enough and still have a good key surface, so that a slightly thinned epoxy can do its job. Hughesy - thanks for that input. This sounds very promising. Dave
-
I have never bought a single crank or soft bait. I bought a few spinners when I was in Sweden 8 years ago. Prior to joining TU, I only used bait, as is the general mode of fishing in the UK. Dave
-
Good points Bass100. Pete is the man, if anyone here can crack this one. I am going to be building a new duplicator machine pretty soon, so I am particularly interested in this project. DAve
-
This is one of those ideas that gets talked about once a year, but never gets built. I have thought about it myself a few times, when I was cutting hundreds of bodies on the duplicator machine, which is why I suspect you are thinking now. We have to think about exactly what the operation will achieve. It certainly is not a cutting action, more a pummeling action were the surface of the lure receives a good beating, which knocks down all the machined ridges and corners. The consistency should be very good, given that each body will be struck many thousands of times in a completely random order. The consistency would be in the law of averages. My thoughts are that sand will be ineffective, in a short time scale. I am thinking decorative marble chips or something similar. Cheap enough and readily available at garden centers. Driven in a small cement mixer. Could even manufacture something suitable with a slow A/C motor from a tumble dryer. With this just being an opinion, you may want to start small with sand and work your way up to half bricks. Once the timing is established, it would just be a case of throwing in a hundred bodies, set the timer, power up and walk away. Dave
-
What I found was that; when you click on the red notification, you must leave your cursor there until it opens. Dave


