

JBlaze
-
Posts
1,300 -
Joined
-
Last visited
-
Days Won
8
Content Type
Profiles
Articles
TU Classifieds
Glossary
Website Links
Forums
Gallery
Store
Everything posted by JBlaze
-
 Really really nice. great job. John
 -
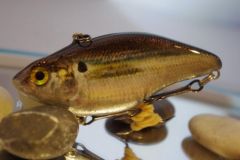
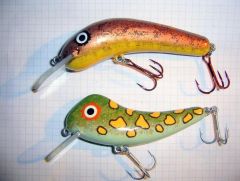
 Gosh Diemei, you did a great job on all of them. I especially like the river runt. John
 -
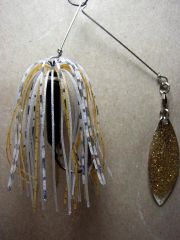 Didn't have any gold blades, so I powder coated with gold glitter mixed in clear powder paint
 -
 A blade with attitude, I believe this one will catch by day or night.
 -
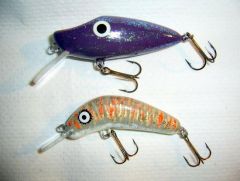
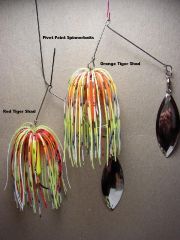 These are a cross between my Sexy Shad and a Fire Tiger.I'll call them Tiger Shads.
 -
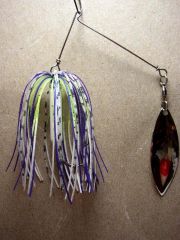
 1/4oz peanut,trying to put together some different colors. I think I like this one.
 -
I have modified several of my molds, and JB Weld does a pretty good job. Here is a pic of one of them in the gallery. I think it would work well for what you are needing to do. John http://www.tackleunderground.com/community/gallery/image/7446-pic-of-modified-mold/
-
Dave, that was super information! I have an older version of photoshop also so this should work well for me. Will be giving this a try. Thanks John
-
 WOW! I like
 -
 Hi Deimai, Your skills with a paint brush are equal to your metal working skills. These are all great looking lures. I especially like your Gecko and how you said it sits with its eyes out of the water. Great job. Sorry to hear that your waters are covered with ice. John
 -
Bob La Londe, Thanks for that good piece of information. I will put it to good use. John
-
This was a very informative post and the info is appreciated very much. I have an old Lee Pot like yours and a new one for a backup should the old one ever fail. That has not happened as of yet. Now, should I ever have to use it, I will know what to do to it should its performance disappoint me as yours did you. Thanks for that. I studied both my pots and had no idea what the answers were so, I did not participate in the contest. Again, thanks for doing this one and by the way, beautiful jig. John
-
Josh, Hobby Lobby also carries the 9oz bottles of 30 minute epoxy. You also might want ask Cadman if he still has his tutorial on painting jigs with powder paint. Its very effective and with the proper brushes and lots of practice, I believe you could achieve about any design you want. Once you bake them the blending of the colors has a very nice look to it. You can also mix and blend powder paints in medicine cups to achieve the desired shade of a color that you may want. Making the eyes with powder paint is another story. Wish someone could/would show how to do that if it is possible to do. Good Luck, John
-
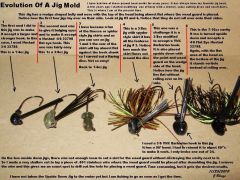
Just want to encourage and put a few ideas out there for some of you guys who like to tinker with your molds. If you think long and hard about why and what you want the end results to be, you can usually achieve them. Proceed slowly, and think, think, think about what you are doing. A small mistake, can usually be repaired with a little JB Weld. A large mistake, well maybe it can be repaired. Ruin it, and for a few $’s, most production molds can be replaced. It is much cheaper than having a custom mold built and you may turn out to have something that is very different, special and catches more fish. I have quite a few molds and most of them have been modified in some way or another. I like to think that I have improved on and made them better. This mold has seen my most extensive mold modifications as of yet. All these modifications were done freehand using a dremel with its assorted bits and cutters. Soon, I plan on getting a sliding vice for the drill press. This would make a lot of the modifications much easier to do and more accurate I have posted in the gallery a series of photos describing the evolution of a peanut head jig http://www.tackleunderground.com/community/gallery/image/7769-evolution-of-a-jig/ (The mold is a Do-It, Weed Less Wally and is no longer in production) This jig has a wedge shaped head with the narrow edges of the wedge at the nose and at the bottom of the jig. The top of the jig is relatively flat. Every cavity in this mold has been modified, from the 1/8oz to the 7/16oz size. The last two modification that I made to this mold was to make it accept a 3/0 Barbarian hook in the 3/8oz cavity and a 4/0 Mustad 32798 BLN Flat Eye in the 7/16oz cavity. Both of these hooks were placed in the mold upside down, necessitating moving the weed guard 180º to what used to be the wedge shaped bottom of the jig, which is now the top. There was not enough room between the cavities of the mold to cut a groove/channel for the weed guard so I cut a very shallow groove to be able to lay a short length of .051 stainless wire into the cavity. After removing the jig from the mold, I remove this piece of wire. This makes an exactly centered pinhole to use for drilling a 1/8 hole for the weed guard. The reason for making this change was that I wanted the jig to sit in an upright stance when at rest without rolling over on its side. With the flat side now on the bottom, and the wedge side on top, it does just that. (Words of caution, when drilling out the hole for the weed guard, Never hold the jig with your fingers, the bit could bind in the lead and almost always binds/catches when the cutting edge hits the hook shank thus twisting the head in your fingers. If you have never had a hook driven into your fingers or hand, this is a good way to experience it). I solved this problem by drilling a hole at about a 45º angle in a short length of hardwood 2x4. The hole should be snug on the sides of and deep enough for the jig to slide down into the hole with the top of the jig just barely beneath the surface of the 2x4. Now drill slowly and when the bit contacts the hook shank you will feel it but it will not have enough leverage to twist the jig head out of the hole. I have quite a few molds and most of them have been modified in some way or another. A few of the cavities have been absolutely butchered because I was careless, in to big of a hurry or did not give enough thought as to the ending result of making the modifications that I was striving for. Fortunately, these were few. Anyone else like to share with the rest of us how he or she have modified and or butchered his or her molds? John
-
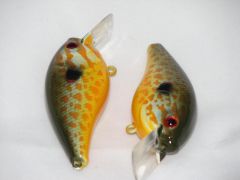
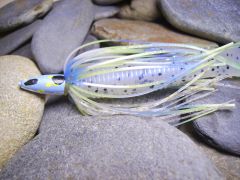
 This is a USD Peanut Head. With a 4/0 Mustad 32798 BLN Flat Eye Hook. The hook and weed guard have been put in the mold up side down. What do you think? John
 -
 Just want to encourage and put a few ideas out there for some of you guys who like to tinker with your molds. If you think long and hard about why and what you want the end result to be, you can usually achieve it. Proceed slowly, and think, think, think about what you are doing. A small mistake, can usually be repaired with a little JB Weld. A large one maybe. Ruin it, and for less than $40.00 it can be replaced. It is much cheaper than having a custom mold built and you may turn out to have something that is very different and special. I have quite a few molds and most of them have been modified in some way or another. I like to think that I have improved on and made them better. This one has seen my most extensive mold modifications as of yet. All these modifications were done freehand using a dremel with its assorted bits and cutters. Anyone else like to share how he or she have modified and or butchered their molds? John
 -
 Hey Josh, that is Bad, Bad, Bad. I want one. Good Job. John
 -
 Hey Josh, I really like this one. Great Job! John
 -
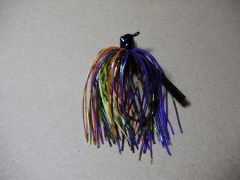
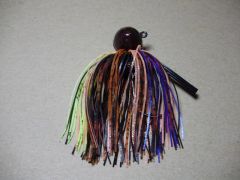 This is a hot glue jig made in the 1½ oz. cavity of a Football mold. I added app 3/16 oz of lead inside the head. It weighs just over 3/8 oz now. There 117 strands and 6 different colors of silicone in this one. 6/0 Mustad BLN
 -
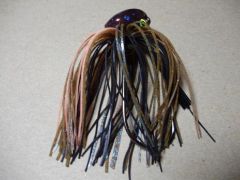 This is a hot glue jig made in the 1oz. cavity of a Brush Jig mold. I added app 3/16 oz of lead inside the head. It weighs right at 3/8 oz now. There 50 strands and 4 different colors of silicone in this one. John
 -
-
I paint eyes on most of my jigs, mostly because I like the way it makes them look. I had never really thought about whether it helped attract a strike or not. I like Peterjays response, It makes sense to me so, I think I will continue to paint eyes on my jigs. Thanks Peterjay. John
-
Got one I call a Brush Hopper cause it comes through brush so well without snagging. Like some of the other guys, when I'm throwing it I usually call it a worthless POS cause it ain't caught nothing yet. John
-
Great idea, thanks for sharing. John
-
 Beautiful