bassguy
-
Posts
426 -
Joined
-
Last visited
-
Days Won
4
Content Type
Profiles
Articles
TU Classifieds
Glossary
Website Links
Forums
Gallery
Store
Everything posted by bassguy
-
All I can say is WOW! Impressive!
-
Most Ace hardware stores carry D2T, they do out here, maybe different back east. I'd check Ace just in case.
-
I use the 2ton for ballast weight and hanger combo, because I know I've never had a failure with it. I then fill the remaining space at the top with the epoxy stick. After it's mixed, press it into the ballast hole and smooth out, once that's done, I can go to the next bait. Once it's cured, sand and prime the bait....ta da.
-
Thanks on the info Bob. I've used the putty with great success. When installing the ballast weight I'll use the 1Ton first to set the weight in and the hook hanger, then fill the hole to the top with the putty, no worries about the epoxy spilling out. Just let the putty set up till sanding time and continue to the next bait. Jerry
-
 The very first one hand carved with my Buck knife.
 -
Here is a topic that has been covered already, but here goes: When I think back of the first bait I actually carved was about six years ago was from piece of pine my wife and I found at the beach. It was absolutely flawless, not a knot one any where on the piece. I took it home and slabbed off some pieces with my table saw. I drew a rough shape on it and started to "whittle" away with my Buck knife, before I knew it I had the first one. It worked the first time I tried it out. I made others out of that quarter of a log but the first one I'll remember forever. It has been retired because I would rather know where it was, than stuck on a tree stump at the bottom of some pond. That's my explanation of my addiction and where it came from, how about you guys? As the rules state, I posted a picture in the gallery of #1. Jerry
-
 Beauties Bob!!
 -
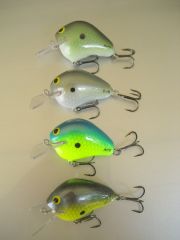
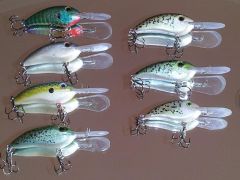
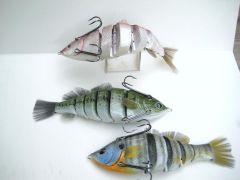
I build my PVC baits very similar to Mark. Rectangular block to start and then draw the outline on the block from a template I made which has the bill location, line pull, and hook hanger locations marked along the edge. I cut out the shape with my scroll saw, then sand to the pencil line with a 1" belt sander. Back to the scroll saw to cut the lip slot. Centerline around the entire bait and mark hook hanger locations and line tie. I pre-drill all the hangers and line tie and ballast holes. Once the bait is to shape, I use an Exacto knife with a #11 blade and start carving to achieve the basic shape of my bait. Once that is done, I use the dremel with the medium size sanding drum and use the dremel like the knife to smooth out the paring marks left from the blade. I use 80 grit sand paper to start and finish up with 150. After the sanding is finished, I'll ballast the bait to find out how it sits in the water. When it is where I want it, I'll epoxy the ballast weight with the hook hanger and then fill the remaider of the hole with epoxy paste and sand smooth. Primer to follow and sand with 200 to remove runs and the like, then paint. All my hook hangers are hand twisted SS wire and I install 1/8" lexan bills once it's painted. When the paint is how I like it, I'll cover with a coat of Devcon 2 Ton epoxy. I too am no expert and believe me because I have a wall of shame in my shop. Good luck.... Jerry
-
I've had problems with the opaque yellow too. I wonder if it's just the nature of the beast??
-
I've thought about using the heat gun as well but found out it can be used to remove old house paint, so I shelved that idea. I picked up a normal no frills hair dryer for around $12 at Wally world. Jerry
-
There is one thing nice about the PVC once it has primer on it. If you don't like the scheme you done, you can take it to the sink (if you use water based acrylic paint) and wash it off. Been there, done that, no harm, no foul, and no mess in the sink to clean up. A little Dawn to help remove the paint and possible oil from your hands off the bait as well. Jerry
-
I have found if the crankbait sits in the water in a perpendicular pose or "square to the water", being the same size, weight, etc. I don't have to lake test my baits. Each and every one has worked the same way. So far (knock on PVC) every bait I have built requires no tuning what so ever when retrieved. Jerry
-
I've found once the tulle has been shot over and over with paint, it starts to work very well.
-
BTH you've overcome the adversity we have all gone through and made it to the other side unscathed, a little bruised but not beaten. I promise you the next one will be easier; from what you learned on the first. Good luck with the many more to come. You have now crossed over into the "Addiction Zone". Jerry
-
I'm kinda of the mind to paint it a frog pattern. Top water frog in the pads, weeds, etc. is a sure winner!!
-
 Those are some awesome baits Mark. Jerry
 -
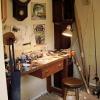
I'll sometimes hit the shop for a couple of hours after work, so if I'm lucky 8 to 10 is a good estimation. If there isn't anything pressing, then the shop has my company all most all day on Saturdays.
-
@DD, I have the dial set at 4 or 5 on the dremel. I don't know what that equates to as RPM. I also use the moto flex tool on the dremel which makes it much easier to use the sanding drum. I'm very careful not to keep the drum in one spot; it doesn't take much to remove the carving marks. I use the carving approach (pulling it toward me) with the sanding drum as well and I can see how much I need to remove for shaping. @Mark, Knock on wood I've been very careful about the carving. Keeping an eye on what I'm doing. Yes, the cuts come quick because one little slip and you're done. Jerry
-
That's what it's all about!!!
-
DD, I should have said ballast ready. Which is only one step away from paint. I use the regular holder with a #11 blade; that is number on the blade. I cinch the blade down with a pair of pliers to keep the blade tight. I find that if the blade loosens up some the blade will have a tendency to turn. After I've cut the square shape from the PVC block with the scroll saw, I make my center lines, drill the ballast hole, cut the lip slot, drill the rear hook hanger and line tie. Once that is done, then I begin to carve. I don't follow the tried and true carve away from your thumb adage, but it's more like peeling an apple carve if you get what I mean. It again is dangerous and not for every one because as you know the Exacto blade is non-forgiving. If you choose to use the Exacto blade this way, be VERY CAREFUL! I can't stress this enough. The dremel goes quicker but you can use 80 grit to smooth out the parring marks and use the other grits as I explained earlier. Yeah, don't give up on PVC you'll be pleased with the outcome once you get the hang of the material. I guess I'm just lazy, I don't like to spend the time sealing the baits..... DD looking forward to seeing your baits in the coming days. Jerry
-
 Speechless!!
 -
 Beautiful.
 -
The spar varnish is basically for exterior doors and the like to protect them from the elements. It's like a "water resistant" coating to protect the stain on the door. Whereas the Devcon 2 ton is "water proof" which is a whole different ballgame. There are other topcoats on the market but I've used nothing but Devcon and I swear by it. Jerry
-
 I continue to try the Blue gill pattern, why? I don't know, I just like the way it looks in the water. PVC material, hand twisted SS hook hangers and line tie. Lexan bill and Devcon 2 ton epoxy finish coating.
 -
 Just a craw type pattern I like on another bait. This is the same size I've been making. Same PVC material, with hand twisted SS hook hangers and line tie. Lexan diving bill and Devcon 2 ton epoxy finish coating.