

Yake Bait
-
Posts
365 -
Joined
-
Last visited
Content Type
Profiles
Articles
TU Classifieds
Glossary
Website Links
Forums
Gallery
Store
Everything posted by Yake Bait
-
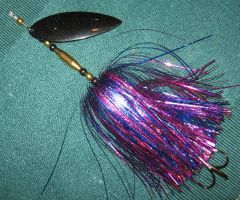 0.062" Wire 0.040" #8 Mag Willow Blade Walmart Christmas Tinsel for the skirt (similar to Hedron Flashabou)
 -
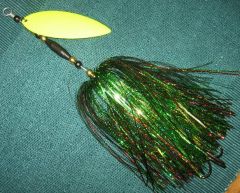 0.062 Wire 0.040" #8 Willow Blade Wal Mart Tinsel (similar to Hedron Flashabou)
 -
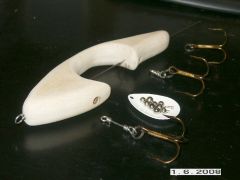
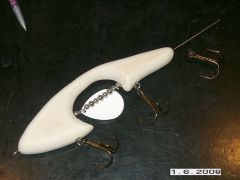
Here is the other bait that I mentioned in the original post which was made the same way. I used through wire and my recent experience with bucktails to make somewhat of a hybrid glide bait with a spinner in the body. Hoping to get a clicking and metal interference noise when this spinner rolls through the cutout in the plug while this bait is jerked. Kind of like an underwater pacemaker noise...
-
Spike, After assembling the bait and epoxying the line tow, bent a wire loop on the back side. I then mixed up a little 5 minute epoxy and work some epoxy into the hole where the wire comes out the back end, then built up a bit around the wire loops. When applying the final coat of epoxy I gobbed a bunch of epoxy on the tail end while the bait was turning to encapsulate the wire loops and make it look like it was part of the body. You can kind of see the wire loops in the ball of epoxy on the tail of the bait in the attached photo.
-
Thanks for the kind words. Gotta agree that that you certainly eliminate the wood plug as a weak point through and through. The plug can get completely destroyed and I would still bag the fish.
-
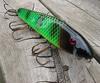
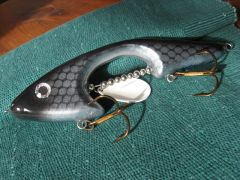
 7.5" Maple Plug 0.051" through wire with drop loops for bottom hooks. #8 spinner bladde integrated into body cutout No additional weight was needed for this bait. Tail hook was omitted to keep neutral bouyancey and balance. Cisco paint scheme.
 -
 7.5" Maple Plug 0.051" through wire with drop loops for bottom hooks. #8 spinner bladde integrated into body cutout No additional weight was needed for this bait. Tail hook was omitted to keep neutral bouyancey and balance. Cisco paint scheme.
 -
 7.5" Maple Plug 0.051" through wire with drop loops for bottom hooks. #8 spinner bladde integrated into body cutout No additional weight was needed for this bait. Tail hook was omitted to keep neutral bouyancey and balance. Cisco paint scheme.
 -
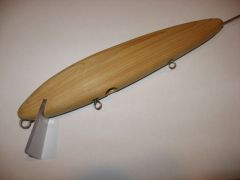
 9" cedar plug. 3/4 oz lead behind front hook. 2" by 1.5" diving lip. 0.062" main through wire with 0.051" driop loops for the two front and middle hooks. Wolverine split rings. Walleye paint scheme.
 -
 9" cedar plug. 3/4 oz lead behind front hook. 2" by 1.5" diving lip. 0.062" main through wire with 0.051" driop loops for the two front and middle hooks. Wolverine split rings. Walleye paint scheme.
 -
 9" cedar plug. 3/4 oz lead behind front hook. 2" by 1.5" diving lip. 0.062" main through wire with 0.051" driop loops for the two front and middle hooks. Wolverine split rings. Walleye paint scheme.
 -
Here are a few more pics of how the final bait came together. Definately more work than scew eyes but entertaining none the less.
-
Tigger is the man and I am sure he will chime in. I've done a few and transparent createx paints seem to do the trick.
-
The nail ideas are super. Will give that a try next time around. This should be a lot less alignment and less chance for stuff to go awry. Just goes to show that there is always a better way! Thanks for the tips!
-
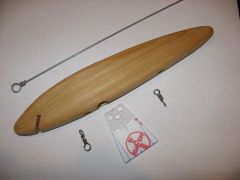
Rofish, I actually tried from both ends on a plug that I screwed up on the router . I ended up a little off on the pilot hole so I used a longer bit from the nose and ended up pretty good all the way through. Everything has to be perfect to get the holes to meet, has to be clamped parallel along the axis in the vice, drill press table has to be perfectly level. The longer the bait is, the more likely you may not connect. A 4" or 6" bait would not likely be a problem. You are also correct in that I drill the bait while it is still "square". After cutting the bait out of a flat piece of wood, I draw a line along the bait body representing where I want the pilot hole to run. I chuck a 6" bit in the drill press then use this line to align the plug with the bit. I attached a photo of the stencil I used to trace the bait wiht the desired wire line on it. Drilling is done with progressively longer bits starting with a standard bit on the press, followed by forstener to recess the loops in the tow eye, finally with a 6" bit on the press keeping the bait clamped in the vice on all three steps. Finally, using the 12" bit in a hand drill, run the hole the rest of the way through.
-
It's a little tricky getting the hole through a longer bait. This bait is 9" long. I started with a standard bit in my drill press and piloted a hole then follow up with a 6" bit. I finish with a 12" bit in my hand drill. By the time you pilot the hole full stroke with your drill press, you pretty much define the path that the bit will take so you dont end up too far off on the other end when you finish with the 12" bit using a hand drill.
-
I find the "center of bouyancy" by floating the bait in my kitchen sink, then find the spot that I can grab with a finger on each side and sink the bait level to the horizon. I mark this spot then bore a hole with drill press using a forstener bit. I then melt the lead into the hole. I generally use cedar for floating baits and maple for neutral or sinking baits.
-
Need to get my rear in gear this winter and get a few hard baits done. Had some fun with bucktails in December but been pretty lax in January. Ive got two hard baits in the works using a different through wire technique. While I have not had problem with screw eyes, after making some bucktails this year I have enjoyed working with wire. Here is a photo of a new one that I started on before getting sidetracked with the superbowl yesterday. Hoping to get it painted this coming wekend. I'm planning to epoxy the base of the wire loop into the nose of the bait to keep the orientation and placement of the line tie in place. After tunneling a hole for the through wire, I countersunk a larger hole in the nose to allow the loop base to be epoxied in flush with the nose. Same goes for the belly hook eyes. Also when I melt the lead into the belly, hoping this will further secure the wire. Once all that is complete, I will bend a tail hook eye. Main through wire is 0.062". Belly hook eyes are 0.051". No real advantage over what I have done before, just something new to try. Gotta make more excuses to use that drill press that I bought last winter
-
-
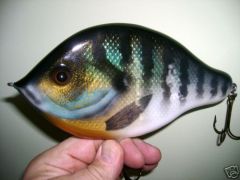
All of those are super, but I just can't believe how real that bluegill lools. Really nice work. No matter how hard you look, somebody always takes it to a new level. Thanks for sharing.
-
I use a plexiglass plate on the base of my router and clamp it upside down in my vice to make a makeshift router table. Works pretty swell and I saved $$ in that I did not need to buy a router table. You do need to be careful with where your fingers are relative to the router bit. http://www.tackleunderground.com/forum/attachment.php?attachmentid=2233&d=1191290497
-
Unreal!!! I was about ready to tie on a fily to catch that thing!
-
 Sweet! Gotta like photos of home maid baits hanging out of the mouth of a fish!
 -
Dandy!
-
 Nice!
Nice!


