


mark poulson
-
Posts
14,726 -
Joined
-
Last visited
-
Days Won
364
Content Type
Profiles
Articles
TU Classifieds
Glossary
Website Links
Forums
Gallery
Store
Everything posted by mark poulson
-
If you tie your own skirts, try using some .024 galvanized wire (Home Depot) as a final wrap, and leave 1 1/4"+- tag ends. Twist and pull the tag ends until you have a tightly twisted tail that's 3/3 to 1" long. I do this with my jigs and spinnerbaits facing down, so the tag end is on the underside. Cut off the untwisted part that you held (with small vise grips) as you twisted, and then fold the twisted tag end back toward the hook. When you slide on your trailer, make sure the twisted tag goes into it parallel to the hook shaft as you slide it on. I have caught half a dozen spinnerbait fish with one grub trailer before I had it slide down, and then all I did was slide it back up, and put the twist wire into the trailer at a slightly different spot. When the hook tears one side, rotate it 180 degrees, and you can just keep using the same trailer for another dozen fish, or until it gets too torn up to hold anymore.
-
"There's always room for Jello".
-
A levee worker here on the CA Delta said they use Roundup to control the hyacinth. It has been killing off the tulles, and the primrose has really gotten out of hand. And the hyacinth, which seemed to have died off over the winter, is coming back.
-
I bought one of these, online, for $80. It has a good backbone, but a softer tip, and throws hollow body frogs really well. http://www.americanlegacyfishing.com/garcia-veritas-20-frog-rod-med-heavy-7-6-casting-rod-vrtcf76-6.html
-
Try musky shops.
-
ipt, I know you're right, because I used to hand pour my Ika molds at 335 to get the salt to settle more. But it doesn't seem to be a problem with the big senkos at 310-315. I stir the crap out of the mix before I suck it up into my injector.
-
I added some yellow carpenter's glue to my last pop mold mix, and the pop came out harder. Then I sealed it with one coat of thinned D2T, and it pours great. I do have to shoot the mold with spray PAM before each pour, or the senkos will be really hard to remove from the cavities. Two coats of D2T would probably make the baits easier to remove, but I didn't want to lose any detail.
-
My sprue is a full 3/4" at 11/16" diameter, and then tapers to the size of the senko in another 1/2". They seem to wiggle a little less than the originals, but it's very close. The feel firmer in hand. I may try a little softener in one batch, but I worry that it will make them as fragile as the originals. Of course, since I'm pouring them myself, they don't cost me $1 apiece anymore, so maybe I shouldn't worry so much about toughness anymore. But I like how mine hold up when I pitch them into heavy cover without getting torn off the hook. I'm just cheap and want to get more than one fish out of each bait, and I don't think the wiggle is as critical when I'm pitching them.
-
I guess I'll try injecting them at 315 without holding pressure next time, and see if that works. Fingers crossed.
-
I want to darken my watermelon/red and black flake senkos by adding more black flake, but I don't want to weaken the baits. Any advice?
-
I shot at 315, and held pressure for ten seconds each, and all three cavities made dent-free baits! I did find that I need to have a full cup of plastisol, or I get air in my injector, no matter how I try and avoid it. I think it has to do with the injector bottoming out in the silicone cup, and the filling being interrupted, but that's just a guess. I will make sure I have enough plastic to fill my 6oz injector without hitting the very bottom of the cup from now on. The baits came out great with the 4/1/1 mix of plastisol, salt, and blasting sand. They are soft (BJ soft plastic) but seem to be tougher than the GYCB senkos I have been using. They came out more green than the originals, so I'll be playing around with how much color I use, but that green color gets bit.
-
What are they made out of?
-
Since one of the cavities didn't dent, I'm thinking it's a matter of holding the pressure longer, even if it means I can only inject two cavities at a time. Or I may try pre-heating the injector, to give me more working time. It those don't work, I'll add some vents in the mid section.
-
If you look at the picture you'll see I drilled 11/16" holes thru the 3/4" mold perimeter for my injector, and then carved a smooth funnel down to the top of each cavity. I can't open the connection any more, or I'll be past the width of the cavities. I topped off the cavities as the plastic shrank. Do you think extending the mold perimeter another 3/4" would keep enough hot plastic available to stop the denting?
-
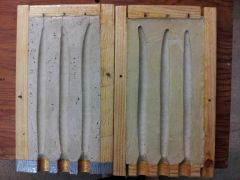 A pop 7" senko mold I made. It took one day each per half, and I let the thinned D2T sealer cure another day. I added some yellow carpenter's glue to the pop to strengthen it. Pours great when I inject it, but I get some small dents. The duct tape on one half it to fill a small gap at the wood perimeter so the plastic won't leak when I hold pressure. I put a small vent at the bottom of the cavities, and there is almost no flash.
 -
Well, I took my time and made a two part, 3 cavity, 7" senko mold out of http://www.tackleunderground.com/community/gallery/image/15807-7-inch-senko-mold/
-

Why Do Some Plastic Crankbaits Swell From Heat?
mark poulson replied to mark poulson's topic in Hard Baits
All the cranks I've had swell were hollow, without foam. -
I forgot to mention that I put an open mouth on my trout swimbaits, and put the line tie in the open mouth. It is just below the centerline of the bait, depending on the actual bait's shape. I think the combination of the V section of the bait's body, which reduces the amount of buoyant material in the lower half of the bait, plus my belly weighting, keeps the baits stable and they stay down.
-
There will always be people like me who are computer illiterate, and who will never be able to adopt this 3D stuff for themselves. I can see this is a great tool for lots of people, and they will really enjoy it. I just worry about the loss of the skills required to hand shape lures. I have seen it in carpentry, where nail guns have created a generation of carpenters who can barely use a hammer. Just like computer games have kids sitting inside for hours, instead of being outside playing physical games, I can see this technology doing the same thing for lure makers. From my perspective, hand shaping a lure gives me a host of insight into how different elements affect lures, and it's fun, too. .
-
I've had good luck sealing balsa with super glue, the runny stuff. I drip it on, and use my finger to spread it. Just be quick, or you'll have finger prints on the bait, or worse.
-
Well, this is the very first time this has happened to me, so I just threw away the rest of that batch of plastic, just in case it was contaminated by something. I will stir more when I have some of the blast sand added, to keep it in suspension and away from the sides and bottom of the silicone cup. I just put the finishing touches on a 3 cavity 7" senko mold, and I'm going to pour it tomorrow in watermelon/red and black flake. To achieve the same weight as the original, but to keep it more durable, I plan to use a 4/1/1 ratio of BJ's soft plastisol to sand and fine salt. I'll add a little heat stabilizer, and I'm going to try to hand pour it with my plastic at 325, to avoid dents. Fingers crossed!
-
Hello. My name is Mark Poulson, and I am a moldaholic.
-
The AC1315 will melt if it contacts soft plastics. I get around this by coating the contact points with clear nail polish. If your legs are really flexible, you might doing what Bob suggested, sealing with the AC1315, finish painting, and then dipping once in the AC1315, followed by a full coat of clear nail polish over the entire bait. It make a really tough, clear top coat. Just be sure you work in a well ventilated area, and using a solvent-filtering respirator is always a good idea. Home Depot sells them as painter's respirators. This is what I use: http://www.homedepot.com/p/3M-Large-Paint-Project-Respirator-6311PA1-A/100195886
-
I was using the sand blasting compound from Harbor Freight. Maybe I need to pass a magnet through it before I use it again.
-
Today, I reheated some plastisol in a NorPro silicone cup, to pour some senkos. When I opened the microwave door, there was some smoke, and I found a spot on the side of the cup had charred. I had added both blasting sand and salt to the plastic, and had pour it before with no problems. I'm wondering what might have caused the charring. When I peeled the plastic out of the cup, I found two places on the bottom where the blasting sand seemed to have clumped, and melted into the silicone. Anyone have a clue what might be going on?
