


mark poulson
-
Posts
14,726 -
Joined
-
Last visited
-
Days Won
364
Content Type
Profiles
Articles
TU Classifieds
Glossary
Website Links
Forums
Gallery
Store
Everything posted by mark poulson
-

What Are Some Good Swimbait Molds For Largemouth Bass?
mark poulson replied to Big Ray's topic in Soft Plastics
I only moved so there would be more bass down south for you! -
What Are Some Good Swimbait Molds For Largemouth Bass?
mark poulson replied to Big Ray's topic in Soft Plastics
Looks good to me. I typically try to pour 5" baits for largemouth. I find that size will catch big fish, too, and works well as a trailer for a chatterbait. I bought five of the Lurecraft silicone two cavity molds, #885, and I can pour ten at a time. Because they are open pour from the top, I can do laminates, too, if I want to. Here's the link" http://www.lurecraft.com/searchprods.asp -
Here are some: http://www.tacklewarehouse.com/Swimbait_Hooks/catpage-TTWHK.html
-
I only coat the first half, the one I'm putting down into the first mold half. If some gets on the other face, once the first half is oven dried, I clean off the excess POP from the exposed faces of the masters, brush away the crumbs, and then do my epoxy sealing. Once the first half is completely done, and I'm ready to do the second half, I spray my release on the first half, and then try and coat the exposed faces of the masters with POP before I fill the second mold half, and make my sandwich.
-
Dink, I am getting old! Thanks for the reminder.
-
I've made multi-cavity POP molds, and, for me, there are several key steps. Taking your time with each, and doing dry runs, will help you succeed on your first attempt. I start by making matching wooden mold box halves, with 1X1 sides, and 1/4" plywood bottoms. After I've made the box halves, I clamp them together evenly, drill a through hole at each end to use for alignment, and add a cutoff 16D nail as alignment pins. They only need to project into the second mold half 3/8" to do their job. Then I seal the insides of the mold boxes with clear spray acrylic (because that's what I have handy). Once I am ready to do the actual POP work, onee key is to use clean, cold water, and to coat the masters with a separate batch of POP first (it will bond) so all I have to do is place them in the wet POP. That way I'm not racing against setting POP as I position the masters. I've found that, for me, trying to do a multi-cavity injection mold with a connected sprue from POP is a nightmare, doomed to fail. I'm sure there are folks here who can and have done it, but they're better men than I, Charlie Brown. Ahead of time, I mark where I want the individual sprue holes on both the inside and outside faces of the mold box edges, so I can place a master in front of each marked spot, smooth the POP as best I can around the masters, and then let it set. Once it's set, but not cured, I further smooth the areas between the masters, so I have a more or less flat surface, and then put the mold half in my oven, set on 170 with the door open, and let it dry out for a hour in the heat. Once the POP is dry, I check to make sure there is no POP on the exposed master half. I clean any off carefully, so I don't disturb the masters in the now-dry POP. I coat the POP faces with D2T epoxy, thoroughly mixed and then thinned with denatured alcohol and brushed on. Once it's soaked into the POP, I brush on a second coat, and then let it set completely, usually overnight. The next day, I spray the POP mold half with spray PAM as a release agent, and coat the faces of the exposed masters with fresh POP, to get it into all the details and to prevent air bubbles from being trapped by the masters. Then I fill my second mold half with fresh, runny POP. I try and leave the level of the POP just below the frame level, to allow for the masters to take up some space. I lay the already completed first mold half face down onto the second half with the wet POP, using the cut off nails already in place for alignment. I push down on the top of the sandwich to force out any excess POP, clamp the two halves together, and then flip them over, so the wet half is on top. I tap the mold sandwich with the rubber handle of a screw driver for thirty seconds+-, to help any air bubble that are trapped to move up and away from the masters. Then I let the POP set. I use the left over POP from the mold fill as a guide so I can tell when it's set. Waiting too long is much better than not waiting long enough. Once I'm sure the second half's POP is set, I carefully pry the two mold halves apart, so they separate cleanly. If all goes well, all I have left to do is to clean any excess POP off of the mold frame, and then remove the masters, and dry the second mold half like I did the first in the oven. I put the first half back in, too, since the masters may not have let the POP under them dry completely the first time. Once both halves have been dried, I coat the second mold half, and the master cavities in the first half, with epoxy like I did with the first half. I now have two matching mold halves. Using the location marks on my mold box frames, I take the closed mold boxes to the drill press and drill individual sprue holes. I start with a 3/4" brad point bit, to make the main sprue hole, 1/2" deep into the 3/4" thick mold frame. Then I use a 1/4" brad point bit to finish the sprue hole, drilling down through the wood frame and into each cavity a little. Don't worry if you're not exact at this point. You can finish the holes into the cavities with an exacto knife. Once I've gotten my sprue holes done to my likeing, I seal the exposed wood and POP with epoxy, the same way as before. This may seem overly complicated, but once you've had a mold attempt fail at some point and have to start all over, you'll see why I do it this way. One last thing. POP sets hard initially, but it isn't dry, and that's why I put it in the oven. If you seal POP with moisture still in it, you'll get mold. Been there, done that. Good luck.
-
Replacing Fg30 Brush Guards With A Wire Option
mark poulson replied to Flippinstick Mike's topic in Wire Baits
I use a piece of weed whacker plastic strand instead of wire, and it works great. I hold it in position in gap filling super glue, and add a drop of accelerant to set the glue fast. Once it's set and hard, I can use a rubber jig band to hold the plastic strand on top of the hook, if I want to fish really gnarly stuff, or just let it float above the hook like a regular weed guard. It doesn't interfere with the hook set. Mark Pack actually came up with this idea, and patented it, so do not use it for jigs you want to sell, or you'll infringe on his patent. -
Dale, Since I work from a centerline that I put on my baits once their profile is cut out and sanded, but while the sides of the bait are still flat and parallel, I can clamp my lure into a wooden jawed Jorgensen clamp and drill my ballast holes with my drill press while there's still enough meat to protect the sides of the bait from blow out. The wood clamp jaws give the bait sides enough pressure to prevent it. I use that clamp because I don't have a drill press vice, and I'm too cheap to buy one. Hahaha I use PVC, but I did the same when I used wood, and it worked. It will involve sealing inside the ballast holes before you float test your bait, but it will let you have decent sized ballast holes, perfectly centered, so you can add whatever ballast you find you need where you want it. I know where I want to add ballast, even if I'm not sure yet how much, so I can drill the holes ahead of time, and just vary the amount of lead wire I add to each location to get both the attitude at rest, the action, and the fall rate where applicable.
-
Smalljaw, The lure I saw was an R bend with what looked like a wire from upper to lower arm to keep the chatter blade from sliding down the wire. I fished the first one I made yesterday, and the blade stayed up and vibrated every cast, except when I threw it where it wasn't supposed to go.
-
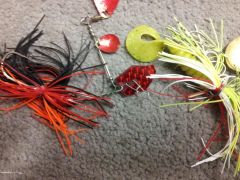
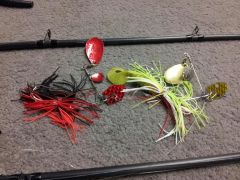
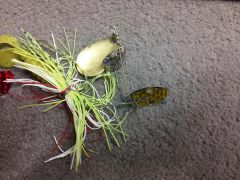 Here are two I made. They are copies of what I saw on a fishing forum, which I can't seem to find anymore. Doh!!! I fished the chartreuse one yesterday, and found it really thumps. The chatter blade keeps it up on a slow retrieve. I used .026 wire on the chartreuse one, and it held up fine, but I made the red one today, and used .024 wire to make it a little sturdier.
 -
Now that you want it, I can't find it. Surprise! I think it was on Jay Kumar's BassBlaster, but I'm not sure. The chatter blade is held loosely in the R bend by what looks like a wire from the 90 degree blade bend back to behind the chatter a little going to the spinnerbait head. Just enough to let it move around but not slide down either leg of the wire. I just made another one, so I'll go down and take a pic., and post it in the Wire Baits Gallery. Here's the link to the first picture. The next two are different views. I hope you can see the wire tie. http://www.tackleunderground.com/community/gallery/image/15630-spchatter3/
-
Someone on Western Bass posted his PB bass, a 16+, and the bait he used. It was a prototype red spinnerbait with a chatter blade. I made one, and it works, although it seems to collect grass more than a plain spinnerbait. It keeps the bait up at low speeds, so I can see it working for a slower presentation over grass, or next to grass on either side. Has anyone here tried it yet?
-
You might have an easier time if you add your hook hangers, seal, then put on the hooks and hang egg sinker to the belly hook tines to get the right ballast amount. You want just enough to keep the bait from rolling when retrieved. And like Surf said, no ballast in the tail section is key, so it is really free to wiggle. Think Twerk!
-
I use their powder to make my colorado and Indiana spinnerbait blades glow, for muddy and stained water. I coat the concave side with clear (nail polish for me), pinch some of their white/green powder onto the wet polish, tap off the excess, and then use the nail polish brush, wet, to work the powder to get rid of unmixed powder and to work it into the first coat. Once it's dried, I put another coat of clear over it, just for additional protection. Their blue works well, too. I add the same powder to hot plastisol to get glow in the dark baits.
-
Check out the Hard Baits Gallery. There are lots of shad baits there with great paint schemes.
-
I use an Indiana for the rear blade, with a smaller Colorado in front, for my slow roll tandem spinnerbaits. The Indiana gives more thump, and more lift, at slower speeds, than the willow. Coat it with nail polish with mylar bits in it, and it flashes like a light house even at slow speeds.
-
Is there any way I can prevent my rubber skirted jigs and baits from eventually melting into themselves and becoming useless? I tie with round rubber that I get from LPO.
-
Just as a general guideline, the lower in the lure the ballast, and therefore the center of gravity, the more stable it will be. I've also found that keeping the ballast as close to the belly hook hanger as I can gives my cranks the maximum side to side (Xing) movement. I think of the lure body, front to back, as the plank on a seesaw. The closer to the center pivot point, the faster the movement.
-
I use both. I split the silicone tabs in half, or fourths, and tie the tab sections where I want them with red rod wrap thread. If I'm mixing in round rubber, I put it on the upper half of the jig, again in partial tabs, and separate the rubber strands after I've tied everything on, and wired over it with 24 ga. galv. wire, with the jig facing down in the vice. I leave the tag ends of the wire long, grab them with small needle nose vice grips, and twist them down to the jig. I pull up on the wire once, to cinch it tighter, and twist up that slack. I cut the twist off 3/4" to 1" long, and fold that back down toward the hook, to act as a keeper for my soft plastic trailers. That wire trick works for spinnerbaits and chatterbaits, too. It so nice not to have to glue trailers on anymore.
-
 They look great!
 -
I had a very early version of a bottom hook/line thru swimbait, and it used a washer on a wire harness to keep the hook from pulling back into the belly. It worked, and I still have the original harness somewhere. It got me thinking that one (you or me) could use buzzbait rivets at each end of the line thru, to protect against the line cutting through the plastic. I envision making my rivet/ballast/rivet assembly being mounted on my thru wire, sprayed with the Spik-It plastic bonder, removed after drying, and then rethreaded onto my guide wire as it is inserted into my silicone mold. I'm sure I'll have to tinker around with the length of the ballast lead, so there isn't any bare wire in the pour, but that's just a matter of playing around with the ballast length. I'm thinking of using Darkman's Mojo/type sinkers as ballast, or egg sinkers.
-
Those are really nice. Which line thru weights do you use?
-
Chartreuse is a green/yellow mix. How much green you add to the yellow, or vice versa, determines how green or yellow your chartreuse is. Here's the skirt color I use: http://lurepartsonline.com/Online-Store/Silicone-Material/Barbed-Wire-Silicone-Material.html It's #630 on your program, but #1 in your heart. That's a tip of the cap to Don Cornelius of Soul Train. Ah, the 70's, when men were men, and sheep ran scared! Hahaha
