


mark poulson
-
Posts
14,726 -
Joined
-
Last visited
-
Days Won
364
Content Type
Profiles
Articles
TU Classifieds
Glossary
Website Links
Forums
Gallery
Store
Everything posted by mark poulson
-
Simple and effective. Good idea! I just wonder if it will keep the hook up too tight to the belly, so the other two hooks never get released into the fish's mouth.
-
 You have some skills!
 -
 It makes me want to take a handful of aspirin and go back to bed!
 -
My toaster oven has one middle rack. I guess you could make another rack using heavy screening, chicken wire, light metal fence wire, or something like that. My oven only has room for the one rack.
-
One of the reasons I use Bait Junky's flake is that it will not bleed, and change the plastisol's color.
-
When I drill the eye recess (1/8"+ deep to give the resin a defining size and edge), if I want a pupil, I paint it in the center of the recess that's already painted with the base color. I'm sure one could use discs of reflective material as the base color, too , and add whatever color pupil you want. The dripped-in resin will act like a lens, if you build up a dome to made a convex eye using it's surface tension. Just go one drop at a time. This is one instance where I wouldn't warm the resin, so it didn't flow. Three minutes under the nail light will set the eye on one side enough to let you turn the lure over and do the other eye. Just be sure to hold the eye level under the light until it is set. I've put powdered GloNation green/white into the recesses, added a couple of drops of super glue to hold it, and then made the resin eyes. They glow in the dark like high beams!
-
http://www.predatorbassbaits.com/id81.html
-
I did make another PVC-tailed Plopper, but with an even wider and deeper tail fin. Guess what? It turned when I shot air past it, but not in the water. I put it next to my successful Plopper tail, and the original's tail, and I finally saw what was wrong. I had made the end of the fin so wide it transitioned back into the body of the tail past the shaft, or axis of rotation, so it was fighting itself when I dragged it through the water. I removed some material to get the connection to terminate even with the shaft, and reduced the size of the end of the fin and, plop, plop, fizz, fizz, oh what a relief it is, because it swims now. I had avoided this problem by dumb luck with my first tail because I tried so hard to duplicate the original, I Not understanding how the fin worked, I just figured bigger is better. Lesson learned (I hope).
-
 Beautiful bait! I like how you think!
 -
I use a brad point bit, and get very little tear out. The nice part of Solarez is that it is made for surfboard repairs, so a patch bond really well. For small repairs, I just use clear nail polish, but I'm only building for me.
-
 You're right, of course. I thought of that after I'd already made the bait. Before would have been too smart! Hahaha On an up note, I added some bondo to the inside trailing edge of the metal fin, to give it a more cupped shape, and now it plops perfectly. So I'll fish this one on a constant retrieve, like the original Whopper Plopper. And I'll play around with how big a tail section I need to float the sst Tally Whacker tail. I just worry that it may be so much buoyant material that it will change the design of the lure.
 -
Jdee, I used your warm water method yesterday, and it worked like a dream! I heated some water in the microwave to about 130 degrees, sat my dipping jug of Solarez in it to warm, and went on to other things to get ready to dip. I sloshed the resin once while it was bathing, and, by the time I was ready to dip, it was 85 degrees inside the jug, on my infrared thermometer. I left the jug in the water and put the whole setup under my dripping location. The Solarez went on great, and dripped off quickly and evenly. I eventually had only a small drip left to remove with a paint brush before I set the lure in the nail light box. In the past, the heat of the light box would cause the Solarez to sag more before it set, but not this time. Thank you for a great tip!
-
I'm not the guy to ask about wood sealers anymore. For balsa, I used to use superglue, because it also added hardness to the outer layer of balsa. One coat to lock the fibers, sand, and another coat to reseal. BobP makes balsa baits. Do a search for wood sealers and you should find plenty of options, too.
-
Yes, you need to seal the wood, or, at least, use something to lock the wood fibers so you can sand the bait really smooth before you paint. Otherwise, the wood grain will keep rising every time you shoot on more paint, if you're using water based paint. Painting indoors means you do need breathing protection and a vent to the outside. I just bought another half face 3M paint respirator from Home Depot. It's rated for the solvents in paint and topcoats. If you're using solvent based paints and top coats, you should never spray inside without both a proper respirator and a proper venting system. If you're using water based paints, you need at least a dust mask, because the paint get's atomized and air born when it's sprayed, and you don't want techicolored lungs. If you can't vent you water based painting area to the outside, make a spray booth with a fan and filters in the back, so the overspray and fumes get trapped. You can make one with a cardboard box, box fan, and HVAC filters. Just be sure and put a washable filter in front of the other filter material, so it will collect most of the paint before it clogs the other filters and the fan, and you can wash it when you're done painting.
-
I'm pretty sure it's running goods are behind it now, for sure! Hahaha I am concerned about how brittle your Solarez turns out. I'm too chicken to take a hammer to any of my lures, but I will keep an eye on them, for sure. Could I have gotten an earlier version that wasn't as brittle? Or maybe you did. I got mine as soon as Bass100 posted about it, and then another quart about six months later. My first quart came in a black plastic jug, but the second one came in metal can. I'll try and find when it was first posted.
-
Geez, that looks like a train wreck! Maybe I've just been lucky not to have a failure like that. I probably need a bigger hammer. Hahaha
-
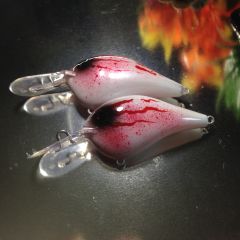
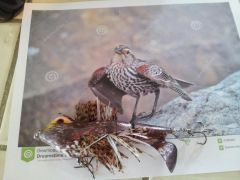
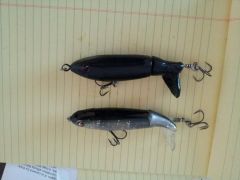
I made a Whopper Plopper with a metal tail fin, painted to imitate a juvenile red wing black bird. It swims, but it doesn't have the same plop, plop sound as the original, or my PVC tail version. I'll be tweaking it to see if I can add a lip to the back edge of the cupped tail, to create that plopping sound. I also don't like how it hangs at a 45 degree angle on the pause. I had hoped the silicone skirt wings would be up at the surface on the pause. That may require a return to an all PVC tail, for the added buoyancy.
-
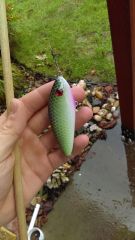
So I got a chance to test swim my Plopper with the metal tail. It does swim, but it doesn't plop. I think I need more cupping. It also hangs down at a 45 degree angle, which I don't like, since I put some silicone skirt material in the belly to simulate wings. I think I am going to either make a new metal finned tail with a cylindrical attachment, to give it more buoyancy, or carve a new tail out of PVC. Knowing myself as I do, I'll probably do one of each. Hahaha I just posted a picture in the Gallery: http://www.tackleunderground.com/community/gallery/image/15484-whopper-plopper9/
-
 Barry, I agree. I made one with a sst Tally Wacker tail, and it hangs at a 45 degree angle on the pause. I don't like it as much, since it's going to have silicone skirt "wings", but maybe the fish will. I was hoping the sst tail would be faster to make and use, and more durable, but, with the shaping and installation work, it is at least as much work as just carving the whole thing out of PVC. Durability will probably be one of the deciding factors, so I will have to wait for warmer water to give them both a true test.
 -
You're a cruel mon, Skinner! Hahaha
-
You can make a cutter similar to the lurecraft cutter with a block of 1 1/2" thick X 2 1/2" wide X 2" long hardwood and single edge razor blades. Cut a channel in the 2 1/2" face of the block, in 3/4" from each edge and deep enough to bury most of the razor blade, so 1/4" is still exposed. That should give you a 1" wide channel. If you want more blades, make both the block and the channel wider. Fill the channel with razor blades, and drill a pilot hole through one side for a screw, to be able to push the blades against the other side of the channel. Seal the finished block with epoxy, so you can spray the blades with PAM as a lubricant without saturating the wood. You can space the blades with cardboard if you want wider tails. If you want longer tails, make the block longer, and use longer blades. I suggest the razor blades because they're cheap and easily replaced when they dull. If you can get one of the self-healing cutting boards to lay your tubes on, you can use an arbor press to push the blades through the bait and do a bunch pretty quickly.
-
This is the stuff I use. I bought it two+ years ago, and I still have 1/2 a quart left. http://solarez.com/products/low-voc-dual-cure-polyester-resin/ I am happy with the gloss I get, but there can be some blushing over black paint, if the resin is too thick. I find it is very tough and not brittle. If I have to drill another hole for ballast after it's already coated, it doesn't crack. My baits have survived the "drop from 42" onto concrete" test, by accident. Solarez is supposed to have a new gloss resin that is even better, but I haven't tried that yet. I haven't tried it on wood, so I don't know if it would work as a wood sealer, but I don't see why it wouldn't.
-
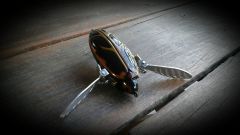
Phillip, I'm sorry but I don't sell baits. I carved the tail from a block of the same AZEK PVC trimboard as the body. I took a piece 1"X 1 1/2"X 1 3/4" and trace the outline of the original tail, and then just began removing material, a little at a time, keeping the original right next to me as a reference. Check out the picture two down from this one for more info.
-
I read online that alcohol is bad for you when you're sick, so I'm cutting back on my internet usage until I get better.
-
Be sure to give us a heads up when it comes in.

